技術情報
- 2021年12月14日
- 技術情報
Converting images into a pdf in python
Last weekend, my friend asked me to help him something about rearranging images and converting them into a pdf with only portrait view and sorting by modified date . But the images were not sorted by that and some in landscape. They were in chaos. Actually there are many online tools to do that. But most of them were not compatible with all what I wanted. Then I decided to do with a python program and wrote the following small code block. Let’s take a look.
I’ve used the image library called Pillow(PIL) and built-in module named os.
Overall program flow is as follow.
- Request user inputs for a pdf filename with path and image folder path to be converted.
- With os module, image files are sorted by modified date.
- Looping the sorted files, rotate the images which are in landscape, to be in portrait with the help of Pillow(PIL) and push the images into an empty list named img_list[ ].
- Finally convert the images list to a pdf.
from PIL import Image
import os

# Function to sort by modified dates
def getfiles(dirpath):
    a = [s for s in os.listdir(dirpath)
         if os.path.isfile(os.path.join(dirpath, s))]
    a.sort(key=lambda s: os.path.getmtime(os.path.join(dirpath, s)))
    return a

# declare an empty list
img_list = []

# Request user input for pdf filename and image folder path
pdf_filename = input("Enter the filename of pdfincluding path to be exported : ")
folder = input("Enter the path of images folder : ")

files = getfiles(folder) # get the files sorted by modified dates
print('Processing....')

for count, filename in enumerate(files):
    image = Image.open(folder+'/'+filename) #open each file

    # To change as portrait layout for landscape images
    width, height = image.size
    if(width>height):
        image = image.transpose(Image.ROTATE_90)
    # Append each processed image in img_list[]
    img_list.append(image)

# All images in img_list[] are converted to a pdf
img_list[0].save(pdf_filename, "PDF" ,resolution=100.0, save_all=True, append_images=img_list[1:])
print("Done!")
This program is very simple but it can be modified to be more useful for other cases. I hope you enjoy that.
By Asahi
waithaw at 2021年12月14日 10:00:00
- 2021年12月13日
- 技術情報
Flutter boosts it’s mobile performance
Google Flutter 2.8, the latest version of open source, cross-platform toolkit for building web, mobile, and desktop applications, has been released, with some improvements in mobile performance and better service compatibilities.
Flutter 2.8′ has been released on December 8 including with Flame Modular 2D Game Engine(v1.0), a game engine built on Flutter to be able to create games faster with flutter.

Google said mobile apps built with Flutter 2.8 should be faster and use less memory. The company said it is leveraging its experience with great Google apps such as Google Pay to make Flutter more efficient and provide profiling and optimization better.
It also makes it easy to connect to back-end services like Firebase and Google Cloud. In addition to supporting the production quality of Google Ads, including major camera updates and built-in web plugins.
Furthermore Dart 2.15, a programming language update that offers improved concurrency, improved enums, and optimizations that reduce memory usage by 10%. Also offering capabilities including stateful hot reload. Google also is exploring higher-level abstractions to make it easier for developers to get running faster.
Flutter is for building cross-platform applications from a single code base. The goal is to change the way applications are created so that mobile, web, desktop, and embedded applications can be developed using a single toolset. The framework currently has 375,000 apps on the Google Play Store, as well as iOS apps available on the Apple App Store.
Yuuma
yuuma at 2021年12月13日 10:00:00
- 2021年12月10日
- 技術情報
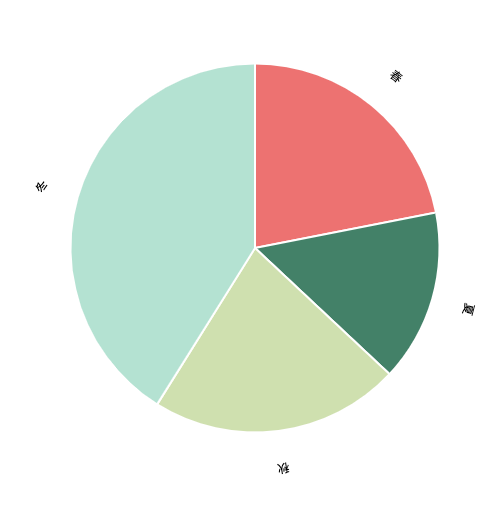
Chart.js – 外側にテキスト表示する方法 とテキストの代わりに画像を表示する方法
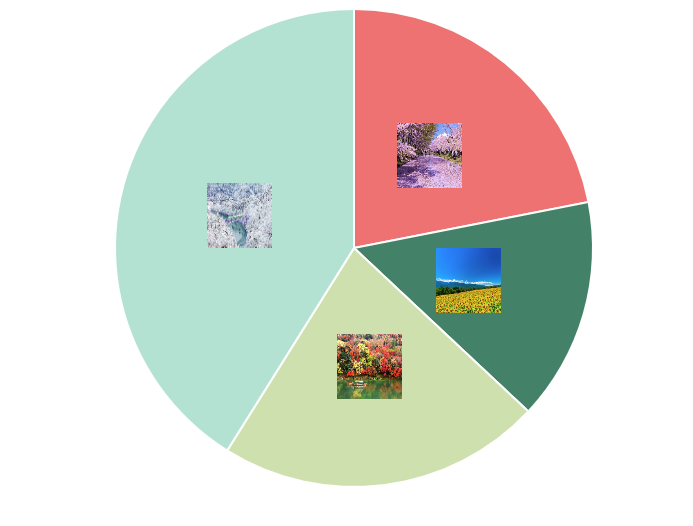
最近Chart.jsというライブラリーを使って開発してるので、Chart.jsで外側にテキスト表示するには色々な方法があるのを気づきました。
というので、今回はChart PieceLabel を使って円グラフ描く方法をご紹介していきたいと思います。
必要となるパッケージをインポートします。
<script src="https://cdnjs.cloudflare.com/ajax/libs/Chart.js/2.6.0/Chart.min.js"></script>
<script src="https://cdnjs.cloudflare.com/ajax/libs/jquery/3.2.1/jquery.min.js"></script>
<script src="https://rawgit.com/beaver71/Chart.PieceLabel.js/master/build/Chart.PieceLabel.min.js"></script>
また、円グラフの表示に必要なデータを挿入します。
 var data = {
            datasets: [{
                data: [16,11,16,30],
                backgroundColor: ['#ee7571', '#438067', '#d0dfad', '#b4e1d1'],
                label: '季' ,// for legend
            }],
          labels : ['春','夏','秋','冬'],
        };
データをキャンバスに表示するためには、キャンバスを作成する必要があります。そして、スクリプトファイルを書くためには、canvas-idを取得する必要があります。
    <div class="col-md-6" style="width: 40%; margin-left: 200px;">
        <canvas id="pieChart" class="chart chart-pie"></canvas>
    </div>
var pieChartCanvas = $("#pieChart");PieceLabelの設定をoptionsに追加し、typeを「pie」に設定する必要もある
        var pieChart = new Chart(pieChartCanvas, {
          type: 'pie',
          data: data,
          options: pieOptions
        });
var pieOptions = {
pieceLabel: {
render: function(d) {
return d.label;
},
fontColor: '#000',
position: 'outside',
arc : true,
fontSize:35,
fontFamily: '"Helvetica , "游ゴシック", sans-serif'
},
};外側にラベル表示するには position に outside と設定する必要があります。FontColor, fontSize, fontFamily も変更したいなら、簡単にできます。
legendを非表示にしたい場合は、displayをfalseにします。
legend: {
   display: false
 },
その結果は:
また、renderにimageを設定して画像を表示することもできます。
render: 'image',
            images: [
                { src: './images/spring.jpeg', width: 65, height: 65 },
                { src: './images/Summer.jpeg', width: 65, height: 65 },
                { src: './images/Autumn.jpeg', width: 65, height: 65 },
                { src: './images/Winter.jpeg', width: 65, height: 65 }
            ]
}
結果は記事の一番上にあります。
最後までお読みいただき、ありがとうございます。この記事を楽しんでいただければ幸いです。
By Ami
asahi at 2021年12月10日 10:00:00
- 2021年12月09日
- 技術情報
PHP QRコード生成ライブラリ「endroid/qr-code」
nishida at 2021年12月09日 10:00:00
- 2021年12月08日
- 技術情報
次世代機で実行可能なUnreal Engine 5 の技術デモが公開されます
映画マトリックスの世界を題材にしたUnreal Engine 5 の技術デモ
「The Matrix Awakens: An Unreal Engine 5 Experience」
がPlayStation5とXbox Series X|S向けに12月10日から公開予定のようです。
tanaka at 2021年12月08日 10:00:00
 大人が楽しめるヒーリング絵本河童のカパと静かな森
 パワースポット 日本三大神滝布引の滝
 佐藤・広幸ドイツ魂
 Himeji Castle姫路城
 ボイドタイムお知らせアプリVoid Time 〜月を無視できない〜
 撮った写真をカレンダーに撮りカレ