他の話題

肩こり対策でマウスを買い替えた話 -Kensington Slim Blade Proレビュー

最近、デスクワーク中の肩こりがひどくなってきました。特に右肩だけが強くこることが多いことから、原因はマウスにあるのではないかと考えていました。

そこで試してみたのが、ケンジントン社の「Slim Blade Pro」です。正直最初は「マウスで肩こりが軽くなるの?」と半信半疑でしたが、使ってみると少し肩こりが改善してきたので、今回はその体験をシェアします。

写真で比較

今回購入したSlim Blade Proと、これまで使用していたMicrosoft社のマウスを並べてみました。

左: ケンジントン「Slim Blade Pro」
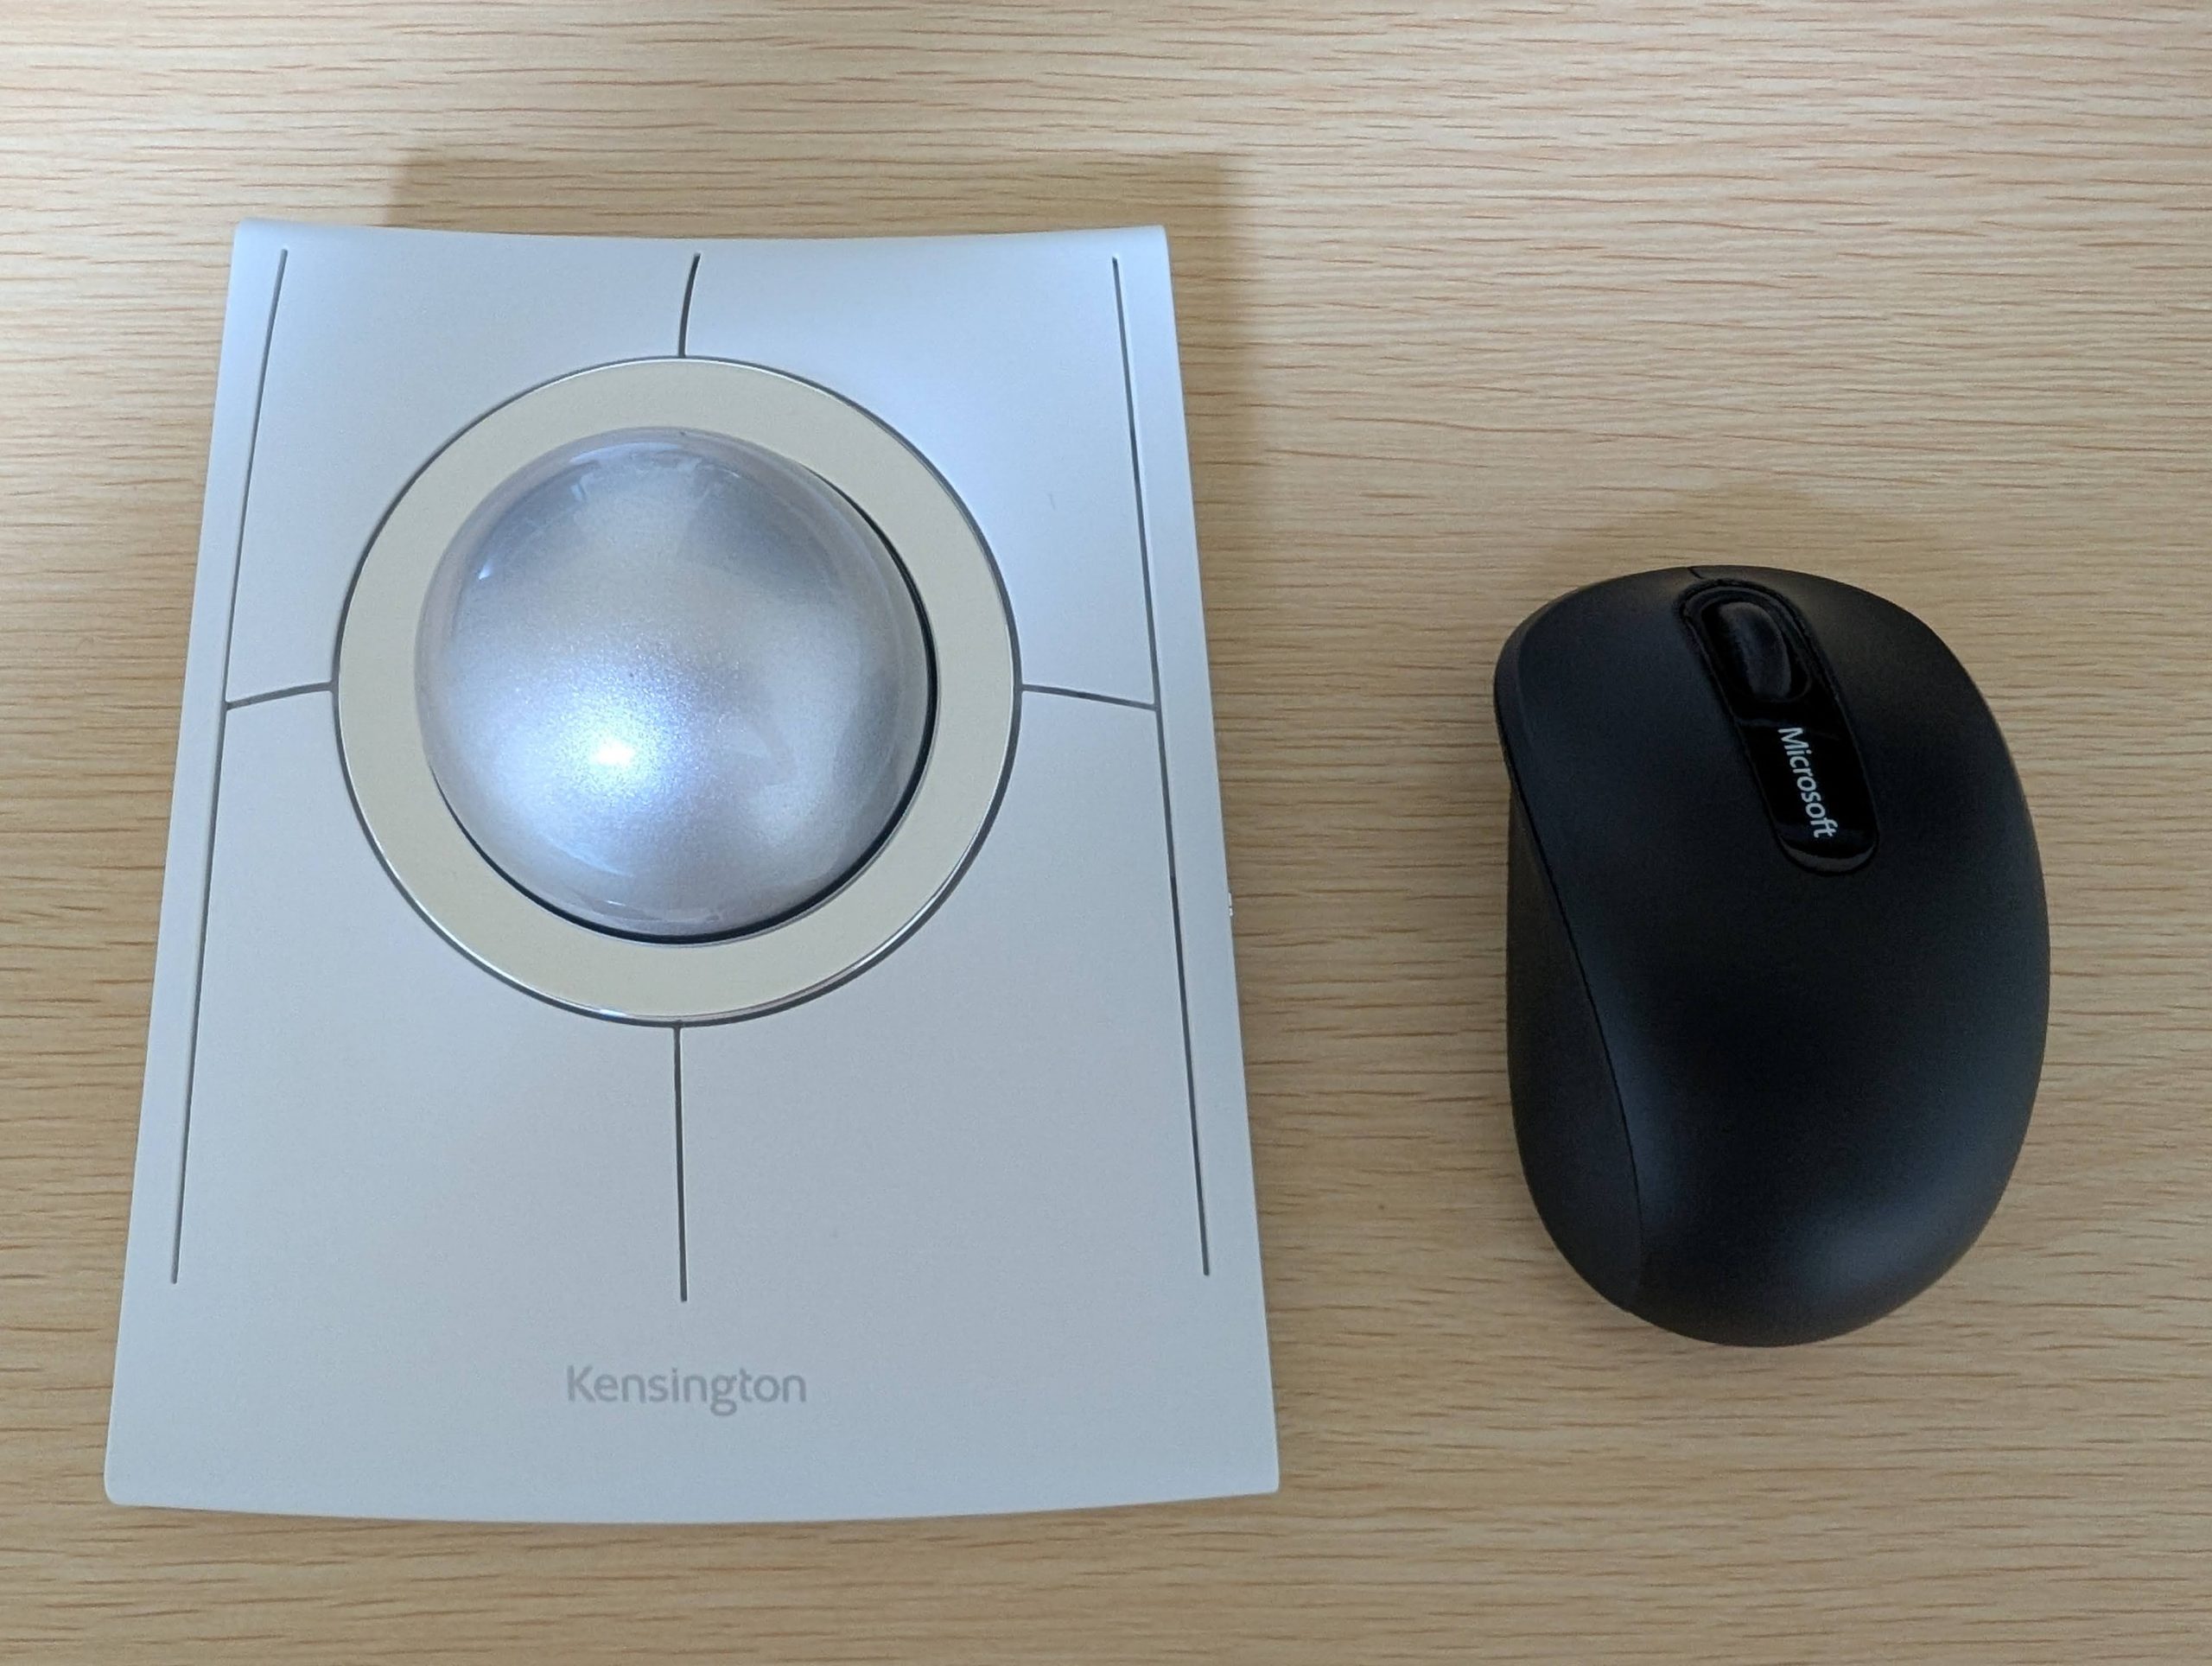
右: Microsoft「Wireless Mobile Mouse 3500」

Slim Blade Proの特徴

ボール: 中央に直径55mmの大きなボールが搭載。一般的なトラックボール(34mm)より大きく、ビリヤードの玉(57mm)とほぼ同じサイズです。

価格: 16,000円

接続方法: Bluetooth、ドングル接続、有線Type-C(充電兼用)に対応。

スクロール機能と操作方法

Slim Blade Proには通常のマウスにあるようなスクロールホイールはありません。
スクロールは『ボールを水平方向に回す(Z軸回転)』ことで行います。慣れるまではクセがあります。

カーソル速度の設定

通常のマウスでは、カーソル速度を速く設定したほうが快適でしたが、Slim Blade Proは遅めの設定が使いやすいです。

遅く設定すれば精密な作業もラクに行えます。

遠距離移動(慣性の利用)

マウスカーソルを高速移動させたい場合は、ボールを弾くように転がすのがコツです。
重いボールが慣性で回転するので、カーソルが目的地まで素早く到達します。

Slim Blade Proのメリット

カーソル操作性: 遅い設定での精密操作と、慣性を使った高速移動が両立します。

身体的負担の少なさ: 腕を動かさずに操作でき、肩の負担を軽減。

両利き対応: 左右対称デザインで左手でも操作可能。

Slim Blade Proのデメリット

ドラッグ操作が難しい: ボールでカーソルを操作する性質上、クリックしたままドラッグする操作は難しいです。特に長距離のドラッグでは、ボールの慣性を活かしつつストップさせる操作に慣れるまで時間がかかります。

クリックが重くて指が疲れます: ボタンのクリック感がやや硬めのため、ドラッグ操作など長時間ボタンを押したままにする操作をおこなう場合、指が疲れます。
→ドラッグはできるだけ使用せず、キーボードショートカットで対応するようにしています。

埃やゴミが挟まる: 昔のボール式マウスのように、使用しているとボールと周囲の間に埃や細かなゴミが挟まることがあります。ゴミが挟まるとボールの慣性が鈍ります。ときどき掃除が必要です。

まとめ

Slim Blade Proは、毎日長時間マウスを使う人におすすめです。
肩や腕への負担が少なく、精密操作も快適に行えるため、長時間作業が楽になります。
もちろんデメリットもあるので通常のマウスと併用もアリです。

もし肩こりに悩んでいるなら、一度試してみる価値はあると思います。

木曜日担当:nishida


Adding Watermarks to PDFs in Python with simple and efficient approach

In today’s digital age, the need to protect and personalize PDF documents is more crucial than ever. Whether you want to brand your documents or add a confidential watermark, Python provides a powerful and straightforward solution. In this blog, we’ll explore a simple Python script that utilizes the PyPDF2 and ReportLab libraries to effortlessly add watermarks to multiple PDF files.

Setting Up the Environment

Before diving into the script, make sure you have the required libraries installed. You can do this by running the following commands.

pip install PyPDF2
pip install reportlab

Understanding the Script

The entire script can be seen at the end. Let’s break down the key components of the script.

1. create_watermark() Function

   – This function uses the ReportLab library to generate a PDF containing a customizable watermark.

   – You can specify the watermark text, color, transparency, font, and rotation angle.

2. add_watermark() Function

   – The core function that adds the watermark to each page of the input PDF.

   – It uses PyPDF2 to merge the original PDF with the watermark PDF on each page.

3. delete_watermark_file() Function

   – A utility function to delete the temporary watermark PDF file after it has been merged with the input files.

4. Command Line Arguments

   – The script accepts two command line arguments:

     – `–path`: The path to the directory containing the PDF files to watermark.

     – `–watermark_text`: The text to be used as the watermark.

Here is the entire script.

import PyPDF2
import argparse
from reportlab.pdfgen import canvas
from reportlab.lib.units import inch
from reportlab.lib import colors
import os

def create_watermark(watermark_text, output_pdf):
    pdf = canvas.Canvas(output_pdf)
    pdf.translate(inch, inch) # move the current origin point(0,0) of the canvas by the current given horizontal and vertical distances
    pdf.setFillColor(colors.red, alpha=0.3) # set the font color with alpha value to adjust the transparency of watermark text
    pdf.setFont("Helvetica", 50) # set font and font size
    pdf.rotate(45) # rotate the canvas by 45 degrees
    pdf.drawCentredString(400, 100, watermark_text) # center the watermark text
    pdf.save()

def add_watermark(input_pdf, output_directory, watermark_pdf):
    base_filename = os.path.splitext(os.path.basename(input_pdf))[0]
    output_pdf = os.path.join(output_directory, f'{base_filename}.pdf')
    with open(input_pdf, 'rb') as file:
        pdf_reader = PyPDF2.PdfReader(file)
        pdf_writer = PyPDF2.PdfWriter()

        for page_num in range(len(pdf_reader.pages)):
            page = pdf_reader.pages[page_num]
            watermark_reader = PyPDF2.PdfReader(watermark_pdf)
            watermark_page = watermark_reader.pages[0]
            page.merge_page(watermark_page)
            pdf_writer.add_page(page)

        with open(output_pdf, 'wb') as output_file:
            pdf_writer.write(output_file)

def delete_watermark_file(watermark_pdf):
    if os.path.exists(watermark_pdf):
        os.remove(watermark_pdf)
        
if __name__ == '__main__':
    parser = argparse.ArgumentParser()
    parser.add_argument("--path", required=True, type=str, help="Path of the directory of file lists")
    parser.add_argument("--watermark_text", required=True, type=str, help="Text to be watermark")
    
    args = parser.parse_args()

    path = args.path
    watermark_text = args.watermark_text
    
    print('Processing.....')
    file_list = [file_name for file_name in os.listdir(path) if os.path.isfile(os.path.join(path, file_name))]

    output_directory = os.path.join(path, 'output_directory')
    if not os.path.exists(output_directory):
        os.makedirs(output_directory)
            
    watermark_pdf_file = os.path.join(path, 'watermark.pdf')
    create_watermark(watermark_text, watermark_pdf_file)
    for file_name in file_list:
        if not file_name == 'watermark.pdf':
            input_pdf_file = os.path.join(path, file_name)
            add_watermark(input_pdf_file, output_directory, watermark_pdf_file)
            
    delete_watermark_file(watermark_pdf_file)
    print('Done!')

Running the Script

To run the script, execute the following command.

python script_name.py --path /path/to/pdf/files --watermark_text "Your Watermark Text"

The script will process each PDF file in the specified directory, add the watermark, and save the watermarked files in a newly created ‘output_directory.’

Conclusion

With this Python script, you can easily add watermarks to your PDF documents, making them visually distinctive and secure. Whether you’re protecting sensitive information or branding your documents, this solution provides a quick and efficient way to enhance your PDF files. I would recommend to look into the used libraries in details and feel free to customize the script further to suit your specific requirements, such as adjusting colors, fonts, or rotation angles for the watermark.

Ref: https://pypdf2.readthedocs.io/en/3.0.0/index.html

Ref: https://docs.reportlab.com

Asahi


AmazonLightsailとtailscaleを使ったお手軽固定IPの取得

Static IPをアタッチしたLightsailとLinuxが動作しているローカルPCをtailscaleのVPNで繋いで
手軽に固定IPを利用してみます。

続きを読む

Exploring different UUIDs versions

UUIDs, or Universally Unique Identifiers, are strings of characters used to uniquely identify information in computer systems. They play a crucial role in various applications, from databases to distributed systems. In this blog, we will explore the different versions of UUIDs, each designed for specific use cases and scenarios.

1. UUID Basics

Before delving into the versions, it’s essential to understand the basic structure of a UUID. A UUID is a 128-bit number typically represented as a 32-character hexadecimal string, separated by hyphens into five groups. The uniqueness of UUIDs is achieved by combining timestamps, node information, and random or pseudo-random numbers.

2. UUID Version 1: Time-based UUIDs

UUID version 1 is based on the current timestamp and the unique node (typically a MAC address) to ensure uniqueness. The timestamp component allows sorting and ordering of UUIDs based on their creation time. While effective, the reliance on a timestamp makes it less suitable for scenarios where privacy and security are top priorities.

3. UUID Version 2: DCE Security UUIDs

Version 2 is similar to Version 1 but includes additional information related to the POSIX UID/GID and POSIX timestamps. However, Version 2 is rarely used in practice, and Version 1 is more widely accepted.

4. UUID Version 3 and 5: Name-based UUIDs (MD5 and SHA-1)

These versions are generated by hashing a namespace identifier and a name using MD5 (Version 3) or SHA-1 (Version 5). The resulting hash is then combined with specific bits to form the UUID. While these versions ensure uniqueness within a given namespace, the use of MD5 and SHA-1 has raised security concerns due to vulnerabilities in these hashing algorithms.

5. UUID Version 4: Random UUIDs

Version 4 UUIDs are generated using random or pseudo-random numbers. This version prioritizes randomness over time-based information, making it suitable for scenarios where ordering is less critical, and privacy is a priority. The randomness is achieved through the use of a random number generator.

6. UUID Version 6: Modified Version 1

A newer addition, Version 6 combines the best of both Version 1 and Version 4. It includes timestamp information for ordering and randomness for improved security. This version is designed to address some of the privacy concerns associated with Version 1.

Conclusion

Understanding the different versions of UUIDs is essential for choosing the right type based on the specific requirements of your application. Whether you prioritize time-based ordering, security, or randomness, there’s a UUID version designed to meet your needs. As technology evolves, so do UUID specifications, ensuring that these unique identifiers continue to play a vital role in the ever-expanding digital landscape.

Asahi


X(旧Twitter)に通話機能が追加されるようです

Xを所有しているイーロン・マスク氏がX上にビデオ・音声通話機能を追加するとポストしました。

続きを読む


アプリ関連ニュース

お問い合わせはこちら

お問い合わせ・ご相談はお電話、またはお問い合わせフォームよりお受け付けいたしております。

tel. 06-6454-8833(平日 10:00~17:00)

お問い合わせフォーム