技術情報
- 2022年01月17日
- 技術情報
Demanding Technologies for developers in 2022
Regardless of your profession or designation, you must adapt to the constant changes that occur in your workplace. You need to learn new work skills through your work to adapt to changes in the workplace, develop your career, and promote career opportunities.
There might be plenty of trending and demanding technologies for 2022. I will describe a few which are demanding and also depending on my personal favors.
Artificial Intelligence (AI)
Artificial intelligence experts focus on building machines that are programmed to think like humans. These machines can perform tasks that require human intelligence. It exists a variety of actions related to human intelligence, such as knowledge representation, problem solving, learning, and reasoning.
AI has become so popular lately. The demand for professionals with knowledge, experience and skills in AI is very high. It goes without saying that careers in the field of AI have potential and are expected to continue in the future.
Blockchain
Blockchain is a digital ledger of transactions that is replicated and distributed thousands of times through a network of computer systems on the blockchain. This is the process of recording information in a way that makes system changes and hacks difficult or impossible.
Given the market trends, the demand for blockchain professionals continues to grow. If you have all the important blockchain-related tools and knowledge, you certainly have a brilliant career.
DevOps
A set of practices and tools that combine software development and IT operations to shorten the system development life cycle. Simply put, its goal is to make the software creation, testing, and launch process faster and more reliable.
DevOps experts are dedicated to creating software and verifying code versions to make sure everything goes smoothly. This is one of the most expensive remote jobs on the market.
AR & VR
Augmented reality (AR) and virtual reality (VR) are technologies that connect the real and virtual worlds. These technologies provide users with a visual view of information and content as if it were in the world. Many industries such as healthcare, travel, aviation and automotive are developing augmented reality solutions in training applications.
AR adds digital elements to live views to enhance the usefulness of digital devices in everyday tasks such as information retrieval and shopping. Virtual reality, on the other hand, allows users to experience what it is like to go anywhere.
While augmented reality provides an interactive experience of real-world scenarios, virtual reality creates a fully immersive virtual environment.
There are still other demanding techs like I said in above such as cyber security, robotics, machine learning etc. Wish everyone may be healthy and have a productive year.
Yuuma
yuuma at 2022年01月17日 10:15:00
- 2022年01月14日
- 技術情報
Laravel8でFullcalendarとAJAXを使ってイベントを作成する
今週は、Laravel 8アプリにFullcalendar JavaScriptイベントカレンダープラグインを使用してイベントを作成・削除する方法を紹介します。
今回はプロジェクトのセットアップをスキップします。
プロジェクトの設定後、イベントの作成、削除を行うために、新しいカレンダーを作成する必要があります。そのために
php artisan make:controller FullCalenderControllerそして、app\Http\Controllersの中の、FullCalenderController.phpで、FullcalendarイベントのビューとCDオペレーションを設定することになります。
public function index(Request $request)
    {
        if($request->ajax()) {
            $data = Event::whereDate('start', '>=', $request->start)
                ->whereDate('end',   '<=', $request->end)
                ->get(['id', 'title', 'start', 'end']);
            return response()->json($data);
        }
        return view('welcome');
}この関数は、作成したイベントが表示されていることを取得します。public function calendarEvents(Request $request)
{
switch ($request->type) {
case 'create':
$event = CrudEvents::create([
'event_name' => $request->event_name,
'event_start' => $request->event_start,
'event_end' => $request->event_end,
]);
return response()->json($event);
break;
case 'delete':
$event = CrudEvents::find($request->id)->delete();
return response()->json($event);
break;
default:
# ...
break;
}
}リクエストタイプはcreateで、create caseを入力すると、イベントが作成され、json形式で返されます。
リクエストタイプはdeleteで、delete caseを入力すると、作成されたイベントを削除して、json形式で返されます。
Controllerがセットアップされたので、次は routes/web.php ファイルに移動します。このファイルでは、ルートを作成するために FullCalenderControllerを使用する必要があります。
Route::get('calendar-event', [FullCalenderController::class, 'index']);
Route::post('calendar-crud-ajax', [FullCalenderController::class, 'calendarEvents']);
最後に、laravel bladeのビューファイルでフFull calenderを表示し、jQueryのAJAXリクエストでイベントの作成、削除を行う必要があります。
<script src="https://cdnjs.cloudflare.com/ajax/libs/jquery/3.1.1/jquery.min.js"></script>
<script src="https://cdnjs.cloudflare.com/ajax/libs/moment.js/2.29.1/moment.min.js"></script>
<script src="https://cdnjs.cloudflare.com/ajax/libs/fullcalendar/3.10.2/fullcalendar.min.js"></script>
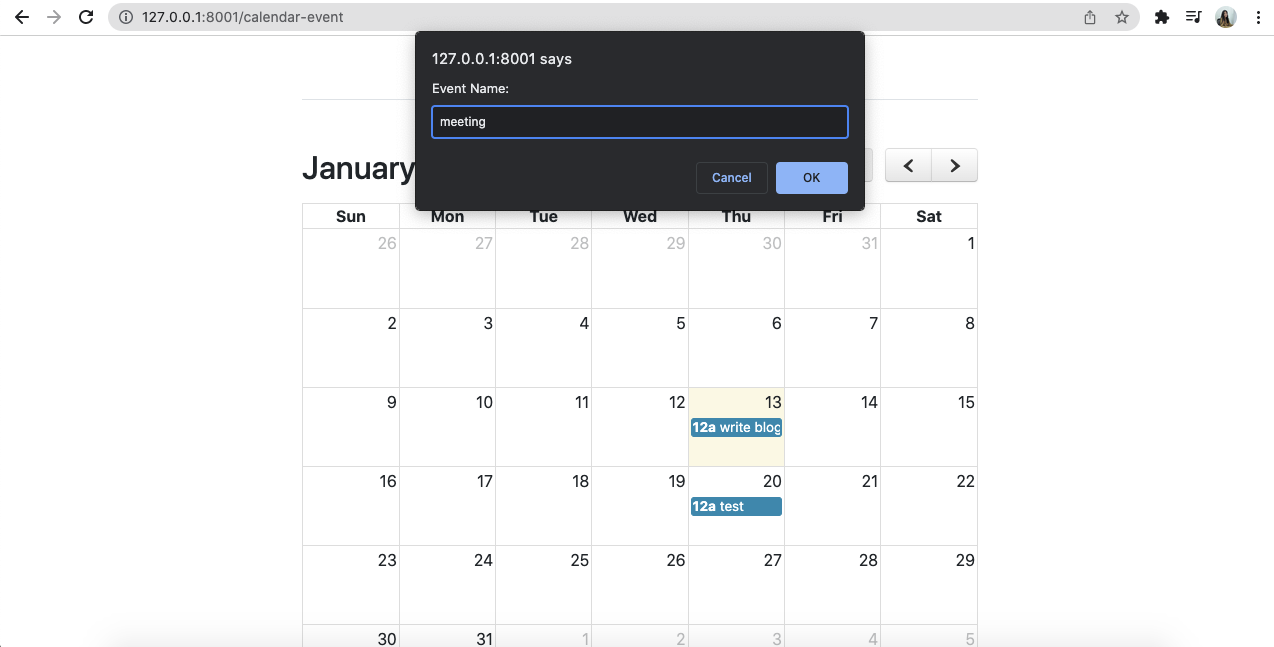
<script src="https://cdnjs.cloudflare.com/ajax/libs/toastr.js/latest/toastr.min.js"></script>カレンダーの日をクリックすると、入力タイプのフィールドが表示され、OKボタンをクリックすると、ajaxリクエストでコントローラに移動し、ajaxリクエストで戻り、イベントが作成されます。
また、作成したイベントをクリックすると、アラートボックスが表示され、OKボタンをクリックすると、作成したイベントが削除されます。
この状態に対して
$(document).ready(function () {

            var SITEURL = "{{ url('/') }}";

            $.ajaxSetup({
                headers: {
                    'X-CSRF-TOKEN': $('meta[name="csrf-token"]').attr('content')
                }
            });

            var calendar = $('#full_calendar_events').fullCalendar({
                editable: true,
                editable: true,
                events: SITEURL + "/calendar-event",
                displayEventTime: true,
                eventRender: function (event, element, view) {
                    if (event.allDay === 'true') {
                        event.allDay = true;
                    } else {
                        event.allDay = false;
                    }
                },
                selectable: true,
                selectHelper: true,
                select: function (event_start, event_end, allDay) {
                    var event_name = prompt('Event Name:');
                    if (event_name) {
                        var event_start = $.fullCalendar.formatDate(event_start, "Y-MM-DD HH:mm:ss");
                        var event_end = $.fullCalendar.formatDate(event_end, "Y-MM-DD HH:mm:ss");
                        $.ajax({
                            url: SITEURL + "/calendar-crud-ajax",
                            data: {
                                event_name: event_name,
                                event_start: event_start,
                                event_end: event_end,
                                type: 'create'
                            },
                            type: "POST",
                            success: function (data) {
                                displayMessage("Event created.");

                                calendar.fullCalendar('renderEvent', {
                                    id: data.id,
                                    title: event_name,
                                    start: event_start,
                                    end: event_end,
                                    allDay: allDay
                                }, true);
                                calendar.fullCalendar('unselect');
                            }
                        });
                    }
                },

                eventClick: function (event) {
                    var eventDelete = confirm("Are you sure?");
                    if (eventDelete) {
                        $.ajax({
                            type: "POST",
                            url: SITEURL + '/calendar-crud-ajax',
                            data: {
                                id: event.id,
                                type: 'delete'
                            },
                            success: function (response) {
                                calendar.fullCalendar('removeEvents', event.id);
                                displayMessage("Event removed");
                            }
                        });
                    }
                }
            });
        });

        function displayMessage(message) {
            toastr.success(message, 'Event');
        }

    </script>
開発サーバーの実行
php artisan serve結果は上部に表示されます。
最後までお読みいただき、ありがとうございました。
By Ami
asahi at 2022年01月14日 10:00:00
- 2022年01月07日
- 技術情報
JetStreamを使用してLaravel 8 Livewire CRUDアプリケーションの作成
今回は、Laravelアプリケーションに必要不可欠なCRUD操作を、LivewireとJetstreamのパッケージを使って簡単に作成する方法を紹介します。
プロジェクトの設定
新しいlaravelアプリをインストールするので、ターミナルに向かい、コマンドを入力し、新しいlaravelアプリを作成します。
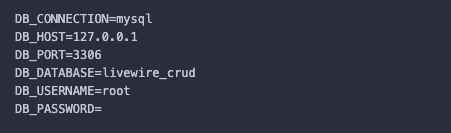
composer create-project --prefer-dist laravel/laravel laravel_livewire_crud.envでデータベースの詳細を追加する
Modelファイル、Migrationファイルの作成
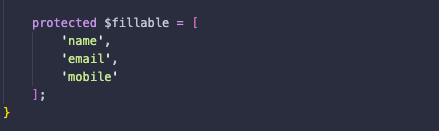
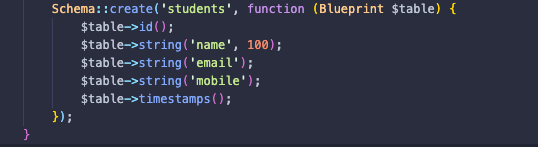
php artisan make:model Student -m例え:
app/Models/Student.phpファイルに$fillable配列を追加し、名前、メール、携帯電話などのテーブルの値を追加します。
また、学生用のmigrationテーブルを設定する必要があります。
LivewireとJetstreamのパッケージのインストール
composer require laravel/jetstreamphp artisan jetstream:install livewireさらに、アセットをコンパイルする必要があるので、両方のnpmコマンドを同時に使用して、ビルドコンパイルタスクを完了させます。
npm install && npm run dev最後に、php artisanコマンドを使用して移行を実行します。
php artisan migrateLivewireのcrudコンポーネントを生成するため
php artisan make:livewire crud
上記のコマンドを実行すると、2つのファイルが生成されました。
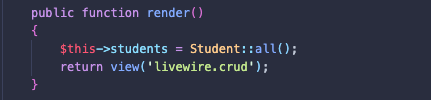
ルートの作成
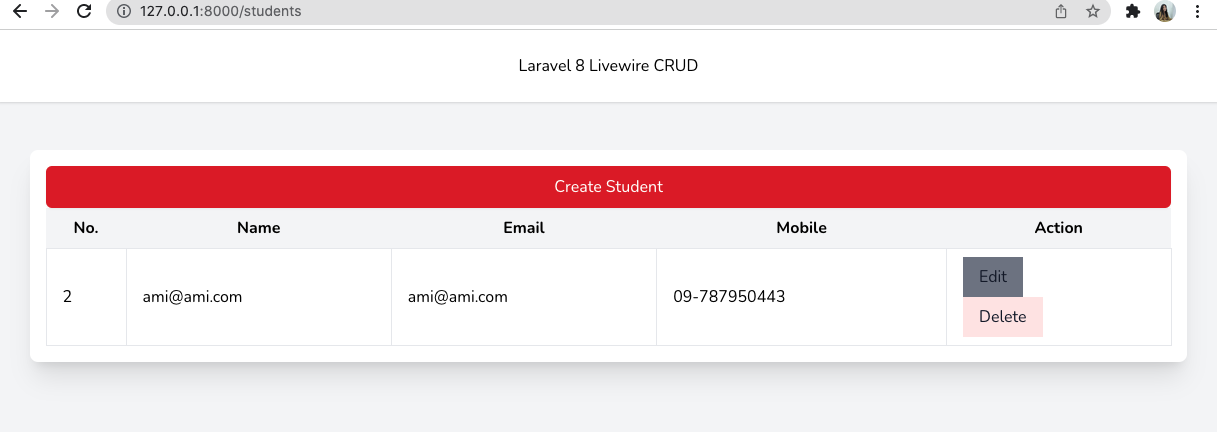
Route::get('students', Crud::class);最初のページに生徒のリストを表示したいので、render関数で全生徒のデータを取得します。
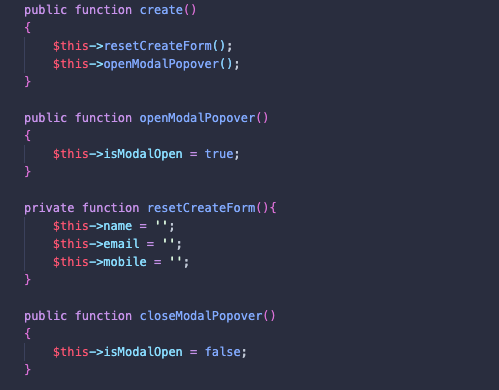
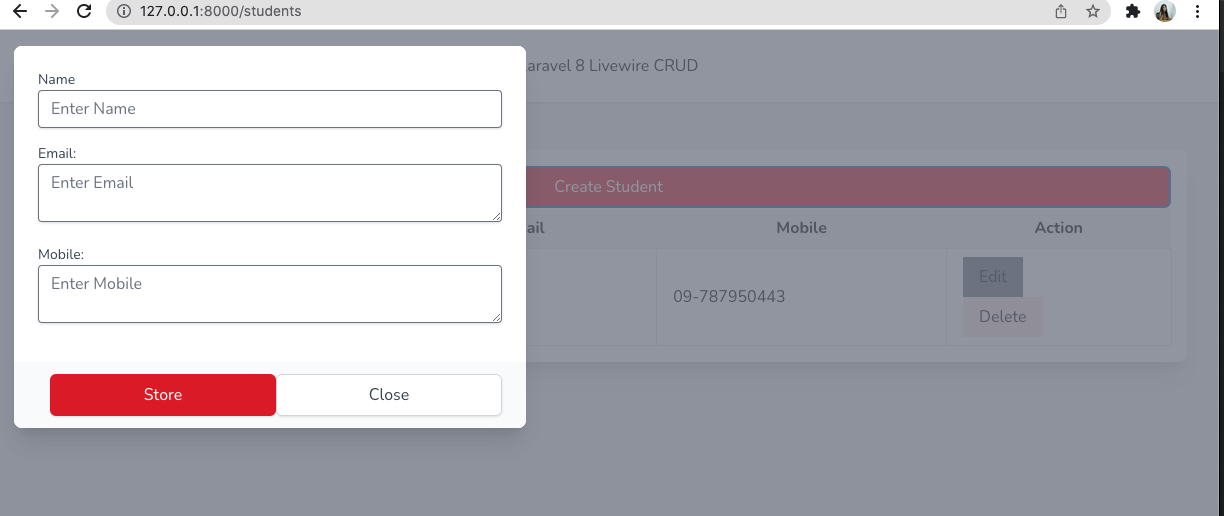
生徒を作成するため、
ボタンに wire:click=”create()” というアクションを追加します。
<button wire:click="create()"
                class="my-4 inline-flex justify-center w-full rounded-md border border-transparent px-4 py-2 bg-red-600 text-base font-bold text-white shadow-sm hover:bg-red-700">
                Create Student
 </button>
学生の作成をモデルフォームとしてデザインしたいので、いくつか条件を追加します。True を指定するとモデルボックスが開き、False を指定するとモデルボックスが閉じます。
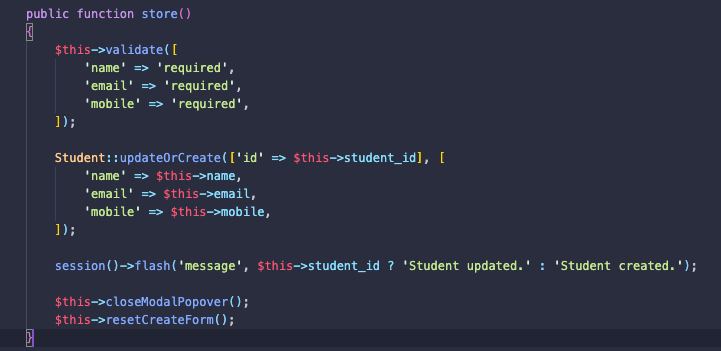
生徒を保存するため、
ボタンに wire:click.prevent=”store()” というアクションを追加します。
<button wire:click.prevent="store()"  type="button"
                            class="inline-flex justify-center w-full rounded-md border border-transparent px-4 py-2 bg-red-600 text-base
                            leading-6 font-bold text-white shadow-sm hover:bg-red-700 focus:outline-none
                            focus:border-green-700 focus:shadow-outline-green transition ease-in-out duration-150 sm:text-sm sm:leading-5">
                            Store
</button>
updateOrCreateを使用して、保存と更新の両方の関数を作成することにします。
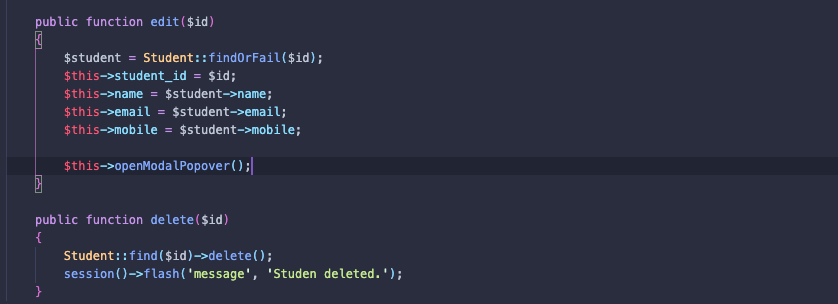
学生の編集を行うには
ボタンに wire:click=”edit({{ $student->id }})” というアクションを追加します。
後学生の削除を行うには
ボタンに wire:click=”delete({{ $student->id }})” というアクションを追加します。
<button wire:click="edit({{ $student->id }})"
                                class="flex px-4 py-2 bg-gray-500 text-gray-900 cursor-pointer">Edit</button>
<button wire:click="delete({{ $student->id }})"
                                class="flex px-4 py-2 bg-red-100 text-gray-900 cursor-pointer">Delete</button>
編集と削除を行うために、生徒のデータを取得して、削除機能は生徒のデータを削除します。
その結果は
学生一覧
学生を作るために
学生を編集するには

最後までお読みいただき、ありがとうございました。
By Ami
asahi at 2022年01月07日 10:00:00
- 2021年12月28日
- 技術情報
Useful Nodejs Packages
Today I would like to share about useful packages of Nodejs. The followings are a collection of some useful packages for Nodejs. Let’s take a look.
Web Frameworks
express
Express is the most popular, fast, and minimalist web framework for node.js backends.
socket.io
Socket.IO enabled real-time bidirectional event-based communication using long-polling or webSockets with disconnection detection and auto-reconnection support.
Utility Functions
async
Async is a module with powerful utility functions for working with asynchronous JavaScript.
rxjs
RxJS is a modular set of libraries to compose asynchronous and event-based programs using observable collections and compositions in JavaScript.
lodash
Lodash is a utility library that makes JavaScript easier by taking the hassle out of working with arrays, numbers, objects, strings, etc.
underscore
Underscore.js is a utility-belt library for JavaScript that provides support for the usual functional suspects (each, map, reduce, filter, etc.) without extending any core JavaScript objects.
ramda
Ramda is a practical, functional library with side-effect free functions composable with currying.
validator
Validator is a library of string validators and sanitizers.
day.js
Day.js is a minimalist JavaScript library that parses, validates, manipulates, and displays dates and times for modern browsers with a largely Moment-compatible API.
date-fns
Date-fns provides the most comprehensive, yet simple and consistent toolset for manipulating JavaScript dates in a browser & Node.js.
jsonwebtoken
Jsonwebtoken is a library to sign, verify and decode JSON Web Tokens.
bcrypt
Bcrypt is a library to hash and verify passwords with sync, callbacks, and promise interface.
uuid
UUID is a library to create RFC4122 universally unique identifiers.
Working With File System
fs-extra
FS-extra adds file system methods that aren’t included in the native fs module and adds promise support to the fs methods.
mkdirp
Just like mkdir -p, mkdirp recursively creates the directory and all necessary subdirectories.
glob
Glob is a library to match files using multiple patterns.
Working with Emails
Nodemailler
Nodemailer is a secure framework that handles email management in your Node.js applications.
This is all for now.
Hope you enjoy that.
By Asahi
waithaw at 2021年12月28日 10:00:00
- 2021年12月27日
- 技術情報
Web3
The evolution of the Web is often divided into three stages: Web 1.0, Web 2.0, and Web 3.0. The Web has evolved significantly over the years, and today’s applications are a lot different from the early days.

Web 1.0
This was the first version of the web. Most of the participants were content consumers, and the creators were developers building websites that contained information presented simply in text or image format. It lasted from approximately 1991 to 2004.
They are basically static content instead of dynamic HTML(including actions and databases). The data and content was provided from a static file system rather than a database, and the sites didn’t have a lot of interactivity at all. This can also be regarded as read only web
Web 2.0
You can think of web2 as an interactive and social web. Most of us also are also interacting with web 2 nowadays.
You don’t have to be a developer to participate to be a creator. Many apps are built to make it easy for anyone to become a creator. If you want to create an idea and share it with the world, you can simply do using many platforms. If you want to upload a video or post and millions of people can watch, interact with, and comment on it.
Web 2 is really simple, and because of its simplicity, more and more people around the world are becoming creators. The current form of the web is really cool in many ways, but there are some down sides
Web 2.0 Cons
When a company releases a popular application, the user experience is usually very sophisticated as the application continues to grow in popularity. At first, many companies don’t care about monetization. They have a strict focus on growth and new user acquisition, but in the end they started making profits.
Investors often expect a return on investment and push the companies onto advertising or selling personal data instead of choosing an organic sustainable growth.
Data breaches occur often in Web2 applications. You also have no control over the data or how the data is stored. In fact, enterprises often track and store user data without the consent of the user and are managed by the enterprise responsible platforms.
On the other hand, users living in countries that have to worry about the negative effects of freedom of speeches are also at risk. Governments and other authorities often shut down servers or freeze bank accounts if they believe that a person has expressed an opinion that is going against them.
Web 3.0
Web3 improves the Internet as we know it today and has several other benefits. Self-control, trustable, no permission, decentralized, robust, etc. With web3, developers don’t create and deploy applications that run on a single server or store data in a single database.
Web3 applications run on blockchains, distributed networks of many peer-to-peer nodes (servers), or a combination of both. These applications are often referred to as Dapps (Decentralized Applications).
You will find that cryptocurrencies are usually part of a conversation on web3. Cryptocurrencies play an important role in these protocols.
People can participate in the protocol and earn a living in different ways, both technically and non-technically. Consumers of the service often pay to use the protocol. For example, you would pay a cloud provider like AWS now for a single dedicated node. But with web3, money is sent directly to the participants in the network. In these decentralization scenarios (there are other forms of decentralization as well), many unnecessary and inefficient intermediaries are no longer needed.
Let’s look at another example of organizational structure. There are projects that are becoming more popular and anyone can participate in or invest in these projects. The company announces the launch of x tokens, offering 10% to the first builder, selling 10% to the public, and booking the rest for future payments of contributors and project fundings.
Stakeholders can use the tokens to vote for future changes in the project, and those who help build the project can make money by selling some of the holdings(tokens) after the tokens are released.
People who believe in the project can buy and hold ownership and those who think the project is going in the wrong direction can lead this by selling their stock.
There are still many stuffs if we are talking about web3 but let me stop here for now. If I have any chance, I will talk about more in future.
Yuuma
yuuma at 2021年12月27日 10:00:00
 大人が楽しめるヒーリング絵本河童のカパと静かな森
 パワースポット 日本三大神滝布引の滝
 佐藤・広幸ドイツ魂
 Himeji Castle姫路城
 ボイドタイムお知らせアプリVoid Time 〜月を無視できない〜
 撮った写真をカレンダーに撮りカレ