アプリ関連ニュース
- 2021年12月28日
- 他の話題
年末年始営業のご案内
拝啓 年の瀬も押し詰まり、ご多用のことと存じ上げます。
さて、誠に勝手ながら、弊社の年末年始の営業は、下記のとおりとさせていただきます。
皆様にはご迷惑をお掛けしますが、何卒ご容赦願います。
今年一年ご愛顧を賜りまして大変感謝申し上げますと伴に、皆様のご多幸をお祈りいたします 。
敬具
記
年内営業 令和3年12月28日 13:00まで
年始営業 令和4年1月5日 10:00より
SH at 2021年12月28日 02:39:39
- 2021年12月28日
- 技術情報
Useful Nodejs Packages
Today I would like to share about useful packages of Nodejs. The followings are a collection of some useful packages for Nodejs. Let’s take a look.
Web Frameworks
express
Express is the most popular, fast, and minimalist web framework for node.js backends.
socket.io
Socket.IO enabled real-time bidirectional event-based communication using long-polling or webSockets with disconnection detection and auto-reconnection support.
Utility Functions
async
Async is a module with powerful utility functions for working with asynchronous JavaScript.
rxjs
RxJS is a modular set of libraries to compose asynchronous and event-based programs using observable collections and compositions in JavaScript.
lodash
Lodash is a utility library that makes JavaScript easier by taking the hassle out of working with arrays, numbers, objects, strings, etc.
underscore
Underscore.js is a utility-belt library for JavaScript that provides support for the usual functional suspects (each, map, reduce, filter, etc.) without extending any core JavaScript objects.
ramda
Ramda is a practical, functional library with side-effect free functions composable with currying.
validator
Validator is a library of string validators and sanitizers.
day.js
Day.js is a minimalist JavaScript library that parses, validates, manipulates, and displays dates and times for modern browsers with a largely Moment-compatible API.
date-fns
Date-fns provides the most comprehensive, yet simple and consistent toolset for manipulating JavaScript dates in a browser & Node.js.
jsonwebtoken
Jsonwebtoken is a library to sign, verify and decode JSON Web Tokens.
bcrypt
Bcrypt is a library to hash and verify passwords with sync, callbacks, and promise interface.
uuid
UUID is a library to create RFC4122 universally unique identifiers.
Working With File System
fs-extra
FS-extra adds file system methods that aren’t included in the native fs module and adds promise support to the fs methods.
mkdirp
Just like mkdir -p, mkdirp recursively creates the directory and all necessary subdirectories.
glob
Glob is a library to match files using multiple patterns.
Working with Emails
Nodemailler
Nodemailer is a secure framework that handles email management in your Node.js applications.
This is all for now.
Hope you enjoy that.
By Asahi
waithaw at 2021年12月28日 10:00:00
- 2021年12月27日
- 技術情報
Web3
The evolution of the Web is often divided into three stages: Web 1.0, Web 2.0, and Web 3.0. The Web has evolved significantly over the years, and today’s applications are a lot different from the early days.

Web 1.0
This was the first version of the web. Most of the participants were content consumers, and the creators were developers building websites that contained information presented simply in text or image format. It lasted from approximately 1991 to 2004.
They are basically static content instead of dynamic HTML(including actions and databases). The data and content was provided from a static file system rather than a database, and the sites didn’t have a lot of interactivity at all. This can also be regarded as read only web
Web 2.0
You can think of web2 as an interactive and social web. Most of us also are also interacting with web 2 nowadays.
You don’t have to be a developer to participate to be a creator. Many apps are built to make it easy for anyone to become a creator. If you want to create an idea and share it with the world, you can simply do using many platforms. If you want to upload a video or post and millions of people can watch, interact with, and comment on it.
Web 2 is really simple, and because of its simplicity, more and more people around the world are becoming creators. The current form of the web is really cool in many ways, but there are some down sides
Web 2.0 Cons
When a company releases a popular application, the user experience is usually very sophisticated as the application continues to grow in popularity. At first, many companies don’t care about monetization. They have a strict focus on growth and new user acquisition, but in the end they started making profits.
Investors often expect a return on investment and push the companies onto advertising or selling personal data instead of choosing an organic sustainable growth.
Data breaches occur often in Web2 applications. You also have no control over the data or how the data is stored. In fact, enterprises often track and store user data without the consent of the user and are managed by the enterprise responsible platforms.
On the other hand, users living in countries that have to worry about the negative effects of freedom of speeches are also at risk. Governments and other authorities often shut down servers or freeze bank accounts if they believe that a person has expressed an opinion that is going against them.
Web 3.0
Web3 improves the Internet as we know it today and has several other benefits. Self-control, trustable, no permission, decentralized, robust, etc. With web3, developers don’t create and deploy applications that run on a single server or store data in a single database.
Web3 applications run on blockchains, distributed networks of many peer-to-peer nodes (servers), or a combination of both. These applications are often referred to as Dapps (Decentralized Applications).
You will find that cryptocurrencies are usually part of a conversation on web3. Cryptocurrencies play an important role in these protocols.
People can participate in the protocol and earn a living in different ways, both technically and non-technically. Consumers of the service often pay to use the protocol. For example, you would pay a cloud provider like AWS now for a single dedicated node. But with web3, money is sent directly to the participants in the network. In these decentralization scenarios (there are other forms of decentralization as well), many unnecessary and inefficient intermediaries are no longer needed.
Let’s look at another example of organizational structure. There are projects that are becoming more popular and anyone can participate in or invest in these projects. The company announces the launch of x tokens, offering 10% to the first builder, selling 10% to the public, and booking the rest for future payments of contributors and project fundings.
Stakeholders can use the tokens to vote for future changes in the project, and those who help build the project can make money by selling some of the holdings(tokens) after the tokens are released.
People who believe in the project can buy and hold ownership and those who think the project is going in the wrong direction can lead this by selling their stock.
There are still many stuffs if we are talking about web3 but let me stop here for now. If I have any chance, I will talk about more in future.
Yuuma
yuuma at 2021年12月27日 10:00:00
- 2021年12月24日
- 技術情報
Laravelの翻訳をテストしました。美しい管理画面付きパッケージ
今回は、パッケージレビューをしたいと思います。
Joedixonのパッケージで、laravel translationsという名前です。翻訳パッケージはたくさんありますが、これはかなりシンプルで強力です。今回はその辺を紹介したいと思います。
取り付けはいたって簡単です。
composer require joedixon/laravel-translationパブリケーションアセットの場合は、次のように追加します。
php artisan vendor:publish --provider="JoeDixon\Translation\TranslationServiceProvider"そして、Publishingが完了すると、config/translation.phpという新しいファイルが作成されます。
これは、私の新しく作ったLaravelプロジェクトで、この翻訳ファイルを設定することができます。
我々は、ドライバを変更することができます => file, database
middlewareを追加 => [‘web’, ‘auth’].
インストールが完了したら、artisan serverコマンドを実行し、/languagesを呼び出します。
このページが表示されます。
新しい言語を追加し、既存の言語を編集することができます。
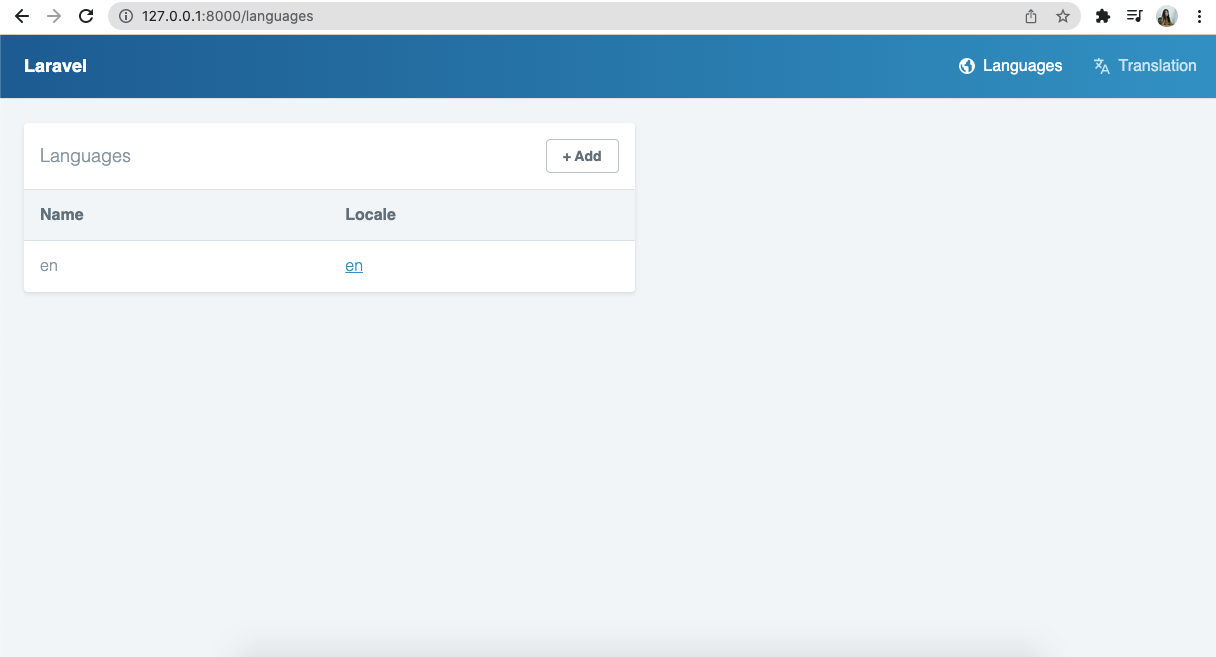
試しに1つだけ言語を変えてみて
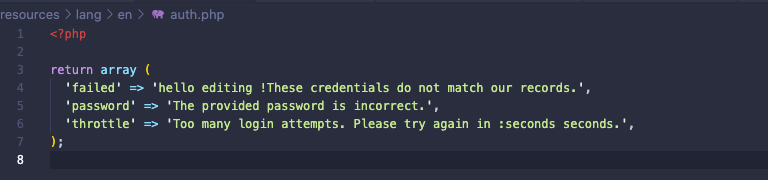
ドライバ => file を選択したため、lang/en/auth.phpファイルに影響を与える可能性があります。
そして、この翻訳が公開されているため、ロールを制限することができます。 そのために、認証ミドルウェアを追加することができます。
'route_group_config' => [
'middleware' => ['web','auth'],
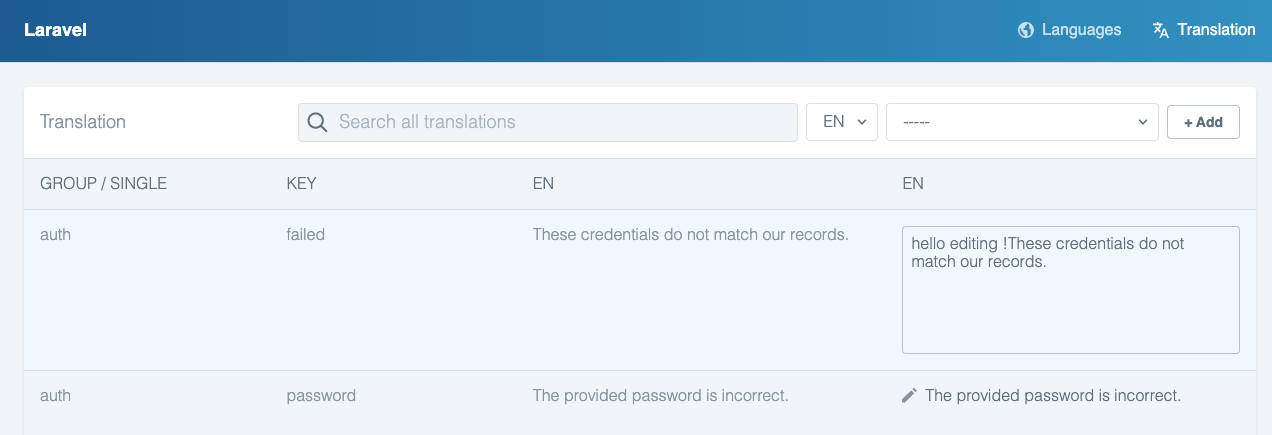
],そして、URLを起動すると、ログインページが表示されることが確認できます。ログイン後、languagesに移動し、/languagesを入力します。
このコマンドは、アプリケーションで利用可能なすべての言語のリストを表示します。
php artisan translation:list-missing-translation-keys例えば、:
Log in を Hey Log In に変更すると、lang/en.json に影響する可能性があります。

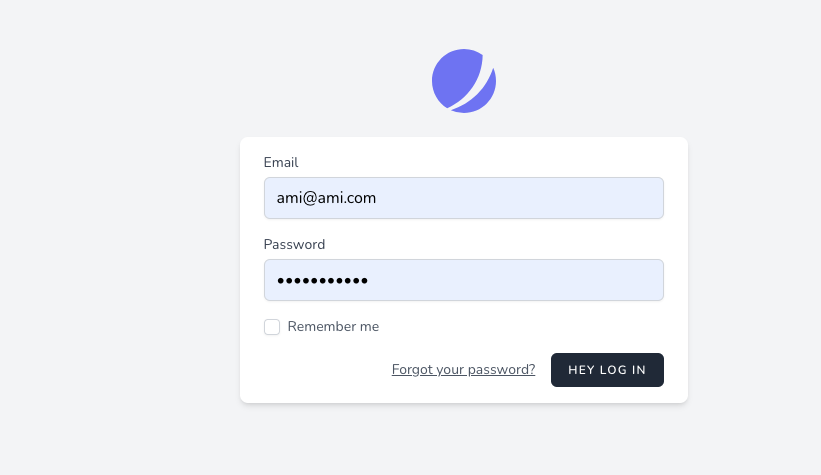
ログインページに移動した後、LOGINをHey Log Inテキストに変更しました。
それは日本語、韓国語などのような他の言語を追加することができます。
おわりに
というわけで、自分でもクライアントでも使いやすいlaravelの翻訳管理パッケージの静かなデモです。
最後までお読みいただき、ありがとうございました。
By Ami
asahi at 2021年12月24日 10:00:00
- 2021年12月23日
- 未分類
4 Reasons Why We Need Code Reviews
Code reviews are necessary as they offer multiple benefits that help improve your code and your team. These benefits include:
- Helping reduce bugs and logic errors
- Providing an opportunity for training
- Spreading knowledge across areas and teams
- Revealing new ideas and techniques
Code reviews help reduce bugs and logic errors
One of the main things a reviewer should be looking for when reviewing code is that the code does the right thing without any errors.
It may seem like it would be hard to find bugs while reading code, but as developers become more experienced reviewing code, issues will start to stand out.
Even with QA and automated testing, finding bugs during a code review is helpful. Reviews help verify the code and tests are both correct. A code review can direct the developer to the exact area of the problem, making it easier to debug and fix. Reviews are just one more step we can use to help avoid stressful after hour bugs.
Reviews offer opportunities for training
We all know how quickly the technology around us changes. there is a new language, tool, or framework every day. We also learn new best practices, standards, and ways to do things as we gain more experience.
How do we keep all the developers on the team up to date with these changes? Of course, there are courses, tutorials, blogs, the team wikis, and guides out there. But do we have time for every developer on our team to always go through a course? Developers should continue to use these resources and learn from them. However, none of these resources have come close to what we learned by working with the team and having code reviewed. Good code has come from code reviews.
Code reviews spread knowledge across areas and teams
If we had two teams of developers who always worked together and reviewed each other’s code versus two groups of developers who never reviewed the other team’s code, who do you think will have better code in the long run?
It probably will be the teams that review each other’s code. Those two teams will be passing knowledge back and forth about their specific areas and the best way to do things. They will be learning from different experiences and projects.
Code reviews also reveal new ideas and techniques
Reviews will teach the same team new things the same way they will teach multiple teams. But new ideas and techniques often come up in code reviews even among the same team members.
Think about most of the code we write. How often do we research different design patterns, consider different architectures or attempt multiple solutions before deploying code? At most places, we don’t have the time to pair program on everything or always meet about how to code every feature. Once a team implements a review process, these suggestions happen without extra steps.
Tsuki
tsuki at 2021年12月23日 10:00:00
 大人が楽しめるヒーリング絵本河童のカパと静かな森
 パワースポット 日本三大神滝布引の滝
 佐藤・広幸ドイツ魂
 Himeji Castle姫路城
 ボイドタイムお知らせアプリVoid Time 〜月を無視できない〜
 撮った写真をカレンダーに撮りカレ