アプリ関連ニュース
Apple is releasing new classical music streaming app
Apple launches new music streaming service focused on classical music. The new Apple Music Classical app offers Apple Music subscribers over 5 million classical music tracks, including new releases in high-quality audio and provides access to hundreds of curated playlists. According to Apple, there are thousands of exclusive albums and other features like songwriter biographies and in-depth reviews of important works.
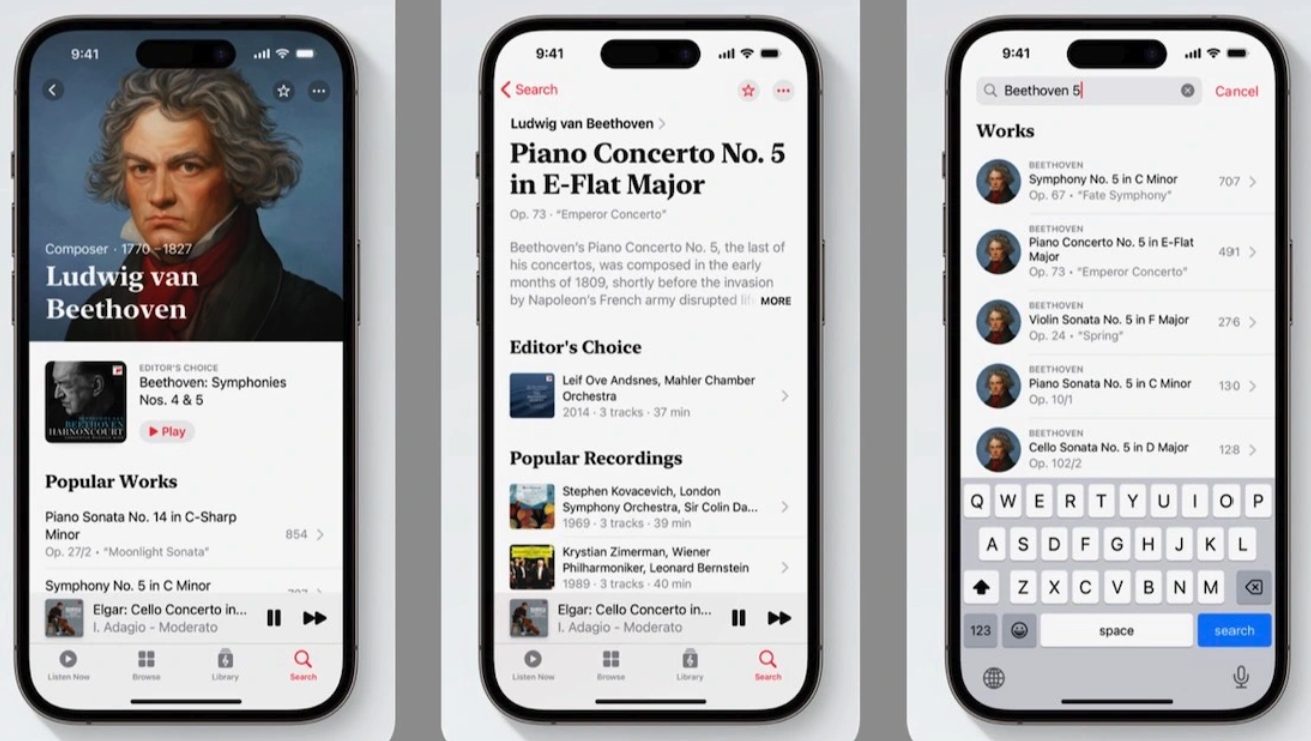
Although the app was announced, it is currently only available for pre-order on the App Store. The release date is March 28th at the end of this month. Also, the app will only support iOS devices running iOS 15.4 or later at the time of release.
The company’s decision to target classical music listeners with a standalone app is a differentiator for its Apple Music subscription service, but rival Spotify announced this week that it will be adding more tech features like AI and video.

Apple Music Classical provides a simple interface for interacting with classical works. Users can search by composer, work, director, or even catalog number to find recordings.
The app also allows users to dive into recordings and read editorial notes and descriptions of key works about the composer. Famous composers will have exclusive high-definition digital portraits commissioned by Apple from the artist.
The service will continue to be updated with new music over time. Apple has been working with classical music artists and music institutions to offer exclusive content and recordings at launch, and says it will continue to do so in the future. Follow news and updates about app and music releases at @appleclassical Twitter account.
Yuuma
yuuma at 2023年03月13日 10:00:00
- 2023年3月07日
- 技術情報
3 Useful image manipulation libraries in Node JS
Today, I would like to share about image manipulation libraries in Node JS. Let’s take a look.
1. Canvas
Node Canvas is a very powerful image library which implements Web Canvas API. So it will be flexible for developers.
Check here for more details.
2. Sharp
Sharp is an efficient image processing library for Node JS. It is very useful for resizing, converting and editing images.
Check here for more details.
3. GraphicsMagick
GraphicsMagick is also a powerful image processing library of Node JS for many image functions.
Check here for more details.
This is all for now. Hope you enjoy that.
By Asahi
waithaw at 2023年03月07日 10:00:00
- 2023年3月06日
- 技術情報
Instagram is releasing its age verification system in more areas
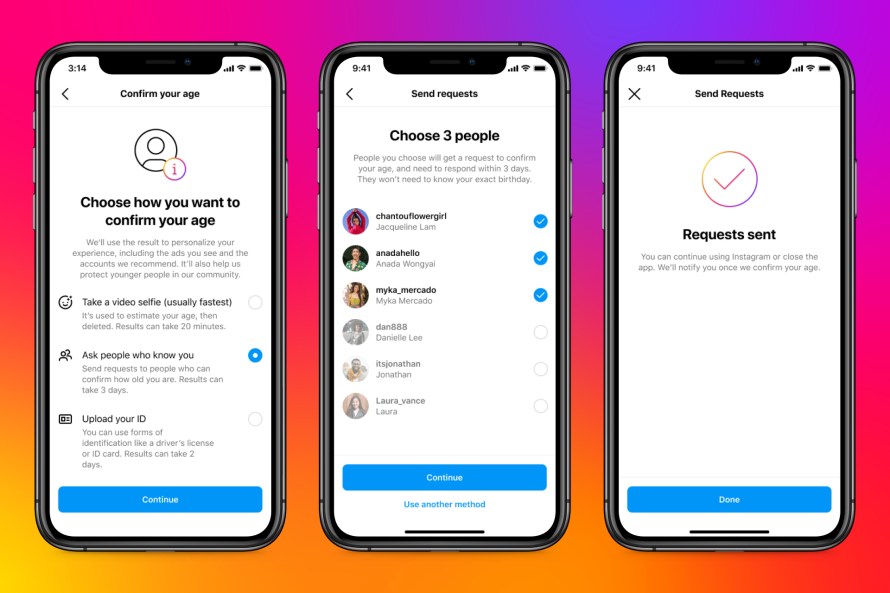
Meta announced that it has begun testing Instagram’s age verification tool in more countries, including Canada and Mexico. Last June, this social he networking app began testing new options for users to verify their age. Use one of the three options. Upload your ID, record a video selfie, or ask a mutual friend to verify your age. When a user tries to edit her date of birth on her Instagram from her 18 to her 18+, the app asks her to verify her age using one of three methods.
It started at the United States and expanded to Brazil and Japan in last October. The age verification tool is currently being tested in more countries in Europe, Mexico, Canada, South Korea, Australia, and Japan. Meta plans to make the tool available globally in the coming months.

To verify your age, you can show your ID, such as your passport or driver’s license. In that case, Instagram will store her ID on its servers for 30 days before deleting it. If you do not have valid ID, you can choose the selfie video method. Instagram has partnered with London-based digital identity startup Yoti to offer this option. When you upload a selfie video, it will be shared with Yoti who uses specially trained AI to check your age. Both companies delete the data once the verification process is complete.

A third age verification option, called “social verification,” allows mutual followers to verify their age. The nominator must be 18 years of age or older and may not nominate on behalf of someone else at that time. Her three chosen guarantors must receive age verification requests and respond within three days. Those who vouch for you will get the option to specify an age range and All three must select the same option to pass age verification.
Yuuma
yuuma at 2023年03月06日 10:00:00
- 2023年3月03日
- 未分類
Flutterのアップデートについて
今回は、Flutterに関する最新のアップデートを紹介します。
Flutter 2.10リリース
Flutter 2.10には、開発者がアプリによるネットワーク要求を監視できる新しいネットワーク追跡機能も搭載されています。その他のアップデートには、Flutter DevToolsの改善、Dart 2.16、null safetyのサポート向上が含まれます。
Web用Flutter
Flutter 2.8では、開発者はflutter createコマンドを使ってWebプロジェクトを作成できるようになり、Flutterで構築したWebアプリケーションのパフォーマンスとユーザーエクスペリエンスに改善が見られます。
Desktop向けFlutter
最近のアップデートにより、Flutterで構築されたデスクトップアプリケーションのパフォーマンスとユーザーエクスペリエンスが改善されています。Flutter 2.8では、開発者はApple SiliconアーキテクチャをサポートするmacOSアプリケーションを作成できるようになりました。
Flutterの状態管理
FlutterチームはRiverpodという新しい状態管理ソリューションをリリースし、Flutterでの状態管理を簡素化することを目的としています。
Flutterプラグイン
FlutterチームはFirebase Analytics、Firebase Performance Monitoring、Google Maps用の新しいプラグインをリリースしました。
Flutterウィジェット
Flutterチームは、開発者がプラットフォームに適応したナビゲーションバーを作成できるAdaptive Navigation Barや、開発者がスクロール可能な領域の残りのスペースを埋めることができるSliverFillRemainingウィジェットなどの新しいウィジェットを発表しました。
結論として、モバイル、ウェブ、デスクトップアプリケーションを構築する場合、Flutterは高品質のユーザーインターフェースを構築するための強力で柔軟なツールキットを提供します。
金曜担当 – Ami
asahi at 2023年03月03日 10:00:00
- 2023年3月01日
- AI
BingのチャットAIがBingのモバイルアプリやSkypeにも組み込まれました
tanaka at 2023年03月01日 10:00:00
 大人が楽しめるヒーリング絵本河童のカパと静かな森
 パワースポット 日本三大神滝布引の滝
 佐藤・広幸ドイツ魂
 Himeji Castle姫路城
 ボイドタイムお知らせアプリVoid Time 〜月を無視できない〜
 撮った写真をカレンダーに撮りカレ