技術情報
- 2021年06月07日
- 技術情報
[Laravel] Adding custom data to eloquent result
Sometimes, we want to add more custom data to our eloquent result before passing to blade or doing further logic improvements. Today we will be focusing how to add custom data to our eloquent result.
I assume you already know laravel framework in this article as we will not covering from scratch of laravel framework. First let’s make a posts table. Here is the migration file.
Schema::create('posts', function (Blueprint $table) {
  $table->id();
  $table->string('name');
  $table->string('description');
  $table->timestamps();
});
In our post table, we will have these columns in above. And we gonna add a data record. You can add manually using database clients or you can of course make a seeder class to add dummy data like this
DB::table('posts')->insert([
  'name' => Str::random(10),
  'description' => Str::random(100),
  'created_at' => date('Y-m-d H:i:s'),
]);
Lets go to our controller and select the data with all method and print the result with dd function.
$data = Post::all();
dd($data);
The output will be look like this.
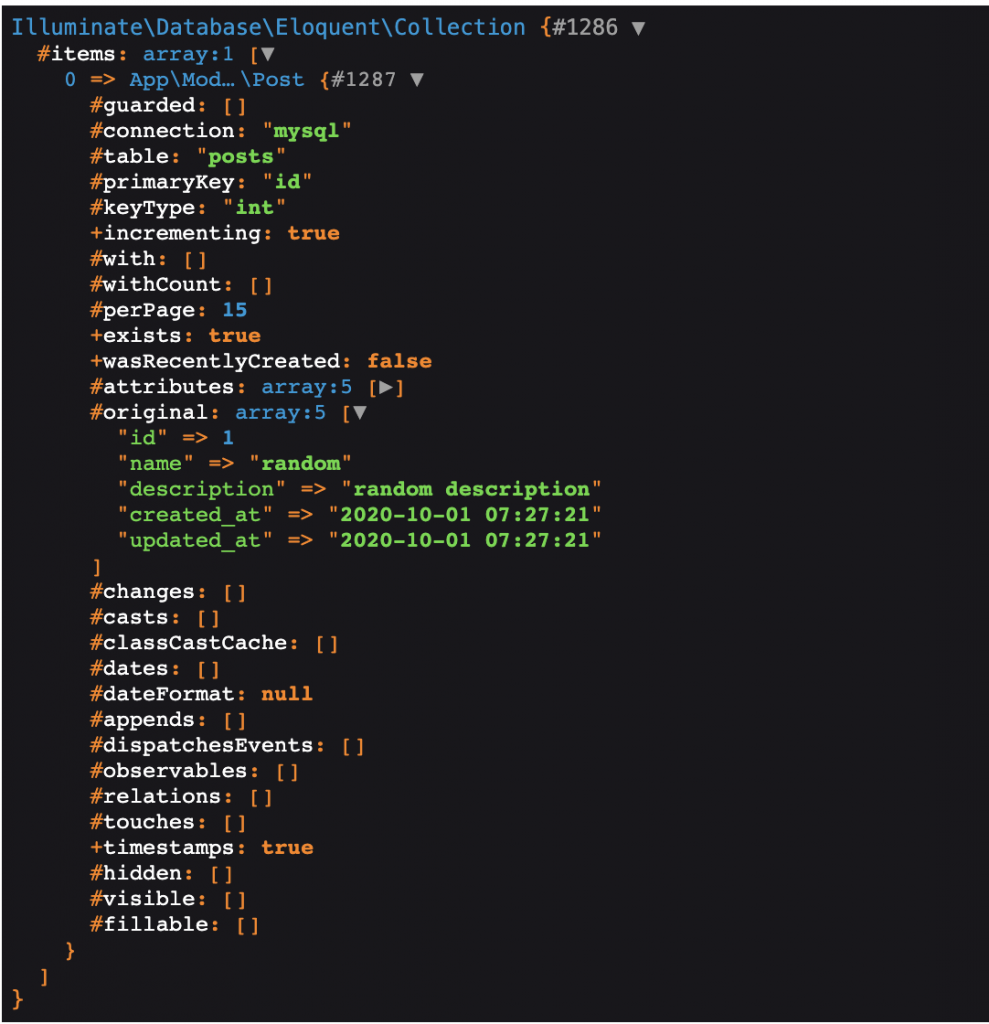
Now , let’s try to add a new column called category_id and user_id to that eloquent results. We can achieve this using map function.
$data = Post::all();

$data->map(function ($result) {
  $result->category_id = 1;
  $result->user_id = 2;
  return $result;
});

dd($data);
And the result will be look like this. Please remember there are two arrays called attributes which is the one we customized and added the data. And there is also original array which contains only original data from eloquent.

Anyhow, we can access our created data using map like always. For further more to customize the eloquent results , please check out here.
dd($data[0]->category_id.','.$data[0]->user_id);
//result -> 1,2
If you need to loop through many data, you can use loop functions but in this case I just added a 0 index to get data easily.
By Yuuma
yuuma at 2021年06月07日 11:10:35
- 2021年06月04日
- 技術情報
How to install Node.js and NPM in your MacOS
Yesterday I wanted to install NPM with package download, such kind of command error message occurred.
Command on found on zshThen I try to add new some command, I got it zsh shell command. So this time I would like to share you how to install both Node.js and NPM with MacOs for new terminal.
Prerequisites
Firstly by typing git that will show you command line tools installed.
gitTo see what shell your terminal currently is in, from the command line type in:
echo $0If you’re in the bash shell, you’ll see printed out:
-bashIf you’re in the zsh shell, you’ll see printed out:
-zshSwitch Your Default Shell To zsh
To switch your shell to the zsh shell, you may enter:
chsh -s /bin/zshTo switch back to the bash shell, you may enter:
chsh -s /bin/bashStep by step installation
Make a directory and enter the folder and add this really nifty package manager for zsh called antigen.zsh
curl -L git.io/antigen > antigen.zshNow we’re going to configure our .zshrc file:
nano ~/.zshrcThen you’ll want to write such kind of .zshrc file:

Then restart your terminal. Now you can finally install Node.js and NPM with a single line using nvm!
nvm install --ltsI hope you have found this useful.
By Ami
asahi at 2021年06月04日 10:00:17
- 2021年05月31日
- 技術情報
Serverless
Have you heard about serverless architecture ? Well it doesn’t mean there is no server for your code. Technically serverless is a framework or architecture to save the expensive server costs. Lets see how it does.
As we all know, a server is a computer where an application is deployed. Most developers deploy their code on a remote server where someone else takes care of hardware and software maintenance. That is what most of us are doing. At this point, servers could be expensive even for small projects, it can be a big impact. Your server must be running 24 hours a day to be able to handle requests at any time.
As I said in above, serverless does not mean there is no server. The serverless infrastructure runs on someone else’s managed server. This means you don’t have to worry about maintenance, network security, or uptime. And we only have to pay when our code is being executed which means it will only charged for the amount of time and memory used.
We all know horizontal & vertical scaling when it comes to handling the traffic from users. Both of the options can be expensive, isn’t it ? Well in serverless, you can scale to millions of requests. No new infrastructure required! There is no need to add new servers.
Well, that is all for now. You can try it out serverless in below services.
Although it is powerful to scale up your application with more affordable cost, there might be some drawback also. For example, caching and debugging can be tricky. And of course, you have to learn the new tools to configure it which can be tricky as well.
Yuuma
yuuma at 2021年05月31日 11:00:55
- 2021年05月28日
- 技術情報
Tips to improve website page load speed
You also know slow-loading website will impact user experience. Pages that load fast have better user retention and lower bounce rates, and win user’s trust faster.
3 Tools to Measure Page Speed
Google Search Console
Although it technically doesn’t measure site speed, but you can use the new core web vitals report to find loading issues you need to take care of.
PageSpeed Insights
Developed by Google, PageSpeed Insights is a site speed tester capable of identifying underlying load speed issues. It’s as simple as entering the URL you want to inspect, and the tool will crawl your site and create a full report.
GTmetrix
If you want more advanced features or if you want to test your page speed on specific locations, GTmetrix is a helpful tool.
2 Tips to Improve Your Website’s Page Load Speed
1.Optimize your image
Image file size
You should aim for the smallest file size possible. A good mark for big images is 150kb to 500kb per image.
File format
It’s not uncommon to use PNG images when creating content. They are easier to handle, after all. Without getting into a whole debate on image extensions, we recommend using JPGs. These have become the standard format for images on the web. They do not lose quality, and their file size is small.
Image dimensions
Make sure to upload a decent image that doesn’t lose quality while scaling. I.e., 800 x 1200 images are the most common on articles.
2.Use lazy loading
We want to make the browser render the top of the page first (above the fold content) before loading the rest of the page.
The great thing about it is that we can implement it natively using the loading attribute in our images and iframes.
<img src=”myimage.jpg” loading=”lazy” alt=”…” />

<iframe src=”content.html” loading=”lazy”></iframe>
These attributes will tell the browser only to download the elements once the user has scrolled to the element and it is now visible on the viewport.
I hope you have found this useful.
By Ami
asahi at 2021年05月28日 10:00:47
- 2021年05月27日
- 技術情報
MySQL 照合順序設定による検索結果の違い(2)
今回はデータベースを作成する際の照合順序設定によってどのように検索結果に影響を与えるかをシェアしたいと思います。
本記事は前回の「MySQL 照合順序設定による検索結果の違い(1)」の続きとなります。
nishida at 2021年05月27日 10:00:47
 大人が楽しめるヒーリング絵本河童のカパと静かな森
 パワースポット 日本三大神滝布引の滝
 佐藤・広幸ドイツ魂
 Himeji Castle姫路城
 ボイドタイムお知らせアプリVoid Time 〜月を無視できない〜
 撮った写真をカレンダーに撮りカレ