技術情報
- 2022年04月29日
- 技術情報
知っておいていただきたいこと – 3
今回も、Laravelの知っておいた方がいいとおもったことをいくつか紹介します。
Tip # Laravel #exclude
入力を受け付けると、そのデータを使ってモデルを作りたいと思うことがよくあります。
例えば、登録フォームはUserモデルを作成するために使われるでしょう。しかし、すべてのフィールドを検証する必要がある一方で、モデルを作成するためにすべてのフィールドを必要としないかもしれません。このような場合、「exclude」ルールを使用します。
class StoreRequest extends FormRequest
{
  public function rules(){
      return [
         'name'                    => 'required|string',
         'email_address'           => 'required|string|email',
         'terms_and_conditions'    => 'required|accepted|exclude',
       ];
  }
}
exclude’ ルールを使用すると、Laravel は ‘terms_and_conditions’ フィールドが全てのバリデーションルールをパスすることを保証しますが、 ‘validate’ または ‘validated’ メソッドによって返されるわけではありません。これにより、DBに’terms_and_conditions’のカラムがないことを気にせずに、簡単にモデルを作ることができます。
class RegistrationController extends Controller
{
     public function store(StoreRequest $request)
     {
        $playload = $request->validate(); //名とメールだけ
        $user = User::create($playload);
        Auth::login($user);
        return redirect()->route('dashboard');
     }
}
ということで、今回はこれで終わります。
金曜担当 – Ami
asahi at 2022年04月29日 10:00:00
- 2022年04月26日
- 技術情報
A simple script to send email by SMTP in Python
Today, I would like to share about sending emails by SMTP with a simple python script. Let’s take a look.
To send smpt emails, we will need just one library smtplib that is a built-in python lib. Here is the code.
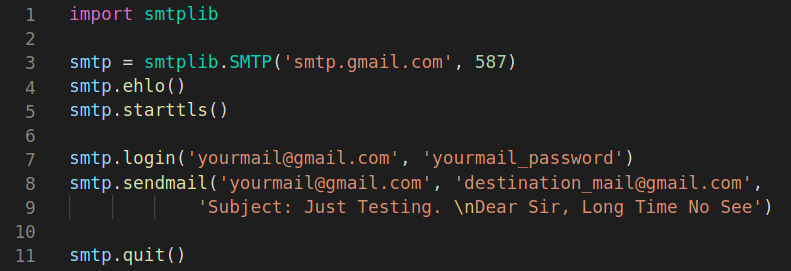
There are just simple 6 steps.
1. Connect to a SMTP server [line 3]
2. Sending the SMTP ‘Hello’ Message [line 4]
3. Starting TLS Encryption [line 5]
4. Logging in to the SMTP server [line 7]
5. Sending an Email [line 8]
6. Disconnecting from the SMTP server [line 11]
Note: To send with gmail SMTP, you will need to turn on ‘Less secure app access’ in your gmail account settings.
This is all for now. Hope you enjoy and can expand to further uses based on that.
By Asahi
waithaw at 2022年04月26日 10:00:00
- 2022年04月25日
- 技術情報
Low-Code Development Technology
Low code is a software development approach that requires little or no coding to create applications and softwares.
Instead of using a complex programming language, you can use a visual interface with basic logic and drag-and-drop capabilities on your low-code development platform.
Users with no advanced coding or software writing skills can use these intuitive techniques to create software for a variety of purposes, including mobile and business application creation.
These platforms are gaining popularity as a quick and easy alternative to traditional software development. The low-code framework can be used by engineers and “citizen developers” (non-professional developers) to build applications.
Low-code development
Instead of traditional hand-coded computer programming, the low-code development framework provides a programming environment for building software applications through a graphical user interface and configuration.
The low-code authoring framework allows users to embed building blocks in workflows and applications. These building blocks abstract the code behind actions and commands, allowing to build business interfaces and applications without having to manually code them.
Drag and drop functionality is available on popular lowcode platforms. This is one of the most important and valuable features that facilitates the manufacturing process. The drag-and-drop convenience provided during app development supports both civil and technical developers.
Security
Insecure low-code tools, no matter how convenient and easy to use, are not a good solution. Before you start using the low-code development framework, make sure you have enough protection to protect the app you are building and the entire platform.
There are still many factors to talk about but let me wrap up here for today. I will talk a bit more in future.
Yuuma
yuuma at 2022年04月25日 10:00:00
- 2022年04月21日
- 技術情報
DataTablesを使用したテーブル生成とサーバーサイド連携(9)
nishida at 2022年04月21日 10:00:00
- 2022年04月19日
- 技術情報
Ubuntu Budgie 22.04 LTS – New Features
Today I would like to share about some Ubuntu 22.04 features of the upcoming Ubuntu stable release. Ubuntu 22.04 Jammy Jellyfish release date is scheduled on April 21, 2022. So, let’s take a look at some new features.
GNOME 42
Ubuntu 22.04 LTS ships with the latest and greatest GNOME 42 desktop environment by default. Most of GNOME 42’s features are enjoyable.
New screenshot tool
One of GNOME 42’s features. Ubuntu 22.04 has a screenshot tool that also includes the screencast (video recording) option. And the screenshot of the selected area, entire screen or current application window can also be taken.
New Ubuntu installer
The installation prompts of Ubuntu 22.04 will look a little different because the installer has been revamped. It was created using Google’s Flutter UI development kit.
Raspberry Pi support
The new Ubuntu 22.04 will support Raspberry Pi models with as little as 2 GB of RAM.
Kernel 5.15
The Kernel 5.15 will come with new features which include a new NTFS file-system driver called NTFS3. This will make Ubuntu 22.04 more compatible with Windows NTFS formatted drives. The new Linux Kernel includes a new in-kernel SMB file service that will provide faster file sharing and more features. And also include support for Amazon’s DAMON (Data Access Monitor) which improves performance and new hardware support for AMD CPUs and GPUs, Apple’s M1 chip, Intel Alder Lake CPUs and so on.
New dock mode
Ubuntu 22.04 has a new addition where the size of the dock can be changed.
Accent Color Selection
With Ubuntu 22.04, a different accent color can be chosen. You can change the default orange theme as you want. The folder icons, notification bars, buttons, and other elements will reflect the selected accent color.
So this is all for now. Hope you enjoy that.
By Asahi
waithaw at 2022年04月19日 10:00:00
 大人が楽しめるヒーリング絵本河童のカパと静かな森
 パワースポット 日本三大神滝布引の滝
 佐藤・広幸ドイツ魂
 Himeji Castle姫路城
 ボイドタイムお知らせアプリVoid Time 〜月を無視できない〜
 撮った写真をカレンダーに撮りカレ