アプリ関連ニュース
- 2021年7月28日
- Android
Flutterを使ってAndroidアプリを作ろう
tanaka at 2021年07月28日 10:00:58
Flutterの開発環境を構築しよう
tanaka at 2021年07月21日 10:00:10
- 2021年7月19日
- 技術情報
Rare HTML tags you mightn’t notice
Today I will talk about some html tags which are not very well-known but of course they are so useful if you know them. So lets get started.
<s> tag
S tag similar to the line-through value of a text decoration CSS property. This is very useful when you need to represent content that is no longer relevant or valid.
Price - <s>100</s>
<p>Discount Price - 70<p>
<ruby>, <rt>, and <rp> tags
The Ruby <ruby> HTML element represents small annotations that are rendered above, below, or next to base text, usually used for showing the pronunciation of East Asian characters.
The HTML Ruby fallback bracket () element is used to provide fallback brackets to browsers that do not support the display of ruby annotations using the element.
<ruby>
  お休み <rp>(</rp><rt>Oyasumi</rt><rp>)</rp>
</ruby>
<detail> Tag
This tag is used to specify additional details that the user can show or hide on click.
<details>
<summary>Click</summary>
<p>Helo</p>
</details>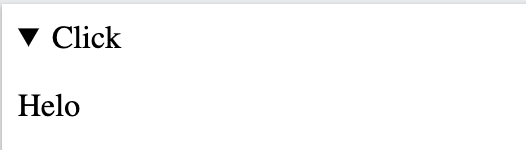
<abbr> tag
The tag displays the full meaning of the abbreviation when the user hovers the cursor over the abbreviation.
<p>My name is <abbr title="Hlaing Tin Htun">Hlaing</abbr> </p>
Well , there are some other interesting tags you probably don’t know yet. Discovering them might be very useful in our daily works relating with creating HTML elements.
Yuuma
yuuma at 2021年07月19日 11:41:13
- 2021年7月12日
- Web Service
A touch to serverless framework – final part
We have created our serverless endpoint last week and lets tweak a bit more today by adding some parameters to our endpoint. Lets get started.
We don’t have to modify serverless.yml and lets keep the same way we did before.
events:
      - http:
          path: sample-endpoint
          method: GET
Lets modify the handler.js as we are adding a name parameter to our endpoint and get a different response depending on the input parameter. We will add a conditional statement for our name parameter in our handler.js like this.
if (event.queryStringParameters && event.queryStringParameters.name) {
    return {
      statusCode: 200,
      body: JSON.stringify(
        {
          message: 'Hello' + event.queryStringParameters.name,
          input: event,
        },
        null,
        2
      ),
    };
  }
So this will be our final result of handler.js
'use strict';

module.exports.hello = async (event) => {


  if (event.queryStringParameters && event.queryStringParameters.name) {
    return {
      statusCode: 200,
      body: JSON.stringify(
        {
          message: 'Hello' + event.queryStringParameters.name,
          input: event,
        },
        null,
        2
      ),
    };
  }

  return {
    statusCode: 200,
    body: JSON.stringify(
      {
        message: 'Go Serverless v1.0! Your function executed successfully!',
        input: event,
      },
      null,
      2
    ),
  }
};
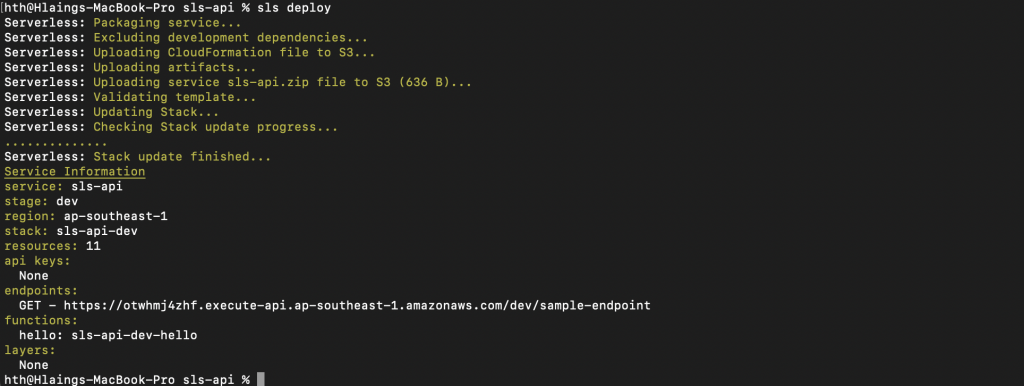
Lets deploy our code and see the result.
Lets go to the endpoint from the browser but this time we will add a name parameter at the end of the url like this
?name=HlaingAs a final result, we will get a response like this.
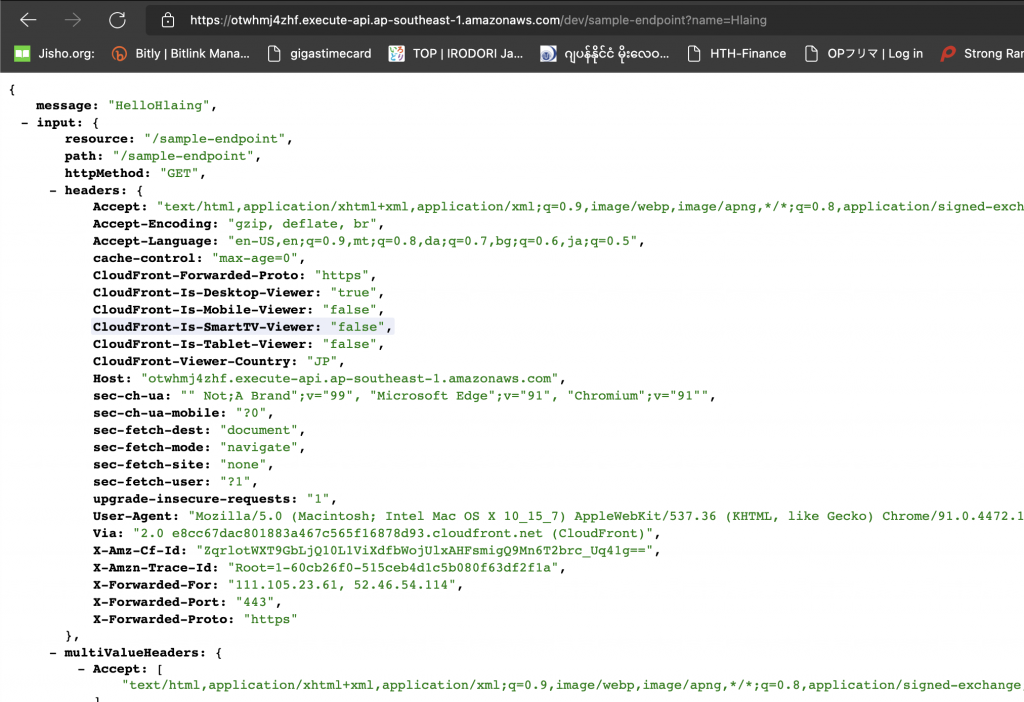
You can see the result of our name parameter in the json response of message data.
That’s all for today and we have successfully added a new parameter to our endpoint.
As a conclusion note, I have to say we can still do many things through this serverless project. We can also create other method type endpoint like POST. We can also create services like S3 buckets, DBs and so on through serverless.yml and deploying it. But let me stop the article series here as I also intended to get you a starting point to the serverless framework and I think you got it.
See you again . Yuuma
yuuma at 2021年07月12日 11:00:25
- 2021年7月09日
- 技術情報
Creating a simple GridView in flutter
During studying flutter, I learned a beautiful and simple grid system. These interesting and simple grid view layout topics I would like to share you today.
Ever created with a multiple layout with multiple rows within a column?
Try a GridView! While there are multiple GridView constructors, the most common way to create a GridView is the count constructor.
GridView.count(
..
..
)
Start by listing all the items you want in the grid,
GridView.count(
children: [allItems],
)
but it doesn’t end there, control how many items you want to across the grid, by setting the crossAxisCount property.
GridView.count(
crossAxisCount: 1,
children: [allItems],
)
Setting it to 1 makes it look like a normal list. And if your items want to some social distancing? Use mainAxisSpacing gives horizontal space between the rows and crossAxisSpacing provides vertical space between the columns.
GridView.count(
mainAxisSpacing: 28.0,
crossAxisCount: 2,
children: [allItems],
)
Now Let’s make simple grid view using GridView.count constructor.
GridView.count(
  primary: false,
  padding: const EdgeInsets.all(20),
  crossAxisSpacing: 10,
  mainAxisSpacing: 10,
  crossAxisCount: 2,
  children: <Widget>[
    Container(
      padding: const EdgeInsets.all(8),
      child: const Text("He'd have you all unravel at the"),
      color: Colors.teal[100],
    ),
    Container(
      padding: const EdgeInsets.all(8),
      child: const Text('Heed not the rabble'),
      color: Colors.teal[200],
    ),
    Container(
      padding: const EdgeInsets.all(8),
      child: const Text('Sound of screams but the'),
      color: Colors.teal[300],
    ),
    Container(
      padding: const EdgeInsets.all(8),
      child: const Text('Who scream'),
      color: Colors.teal[400],
    ),
    Container(
      padding: const EdgeInsets.all(8),
      child: const Text('Revolution is coming...'),
      color: Colors.teal[500],
    ),
    Container(
      padding: const EdgeInsets.all(8),
      child: const Text('Revolution, they...'),
      color: Colors.teal[600],
    ),
  ],
)
The result is!

By Ami
asahi at 2021年07月09日 10:00:37
 大人が楽しめるヒーリング絵本河童のカパと静かな森
 パワースポット 日本三大神滝布引の滝
 佐藤・広幸ドイツ魂
 Himeji Castle姫路城
 ボイドタイムお知らせアプリVoid Time 〜月を無視できない〜
 撮った写真をカレンダーに撮りカレ