アプリ関連ニュース
- 2021年10月15日
- 技術情報
Flutter – Turtle
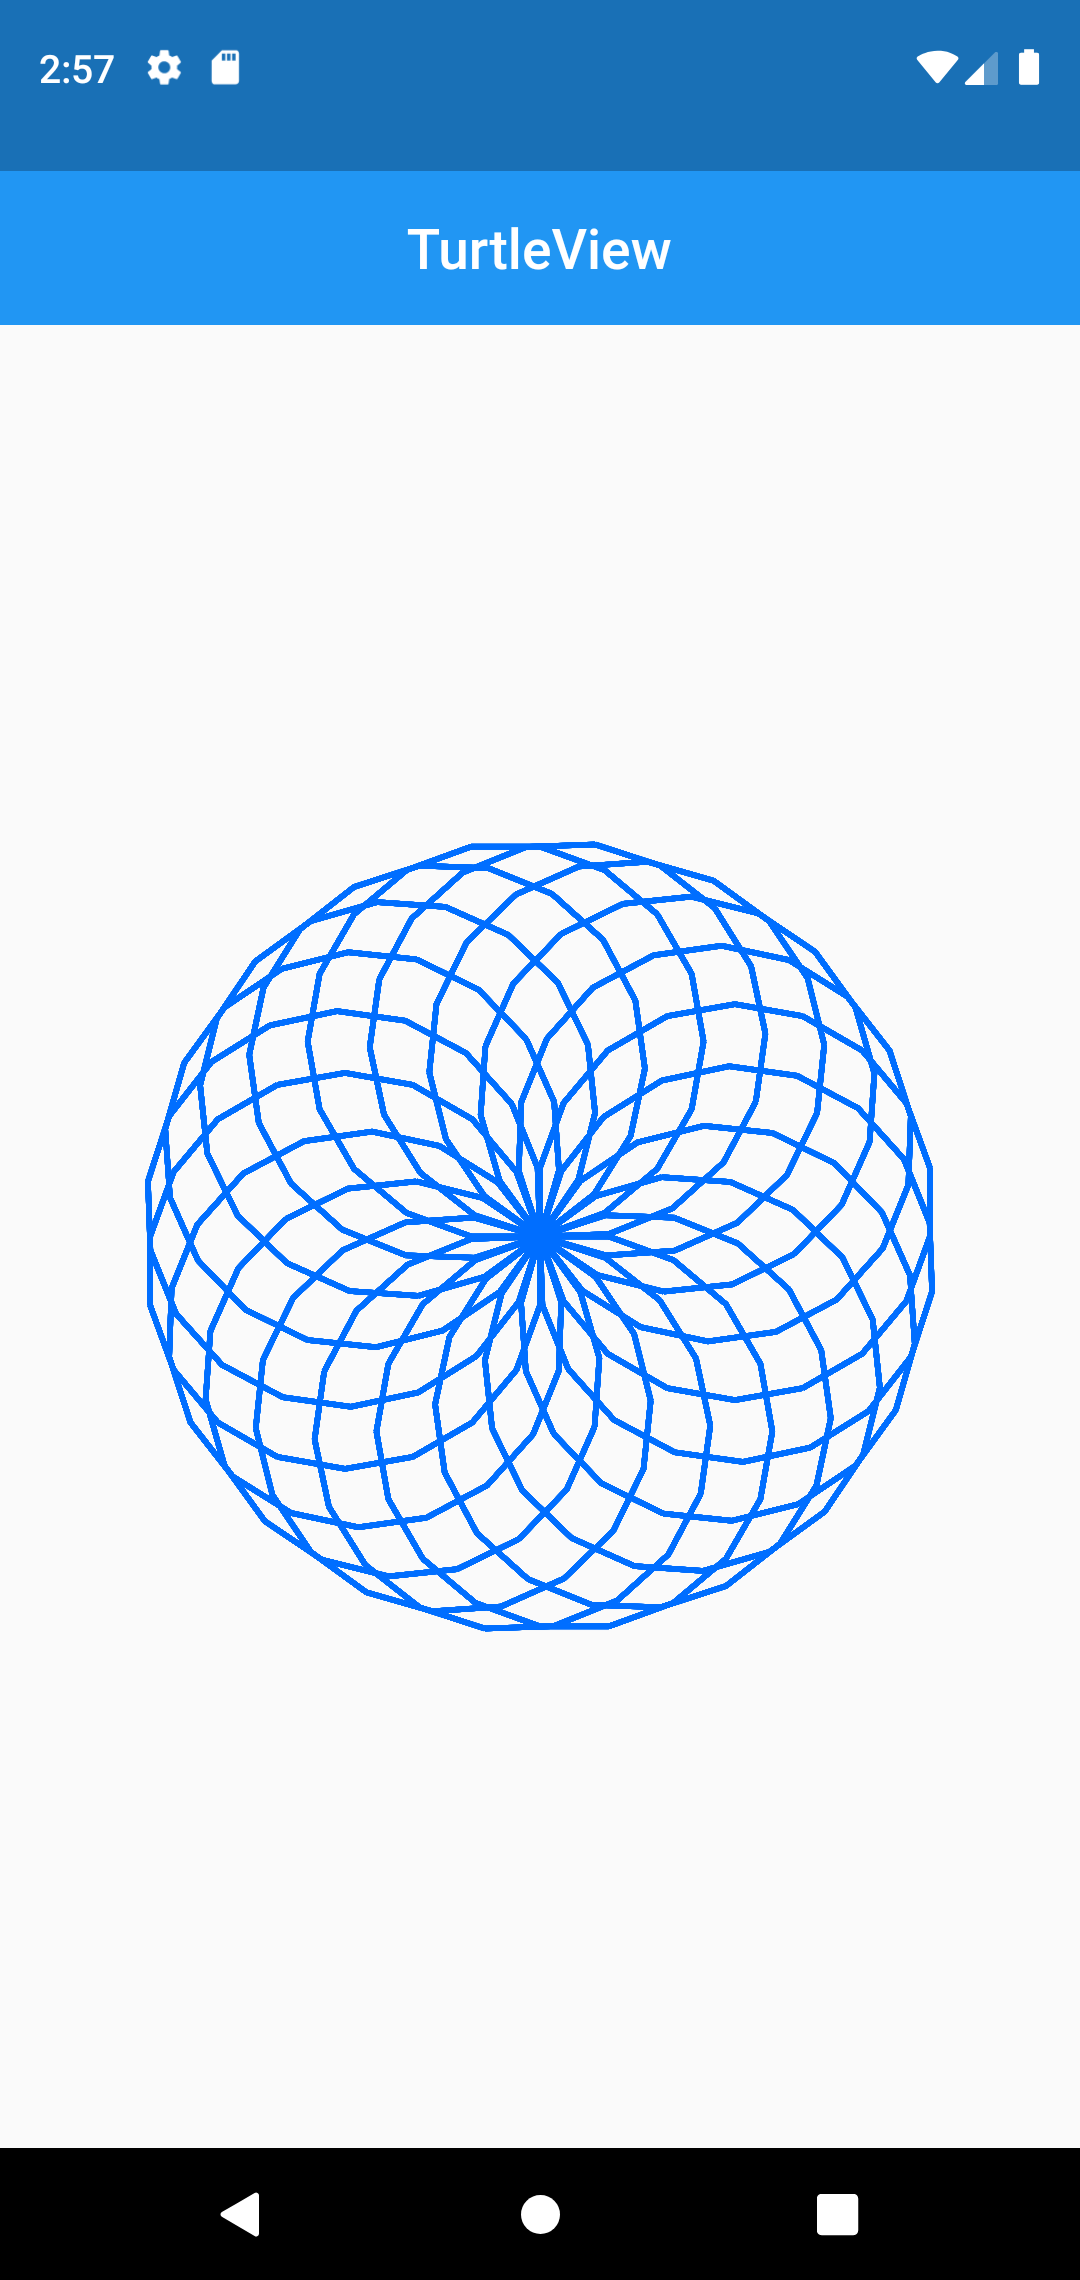
What is flutter turtle? This is a simple presentation of turtle graphics for flutter. It can simply apply to draw graphics with a custom painter like a logo language.
Flutter turtle is two classes, named with TurtleView and AnimatedTurtleView. To create a turtleView, both of classes require commands parameter. If you want your logo to repeat 5 times and forward 100 , right 200. You can use like this using commands parameter.
[
  Repeat((_) => 5, [
    Forward((_) => 100),
    Right((_) => 200),
  ]),
];
With more information about flutter turtle, check on flutter pub.dev.
Example code :
Widget build(BuildContext context) {
  return Scaffold(
    appBar: AppBar(
      title: const Text('TurtleView'),
      centerTitle: true,
      elevation: 0,
    ),
    body: TurtleView(
      child: Container(),
      commands: [
        PenDown(),
        SetColor((_) => const Color(0xFF006EFF)),
        SetStrokeWidth((_) => 2),
        Repeat((_) => 20, [
          Repeat((_) => 180, [
            Forward((_) => 25.0),
            Right((_) => 20),
          ]),
          Right((_) => 18),
        ]),
        PenUp(),
      ],
    ),
  );
}
Hop you enjoyed this article!
By Ami
asahi at 2021年10月15日 10:00:00
XamppのMariaDBをMySQLに置き換える方法(1)
開発/検証環境を手軽に構築するためにはXamppの導入は有効ですが、Xamppに含まれるDBが本番サーバーのDBと異なる場合、同じものにあわせて検証をおこなう必要があります。
今回は本番サーバーのDBがMySQLと仮定して、Xamppに含まれているMariaDBをMySQLに置き換える方法をシェアしたいと思います。
nishida at 2021年10月14日 10:00:00
Intel 12世代 Coreシリーズについて
近く発売開始が予想されているIntel社の12世代Coreシリーズは
AppleのM1チップの様にいくつかの高性能コアと
いくつかの高効率コアの組み合わせで構成されているといわれています。
低負荷時は高効率コアを使い、負荷が高くなれば高性能コアを使うように
割当を変えるでしょうからアイドル〜低負荷時の電力効率は
既存のCoreシリーズより改善されるでしょう。
高性能コアのクロック数が向上しているらしいので、
逆に高い負荷を継続して与えられるような処理では
今までより冷却性能を要求されるかもしれませんね。
ただ、対応ソケットが変更されたことでマザーボードや
CPUクーラーの買い替えが必要となります。
水曜担当:Tanaka
tanaka at 2021年10月13日 10:00:00
- 2021年10月11日
- AI
Introduction to Artificial Intelligence – Part 2
Previously , I talked about general knowledge of AI and it’s types , ANI, AGI, ASI which are in Type I group. Today I will talk about Type II AI group. With further research on AI, this form can be further divided into two types, called strong AI and weak AI.
The main reason was to distinguish between the production levels of different types of AI machines.
Strong AI
- This is a wide range of widespread applications.
- This form of application has incredible intelligence at the human level.
- It uses combined action of gathering data to process the information.
- Example: Advanced robotics

Weak AI
- This is a small application with a finite scope.
- This type of AI is useful for some limited tasks.
- Process information using supervised and unsupervised surveys
- Example: Siri, Alexa.

Why AI
The reason for artificial intelligence is to support human capabilities and data resolution with widespread consequences. That’s the right answer from a professional point of view. From a philosophical point of view, artificial intelligence can help people lead a more profitable life without working hard.
Of course, there are consequences with the development of AI, but we are still far from such consequences. If you are more interested in artificial intelligence, I suggest that you take an artificial intelligence course to understand the delicacy and skills of today’s artificial consciousness.
yuuma at 2021年10月11日 10:15:00
- 2021年10月08日
- 技術情報
Flutter – Navigation drawer
Output:
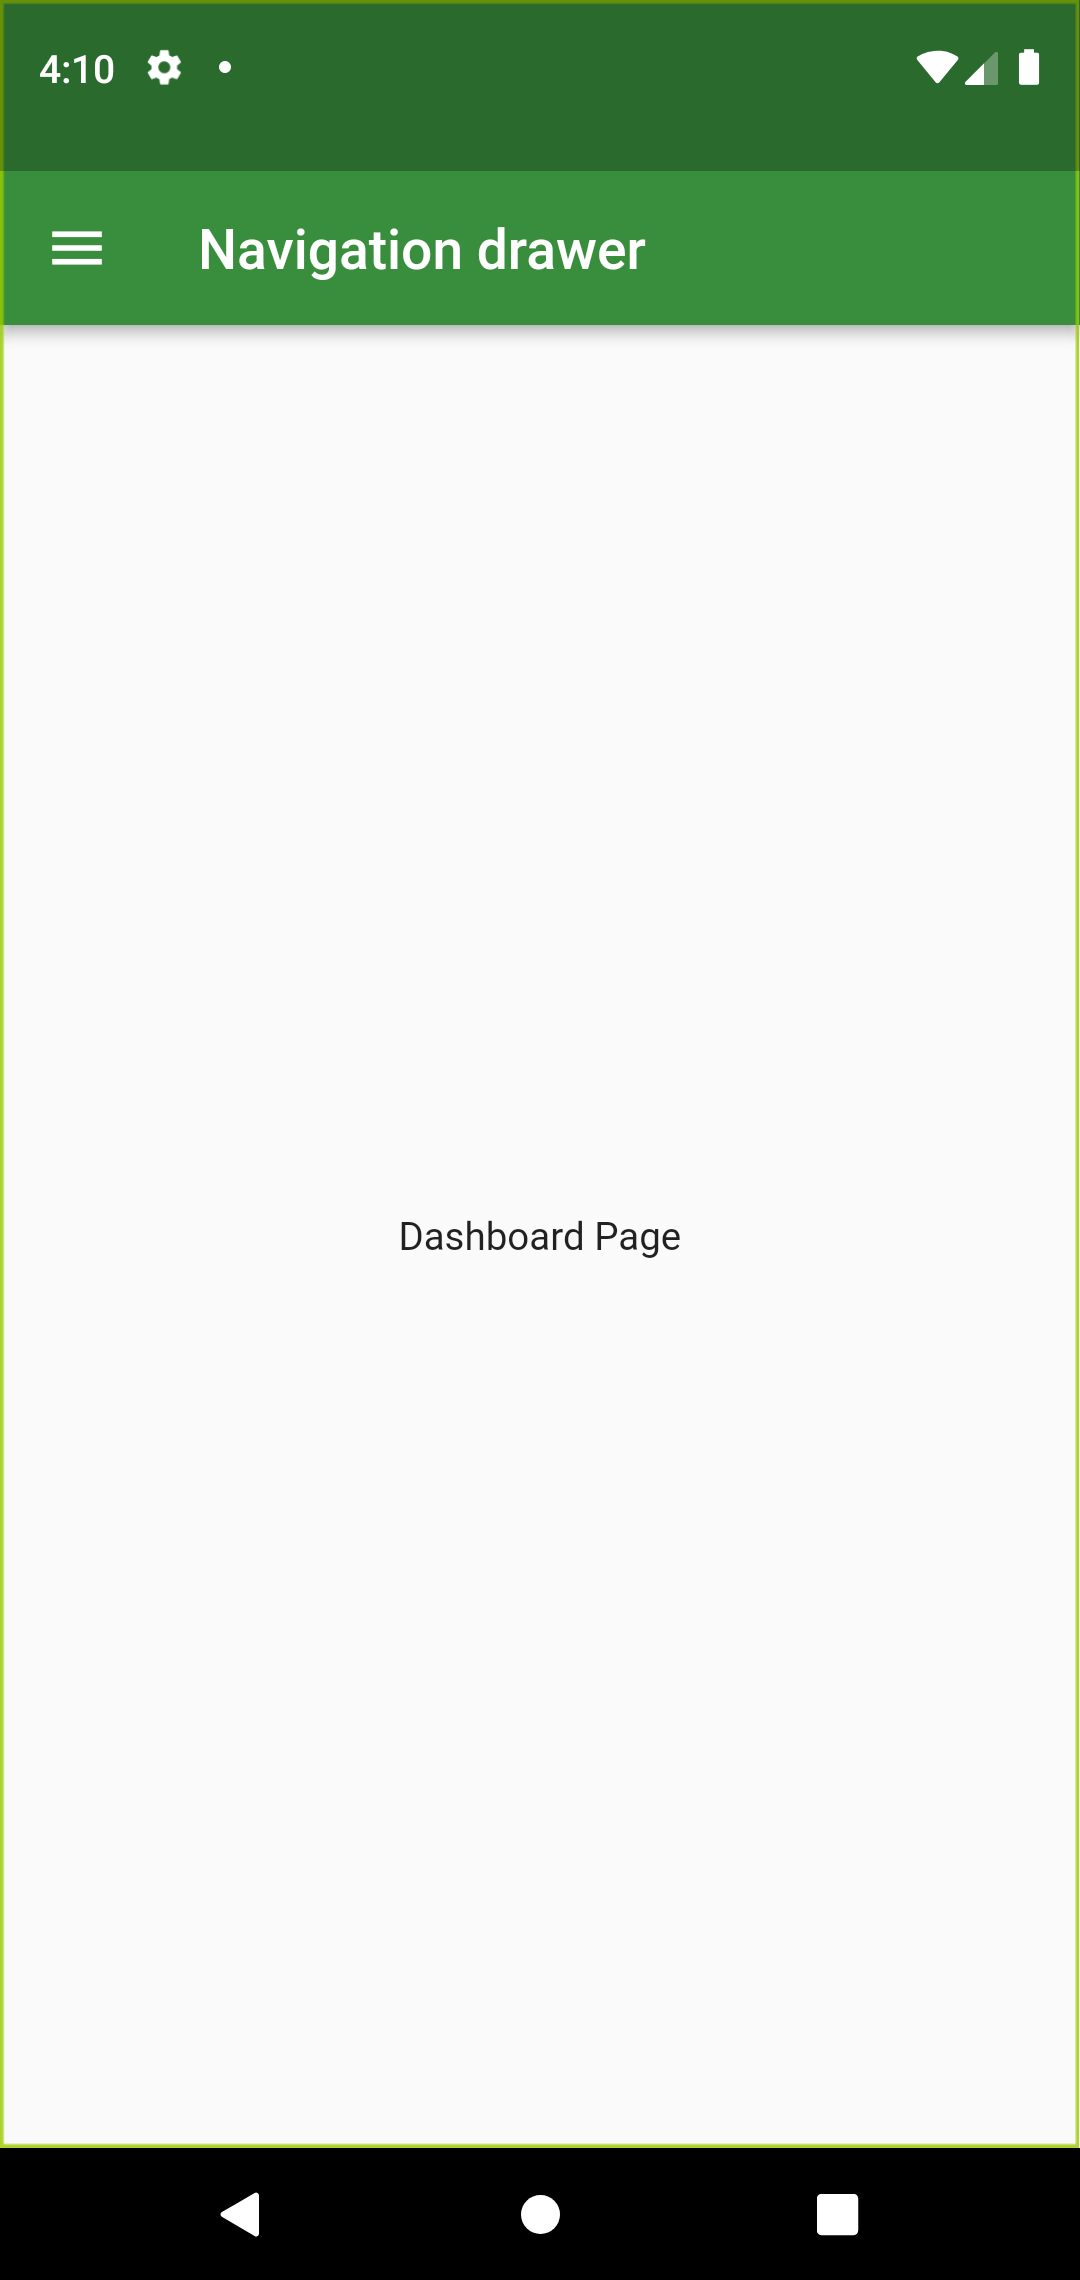
This week I would like to share about navigation drawer from Drawer widget. We can create navigation drawer by calling the constructor of the drawer class. Drawer widgets show us navigation drawer that slides to horizontally from edge fo the screen.
When we tap app bar, it will display the drawer. In this article we will create DrawerSection and eight navigation links. The links Dashboard, Contacts, Events, Notes, Settings, Notifications, Privacy policy and Send feedback are created using Column widget. Let’s design the drawer part first. I am creating drawer widget named MyDrawerList. And I am creating other drawer in a separate file so that we can reuse it in other pages.
Basic implementation of navigation drawer:
MyDrawerList(
        child:Column(

         children: [
             menuItem(1, "Dashboard", Icons.dashboard_outlined,
              currentPage == DrawerSections.dashboard ? true : false),

              menuItem(2, "Contacts", Icons.people_alt_outlined,
              currentPage == DrawerSections.contacts ? true : false),
etc..

          ],
        ) ,
   ),
At first dashboard page is wanted to see, we can assign currentPage to DrawerSection.dashboard.
var currentPage = DrawerSections.dashboard;To display a navigation drawer we have to provide Drawer widget to scaffold’s drawer property.
Scaffold(
      appBar: AppBar(
        backgroundColor: Colors.green[700],
        title: const Text("Navigation drawer"),
      ),
      body: container,
      drawer: Drawer(
        child: SingleChildScrollView(
          child: Column(
            children: [
              const MyHeaderDrawer(),
              MyDrawerList(),
            ],
          ),
        ),
      ),
    );
If you want to navigate to another route first we have to dismiss the drawer by using below line of code
Navigator.pop(context);Now we have to navigate to another route using menuItem like below, in above we assign current page to dashboard page and menuItem widget is called in MyDrawerList widget.
Widget menuItem(int id, String title, IconData icon, bool selected) {
    return Material(
      color: selected ? Colors.grey[300] : Colors.transparent,
      child: InkWell(
        onTap: () {
          Navigator.pop(context);
          setState(() {
            if (id == 1) {
              currentPage = DrawerSections.dashboard;
            }
        }
etc..
}
Hope you enjoyed this post.
By Ami
asahi at 2021年10月08日 10:00:00
 大人が楽しめるヒーリング絵本河童のカパと静かな森
 パワースポット 日本三大神滝布引の滝
 佐藤・広幸ドイツ魂
 Himeji Castle姫路城
 ボイドタイムお知らせアプリVoid Time 〜月を無視できない〜
 撮った写真をカレンダーに撮りカレ