アプリ関連ニュース
- 2021年11月29日
- 技術情報
Deleting .env file back from Git
Sometimes , we accidentally pushed a file with some username , password or secret tokens etc. It has a variety security concerns for your project and this should be removed back from Git.
Git ignore
First thing you need to do is to add the file you don’t want to push to git at .gitignore file. Add it in .gitignore , commit and push it.
# Secret file
.env
But this will not change any effects to .env as the file is already pushed before and .gitignore doesn’t untracked the already committed changes
Deleting the file
So we have to remove the specific file , .env in our case from the git remote repo entirely. We can use the following command.
git rm -r --cached .envIf we push the changes , the .env file will be remove from the remote repository
Git History
However, one more thing is left which is git histories. We can check the .env file contents also in git histories. So we need to remove the specific git history as well to hide the .env contents.
To remove the file altogether, we can use like following.
git filter-branch --index-filter "git rm -rf --cached --ignore-unmatch .env" HEADWhen you push this time, you have to use –force option.
git push --forceIf we look at our history, we can still see the commits that include .env file but the content is empty.
That’s all for now.
Yuuma
yuuma at 2021年11月29日 10:00:00
- 2021年11月26日
- 技術情報
JavaScript HandSonTable Renderer Memo

I would like to share about how to renderer as your desire cells when you use HandSonTable. HandSonTable can’t directly insert html elements into cells. But after declaration renderer:html in our table of cell, we can use html elements as your desire. Second ways is to create custom renderer in cells properties with our own way.
Firstly we will create simple html file. In this file we will import handsontable.min.js and handsontable.min.css. We can get these file script from this site cdnjs.com.
<script src="https://cdn.jsdelivr.net/npm/handsontable@11.0/dist/handsontable.full.min.js"></script>
<link type="text/css" rel="stylesheet" href="https://cdn.jsdelivr.net/npm/handsontable@11.0/dist/handsontable.full.min.css" />
To insert our table, create a div with id attribute and call this id with JS querySelector.
<div id="example1" class="hot "></div>
const container = document.querySelector('#example1');
Usage of HandSonTable
const hot = new Handsontable(container, {
data : data
});
const data = [
{ id: 1, name: 'Suga', isActive: true, date: '2021-11-25' },
{ id: 2, name: 'Jimin', isActive: false, date: null },
{ id: 3, name: 'JHope', isActive: true, date: null },
{ id: 4, name: 'V', isActive: false, date: null },
];If you want to add colsHeader, set to true => colHeaders : true
And if you want to add strict cell type and render columns, we can set inside columns.
  columns: [
    { data: 'id', type: 'text' },
    // 'text' is default, you don't actually need to declare it
    { data: 'name', renderer: yellowRenderer },
    // use default 'text' cell type but overwrite its renderer with yellowRenderer
    { data: 'isActive', type: 'checkbox' },
    { data: 'date', type: 'date', dateFormat: 'YYYY-MM-DD' },
  ],
I will add another custom renderer named with greenRenderer but this greenRenderer will not add all the cell, just add some row. So I will use this greenRenderer inside a cell.
 cells(row, col, prop) {
    if (row === 3 && col === 0) {
      this.renderer = greenRenderer;
    }
  }
yellowRenderer function => this function will add all the cell with background color yellow.
const yellowRenderer = function(instance, td, row, col, prop, value, cellProperties) {
  Handsontable.renderers.TextRenderer.apply(this, arguments);
  td.style.backgroundColor = 'organe';
};
greenRenderer function => this function will add some of cell with background color red.
const greenRenderer = function(instance, td, row, col, prop, value, cellProperties) {
  Handsontable.renderers.TextRenderer.apply(this, arguments);

  td.style.backgroundColor = 'purple';
};
If you want to set custom colWidths , then set colWidths to your desire value.
colWidths : 100Hope you enjoyed about this article!
By Ami
asahi at 2021年11月26日 10:00:00
- 2021年11月25日
- Windows
Windows10でシステム環境変数がグレイアウトしている場合の対処方法
システム開発をおこなう際の環境構築でパスを通す設定が必要になることがありますが、
Windows10のシステム環境変数の設定が下図のように「新規」「編集」「削除」の各ボタンが
グレイアウトしていて設定できない場合があります。
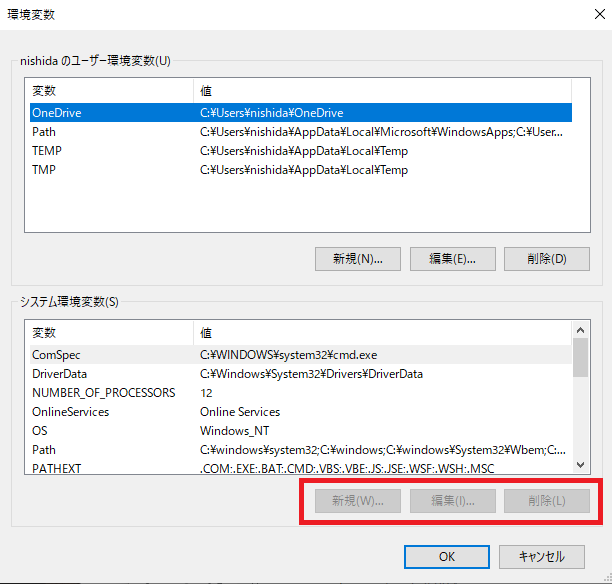
今回はこのような場合の対処法をシェアしたいと思います。
システム環境変数を有効化する方法
Windows10でシステム環境変数がグレイアウトしている場合、
以下の手順で操作をおこなうことで有効化することができます。
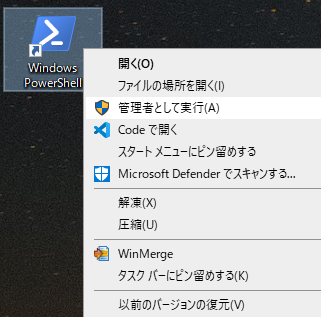
WindowsPowerShellを右クリックしてサブメニューから「管理者として実行」を選択します。
WindowsPowerShellのコマンドプロンプトが開きますので、以下のコマンドを入力します。
Start C:\Windows\system32\rundll32.exe sysdm.cpl, EditEnvironmentVariables
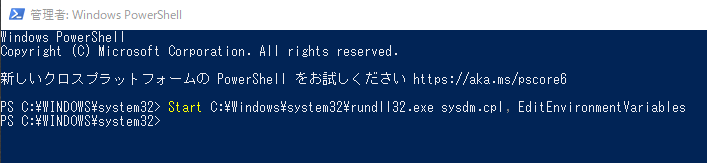
上記のコマンドを実行することにより、システム環境変数の「新規」「編集」「削除」の各ボタンが
有効化されます。

木曜日担当:nishida
nishida at 2021年11月25日 10:00:00
- 2021年11月25日
- Web Service
Cleaning Up Laravel Controllers
Introduction
Controllers play a huge role in any MVC (model view controller) based project. They’re effectively the “glue” that takes a user’s request, performs some type of logic, and then returns a response.
The Problem with Bloated Controllers
Bloated controllers can cause several problems for developers. They can:
1. Make it hard to track down a particular piece of code or functionality.
2. Make it difficult to spot the exact location of a bug.
3. Make it harder to write tests for more complex requests.
The Bloated Controller
For this blog, I am going to use an example UserController:
class UserController extends Controller
{
    public function store(Request $request): RedirectResponse
    {
        $this->authorize('create', User::class);        $request->validate([
            'name'     => 'string|required|max:50',
            'email'    => 'email|required|unique:users',
            'password' => 'string|required|confirmed',
        ]);        $user = User::create([
            'name'     => $request->name,
            'email'    => $request->email,
            'password' => $request->password,
        ]);        $user->generateAvatar();
        $this->dispatch(RegisterUserToNewsletter::class);        return redirect(route('users.index'));
    }    public function unsubscribe(User $user): RedirectResponse
    {
        $user->unsubscribeFromNewsletter();        return redirect(route('users.index'));
    }
}

1. Lift Validation and Authorization into Form Requests


One of the first things that we can do with the controller is to lift any validation and authorization out of the controller and into a form request class.

We’ll use the following Artisan command to create a new form request:

php artisan make:request StoreUserRequest

The above command will have created a new app/Http/Requests/StoreUserRequest.php class that looks like this:

class StoreUserRequest extends FormRequest
{
    /**
     * Determine if the user is authorized to make this request.
     *
     * @return bool
     */
    public function authorize()
    {
        return false;
    }
    /**
     * Get the validation rules that apply to the request.
     *
     * @return array
     */
    public function rules()
    {
        return [
            //
        ];
    }
}


We can use the authorize() method to determine if the user should be allowed to carry out the request. The method should return true if they can and false if they cannot. We can also use the rules() method to specify any validation rules that should be run on the request body.

class StoreUserRequest extends FormRequest
{
    /**
     * Determine if the user is authorized to make this request.
     *
     * @return bool
     */
    public function authorize(): bool
    {
        return Gate::allows('create', User::class);
    }
    /**
     * Get the validation rules that apply to the request.
     *
     * @return array
     */
    public function rules(): array
    {
        return [
            'name'     => 'string|required|max:50',
            'email'    => 'email|required|unique:users',
            'password' => 'string|required|confirmed',
        ];
    }
}

Our controller should now also look like this:

class UserController extends Controller
{
    public function store(StoreUserRequest $request): RedirectResponse
    {
        $user = User::create([
            'name'     => $request->name,
            'email'    => $request->email,
            'password' => $request->password,
        ]);
        $user->generateAvatar();
        $this->dispatch(RegisterUserToNewsletter::class);
        return redirect(route('users.index'));
    }
    public function unsubscribe(User $user): RedirectResponse
    {
        $user->unsubscribeFromNewsletter();
        return redirect(route('users.index'));
    }
}

2. Move Common Logic into Actions or Services

Another step that we could take to clean up the store() method could be to move out our "business logic" into a separate action or service class.

class StoreUserAction
{
    public function execute(Request $request): void
    {
        $user = User::create([
            'name'     => $request->name,
            'email'    => $request->email,
            'password' => $request->password,
        ]);
        $user->generateAvatar();
        $this->dispatch(RegisterUserToNewsletter::class);
    }
}

Now we can update our controller to use the action:

class UserController extends Controller
{
    public function store(StoreUserRequest $request, StoreUserAction $storeUserAction): RedirectResponse
    {
        $storeUserAction->execute($request);
        return redirect(route('users.index'));
    }
    public function unsubscribe(User $user): RedirectResponse
    {
        $user->unsubscribeFromNewsletter();
        return redirect(route('users.index'));
    }
}

3. Use Resource or Single-use Controllers

A great way of keeping controllers clean is to ensure that they are either “ resource controllers” or “ single-use controllers”.

A resource controller is a controller that provides functionality based around a particular resource. So, in our case, our resource is the User model and we want to be able to perform all CRUD (create, update, update, delete) operations on this model. A resource controller typically contains index(), create(), store(), show(), edit(), update() and destroy() methods.

A single-use controller is a controller that only has one public __invoke() method. These are really useful if you have a controller that doesn't really fit into one of the RESTful methods that we have in our resource controllers.

So let’s create a new controller using the following Artisan command:


php artisan make:controller UnsubscribeUserController -i

Notice how we passed -i to the command so that the new controller will be an invokable, single-use controller. We should now have a controller that looks like this:

class UnsubscribeUserController extends Controller
{
    public function __invoke(Request $request)
    {
        //
    }
}

We can now move our method’s code over and delete the unsubscribe method from our old controller:

class UnsubscribeUserController extends Controller
{
    public function __invoke(Request $request): RedirectResponse
    {
        $user->unsubscribeFromNewsletter();
        return redirect(route('users.index'));
    }
}


Conclusion

Hopefully this article has given you an insight into the different types of things you can do to clean up your controllers in your Laravel projects.


Tsuki
tsuki at 2021年11月25日 10:00:00
- 2021年11月24日
- 技術情報
Django & Laravel
Today I would like to share about advantages and disadvantages between Django and Laravel framework. First of all, as we know, each framework has each property and market. So this article just describes about the pros and cons.
What is Django?
Django is a web framework operating with Python programming language. Django is more suitable for implementing such technologies as AI(Artificial Intelligence) and ML(Machine Learning). Django follows the MVT(model view template) architectural pattern. It is adaptable to almost any project in various industries and includes various ready-made feature packages.
What is Laravel?
Laravel is a web framework that runs on PHP and maintains the MVC (model view controller) architectural pattern. It involves lots of additional libraries that make the development process more simple and supports the object-oriented approach. Laravel is supported by comprehensive documentation and detailed tutorials.
Advantages of Django
- is easily adjustable to any project;
- scalability;
- SEO tools included;
- quick prototype creating;
- generous dev community support and extensive documentation;
- easy data management
Disadvantages of Django
- Knowledge of full system is required to work
- creating API by yourself
- not very suitable for small projects
- Uses routing pattern specify its URL
Advantages of Laravel
- fast development
- clean and user-friendly architecture
- growing developer community
- a built-in command-line Artisan
- large cloud storage for files
- an easy way to build API
- ability to operate on numerous file systems simultaneously
Disadvantages of Laravel
- the syntax is difficult for beginners
- having to deal with standards
- no shared hosting support included
- unnecessary queries on databases
That is all for now. Hope you enjoy it.
By Asahi
waithaw at 2021年11月24日 10:00:00
 大人が楽しめるヒーリング絵本河童のカパと静かな森
 パワースポット 日本三大神滝布引の滝
 佐藤・広幸ドイツ魂
 Himeji Castle姫路城
 ボイドタイムお知らせアプリVoid Time 〜月を無視できない〜
 撮った写真をカレンダーに撮りカレ