アプリ関連ニュース
- 2022年1月28日
- 技術情報
Laravel 9に搭載される機能の紹介
Laravel v9はLaravelの次のLTSバージョンで、2022年2月頃に登場する予定です。この記事では、これまでに発表された新機能や変更点を概説したいと思います。
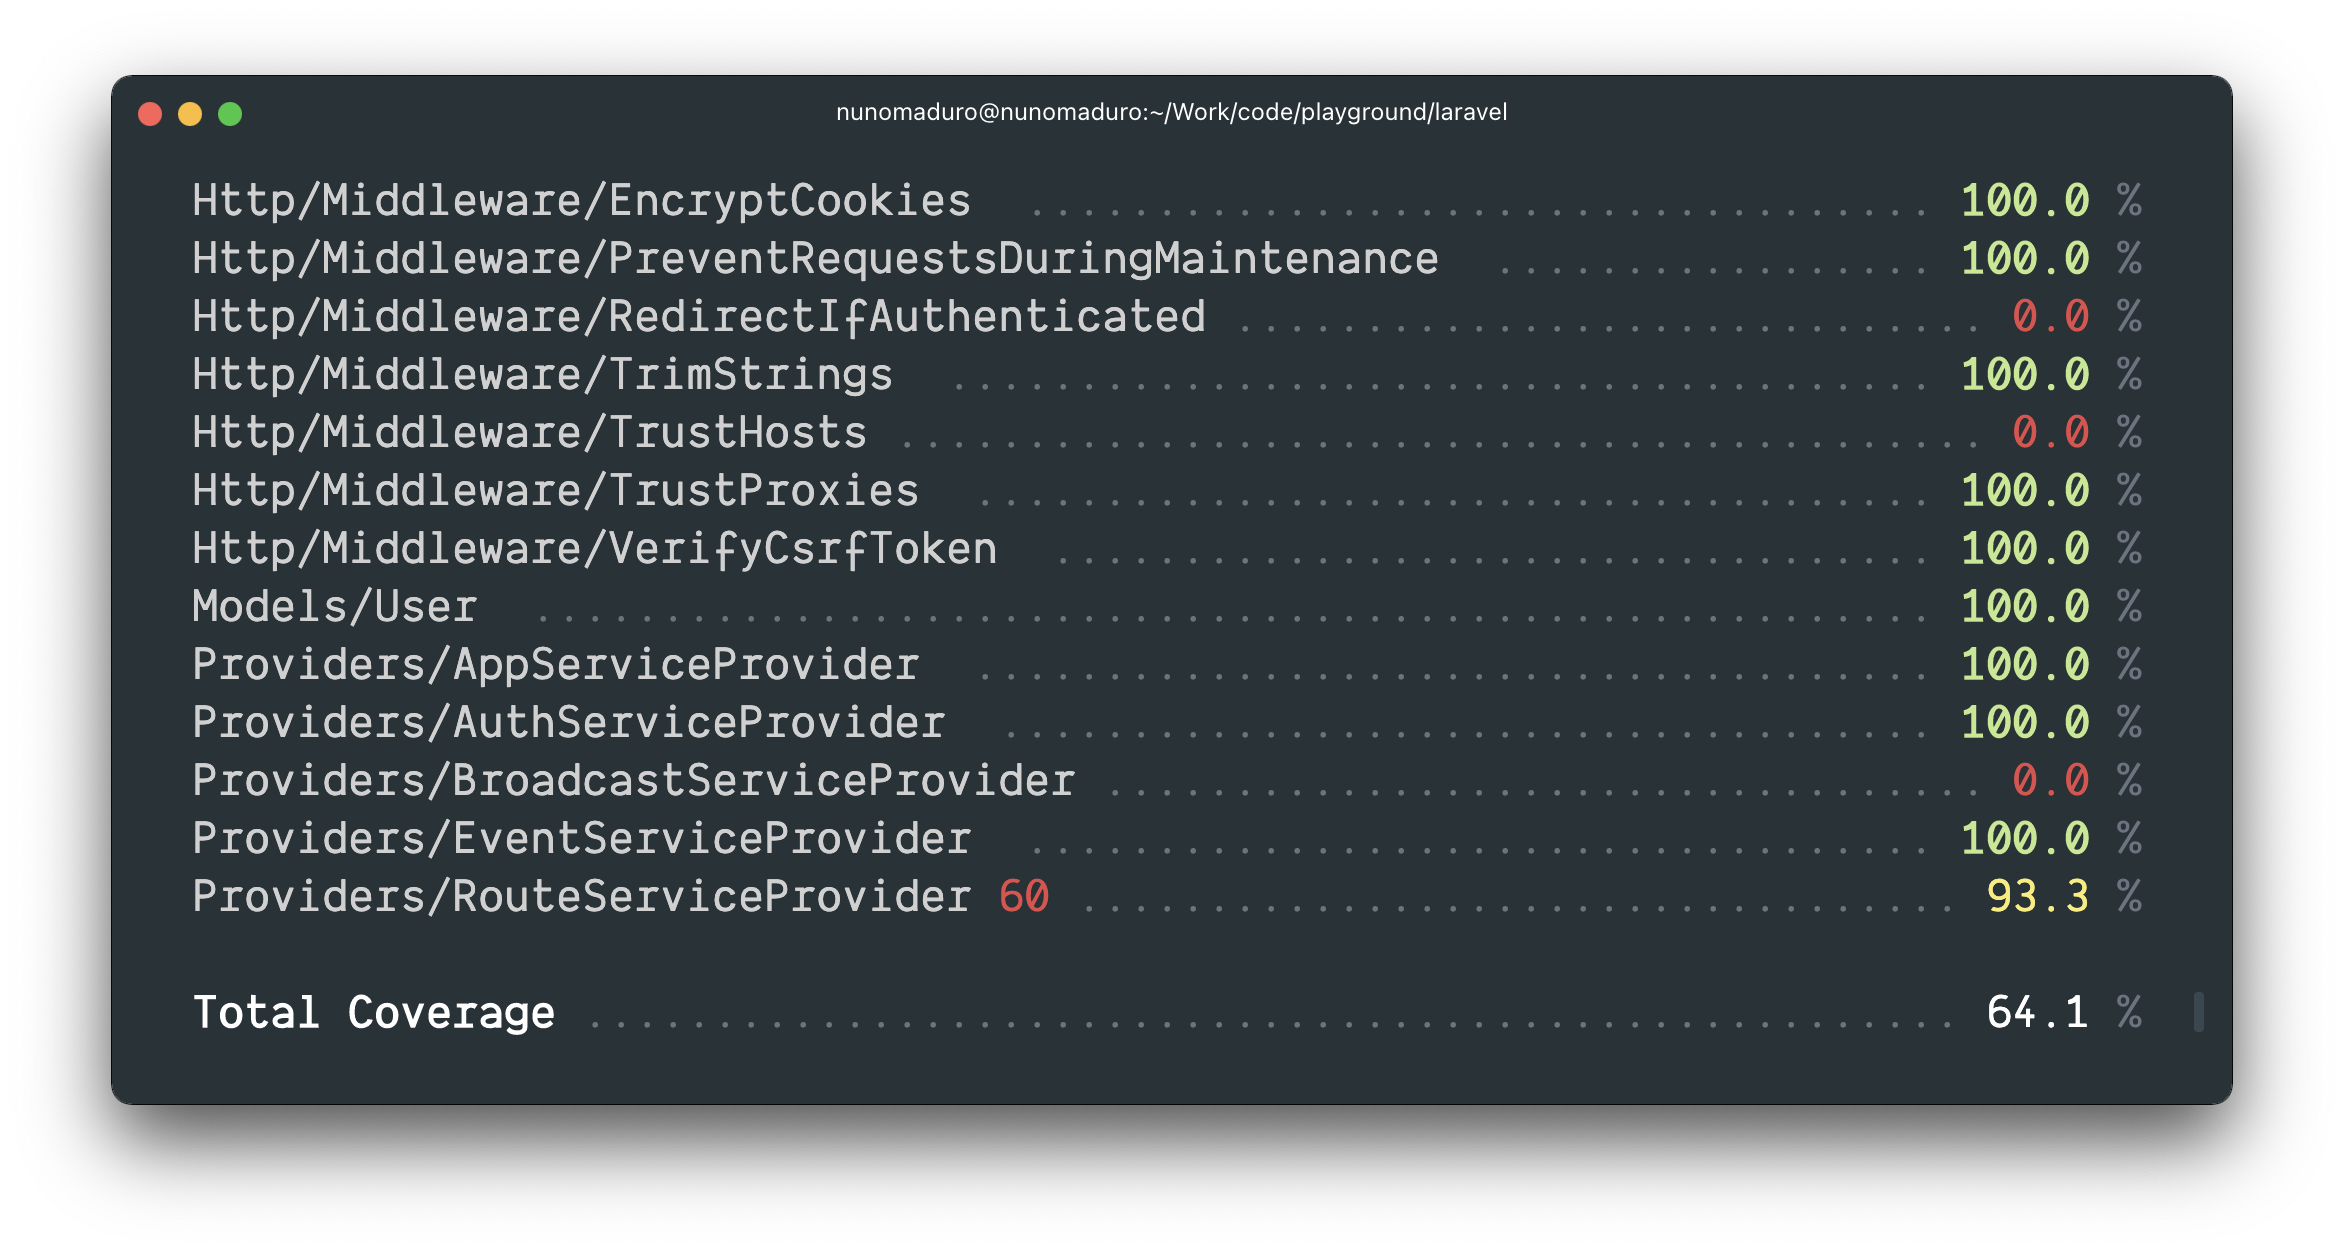
テストカバレッジオプションを追加
新しいartisan test –coverage オプションは、テストカバレッジをターミナルに直接表示します。また、–min オプションを使用すると、テストカバレッジの最小閾値を指定することができます。
Enumを使った暗黙のルートバインディング
PHP 8.1ではEnumのサポートが導入されました。Laravel 9では、ルート定義にEnumをタイプヒントする機能が導入され、LaravelはそのルートセグメントがURIの有効なEnum値である場合にのみルートを呼び出します。そうでない場合は、HTTP 404レスポンスが自動的に返されます。例えば、次のようなEnumがあるとします。
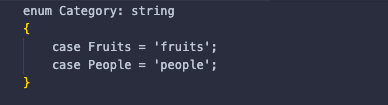
ルートセグメント {category} が fruits または people のときだけ呼び出されるルートを定義することができます。そうでない場合は、HTTP 404 レスポンスが返されます。

全文インデックス/Where句
fullText メソッドをカラム定義に追加して、フルテキストインデックスを生成することができるようになりました。
$table->text('bio')->fullText();whereFullTextまたはWhereFullTextメソッドを使用すると、フルテキストを取得することができます。
$users = DB::table('users')
           ->whereFullText('bio', 'web developer')
           ->get();
* laravelのリリースから引用しています。
また、公式リリースページもご覧いただけます。
今週はここで終了となります。
最後までご高覧頂きまして有難うございました。
By Ami
asahi at 2022年01月28日 10:00:00
- 2022年1月27日
- Web Service
CSS tricks for web designer
— Absolute positioning
If you want to define where an element is placed on the website at all times, absolute positioning is the key to make this happen. Absolute positioning allows you to control exactly where an element will stay. And then use top, right, bottom and left, accompanied by a pixel value to control the place.
position:absolute;
bottom:10px;
right:10px
The CSS above sets the position of an element to stay 10px from the bottom and right edges of the browser.
— Use a CSS preprocessor
Use Less or Sass or SCSS when you develop the website. They can help you declare colors, sizes, etc one single time, and create CSS with for cycles and similar things.
— Link states
The :link pseudo-class controls all links that haven’t been clicked on yet. The :visited pseudo class handles the styling of all of the links you’ve already visited. This tells website visitors where they have already been on the site, and where they have yet to explore.
a:link { color: blue; }
a:visited { color: purple; }
— Resize images to fit
Sometimes images are needed to fit a certain width, while scaling proportionally. An easy way to do this is to use max width to handle this.
Here is an example:
img {
    max-width:100%;
    height:auto;
}
— Split HTML and CSS
It is the best idea of creating different CSS files (for example, one for desktop and one for mobile) while developing, and only, in the end, merge them.
The same principle can be made with HTML. If you’re not developing in SPA environments, you can use PHP to include and require pieces of HTML code.
— Direct children
Use > to select the direct children of an element.
#footer > aThis will select and style all of the active link elements that are immediately under the Footer ID.
— :before
This CSS is a selector that allows you to choose a CSS element and insert content before every element with a specific class applied to it.
h3:before {
    content: "More: ";
<span class="new-blog"> color: #F00;</span>
}
— :after
Like the :before selector, :after can be used to insert content globally on specific elements. A practical use would be adding “see more” after every excerpt on an article . You can do like this:
p:after{
    content: " -Read more… ";
    color:#f00;
}
By Tsuki
tsuki at 2022年01月27日 10:00:00
- 2022年1月25日
- 技術情報
Useful Laravel Packages
Today I would like to share about useful laravel packages. The following packages are most useful 7 packages of the best laravel packages. Let’s take a look.
Laravel Debugbar
Laravel Debugbar is a package that help users add a developer toolbar to their applications. This package is mainly used for debugging purposes. There are a lot of options available in Debugbar. It allows you to monitor and debug all the requests directly on the Laravel view. You can also monitor SQL queries, Mail, and queue.
https://github.com/barryvdh/laravel-debugbar
Laravel User Verification
This package allows you to handle user verification and validates emails. It generates and stores a verification token for the registered user, sends or queue an email with the verification token link, handles the token verification, sets the user as verified. This package also provides functionality, i.e verified route middleware.
https://github.com/jrean/laravel-user-verification
Socialite
Socialite offers a simple and easy way to handle OAuth authentication. It allows the users to login via some of the most popular social networks and services including Facebook, Twitter, Google, GitHub, and BitBucket.
https://github.com/laravel/socialite
Laravel Mix
Laravel Mix provides a clean and rich Application Programming Interface (API) for defining webpack-build steps for your project. It is the most powerful asset compilation tool available for Laravel today.
https://www.npmjs.com/package/laravel-mix
Migration Generator
Migration generator is a Laravel package that you can use to generate migrations from an existing database, including indexes and foreign keys.
https://github.com/Xethron/migrations-generator
Laravel Backup
This Laravel package creates a backup of all your files within an application. It creates a zip file that contains all files in the directories you specify along with a dump of your database. You can store a backup on any file system.
https://github.com/spatie/laravel-backup
No Captcha
No Captcha is a package for implementing Google reCaptcha validation and protecting forms from spamming. First, you need to obtain a free API key from reCaptcha.
https://github.com/anhskohbo/no-captcha
This is all for now.
Hope you enjoy that.
By Asahi
waithaw at 2022年01月25日 10:00:00
- 2022年1月24日
- 技術情報
Laravel 9
It’s not officially release yet. It was originally scheduled to be released around September this year, but the Laravel team decided to release back to January 2022. Lets see what kinds of features might include in Laravel 9.
PHP Version
Laravel 9 requires Symfony 6.0 and has a minimum requirement of PHP 8,so I think the same rules will apply to Laravel 9.
Anonymous stub migrations
Laravel 8.37 announced a new feature called Anonymous Migration that avoids migration class name collisions.
use Illuminate\Database\Migrations\Migration;
use Illuminate\Database\Schema\Blueprint;
use Illuminate\Support\Facades\Schema;

return anoyclass extends Migration {

    /**
     * Run the migrations.
     *
     * @return void
     */
    public function up()
    {
        Schema::table('table', function (Blueprint $table) {
            $table->string('column');
        });
    }
};
A tidy design for routes:list
The route: list command has been in Laravel for a long time, and the problem I sometimes encounter is that if you have defined large and complex routes, trying to view them in the console can be complicated.

New Query Builder Interface
Laravel 9 has a new QueryBuilder interface developed by Chris Morrell and you can see here for all the details.
For developers who rely on type hints for static analysis, refactoring, or code completion in their IDE, the lack of a shared interface or inheritance between
Query\Builder,Eloquent\BuilderandEloquent\Relationcan be pretty tricky:
return Model::query()
  ->whereNotExists(function($query) {
    // $query is a Query\Builder
  })
  ->whereHas('relation', function($query) {
    // $query is an Eloquent\Builder
  })
  ->with('relation', function($query) {
    // $query is an Eloquent\Relation
  });
SwiftMailer to Symfony Mailer
Swift Mailer has been deprecated in Symfony and Laravel 9 will switch to using Symfony Mailer for all mail transport.
PHP String functions
Although PHP 8 will be the minimum, you can still use PHP string functions, str_contains(), str_starts_with() and str_ends_with() internally in the \Illuminate\Support\Str class. You can check here for more detail.
There might be still many featuers going on and I guess laravel 9 is coming soon. When it releases, I might probably write another article relating with this.
Yuuma
yuuma at 2022年01月24日 10:00:00
- 2022年1月21日
- 技術情報
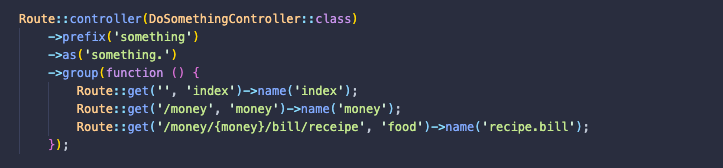
Laravel 8.80でRoute Group Controllerを定義する
Laravelチームは、バージョン8.80をリリースしました。このバージョンでは、ルートグループコントローラーの定義、Bladeコンパイラーによる文字列のレンダリング、PHPRedisのシリアライズと圧縮設定のサポート、v8.xブランチの最新の変更点などを確認することができます。
ルートグループコントローラーを定義する
これは、ルートグループにコントローラを定義する機能で、グループが同じコントローラを使用する場合、ルートが使用するコントローラを繰り返す必要がないと言う意味です。
例:
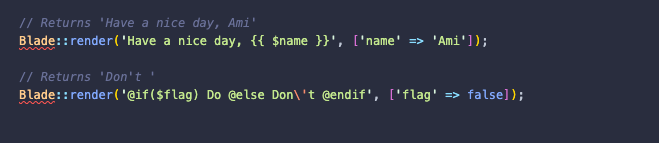
ブレードで文字列をレンダリング
Blade::render()は 、Blade コンパイラを使用して、Blade テンプレートの文字列をレンダリング文字列に変換します。
phpredis Serialization と Compression コンフィグサポート
このオプションは、Redis – Laravelのドキュメントに記載されるようになりました。
これは、PHPRedis のシリアライズや圧縮のオプションを設定する機能で、 サービスプロバイダを上書きしたりカスタムドライバを定義したりする必要がありません。
シリアライズオプションは以下の通りです。
- NONE
- PHP
- JSON
- IGBINARY
- MSGPACK
そして、以下のコンプレッサーのオプションです。
- NONE
- LZF
- ZSTD
- LZ4
8.xのリリースノート
新機能やアップデート、8.79.0と8.80.0の差分はGitHubで確認できます。また、以下のリリースノートはチェンジログから直接引用しています。
ということで今回は以上になります。
最後までご高覧頂きまして有難うございました。
By Ami
asahi at 2022年01月21日 10:00:00
 大人が楽しめるヒーリング絵本河童のカパと静かな森
 パワースポット 日本三大神滝布引の滝
 佐藤・広幸ドイツ魂
 Himeji Castle姫路城
 ボイドタイムお知らせアプリVoid Time 〜月を無視できない〜
 撮った写真をカレンダーに撮りカレ