アプリ関連ニュース
- 2022年3月11日
- 技術情報
Laravel 8のメール送信の例と、alwaysTo()を使って誤送信を防ぐ方法
今回は、Laravel 8のメール送信の例と、alwaysTo()を使って誤送信を防ぐ方法を紹介します。
Laravel 8には、メール送信のためのmailクラスがあり、メール送信のためのドライバーを複数用意し、お好みで使用することができます。smtp、Mailgun、Postmark、Amazon SES、sendmailが使用できます。どのドライバを使用するかは、envファイルで設定する必要があります。
今回はsmtpドライバを使用します。
.envでSMTPを設定する
MAIL_MAILER=smtp
MAIL_HOST=smtp.gmail.com
MAIL_PORT=587
MAIL_USERNAME=Add your user name here
MAIL_PASSWORD=Add your password here
MAIL_ENCRYPTION=tls
MAIL_FROM_ADDRESS=Add your user name here
※メールを使い場合、googleアカウントのless secure app accessでturnをオンにする必要があります。
利用可能なメールクラスの作成
以下のコマンドを使用して、MyTestMailという名でメイラブルクラスを作成します。
php artisan make:mail MyTestMailMyTestMailで以下のように変更する必要があり
    public $details;
    public function __construct($details)
    {
        $this->details = $details;
    }

    public function build()
    {
        return $this->subject('Mail from AMI')
                    ->view('emails.myTestMail');
    }
ブレードビューの作成
ブレードビューファイルを作成し、送信するメールを記述します。「emails」フォルダに以下のようなファイルを作成します。
<!DOCTYPE html>
<html>
<head>
    <title>メール送信テスト</title>
</head>
<body>
    <h1>{{ $details['title'] }}</h1>
    <p>{{ $details['body'] }}</p>

    <p>Thank you</p>
</body>
</html>
最後に、テストメールを送信するための “MyTestMail “を作成します。
Route::get('send-mail', function () {

    $details = [
        'title' => 'Mail from AMI',
        'body' => 'This is for testing email using smtp'
    ];

    \Mail::to('name@gmail.com')->send(new \App\Mail\MyTestMail($details));

    dd("Email is Sent.");
});
プロジェクトを実行すると結果は
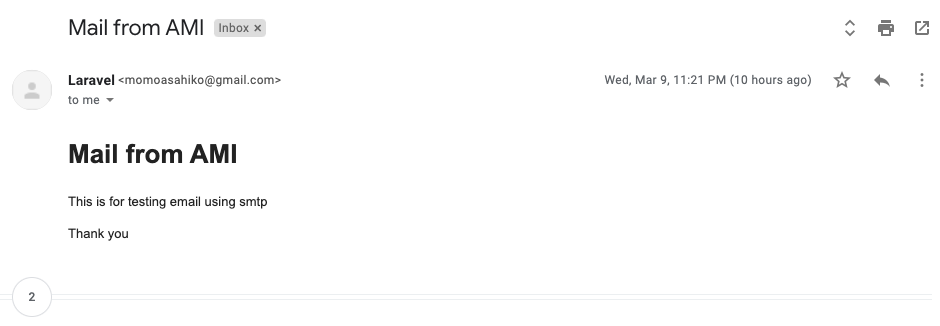
ステージング環境から実際のお客様に誤って何千通ものメールを送信してしまうこともあります。その時、どうのように設定するのかを共有します。
class AppServiceProvider extends ServiceProvider
{
    // Stuff omitted

    public function boot()
    {
        f (! app()->environment('production')) {
            Mail::alwaysTo('ex@example.org');
        }
    }
}
alwaysToで何が起きているのか?
alwaysTo() メソッドは、メールメッセージ内の to, cc, bcc に追加されたすべてのアドレスを上書きします。
そこで、上記のコードでは、Laravelに、本番環境でない場合のみ、ex@example.org にメールを送信するように指示しています。
ということで今回はこれで終わりです。
By Ami

asahi at 2022年03月11日 10:00:00
- 2022年3月10日
- Web Service
Laravel + Vue JS CRUD Single Page Applicationの作成
今回は、LaravelとVue JSを使ったSingle Page Applicationの作成方法についてご案内します。
ここでは、セットアップに必要な手順を説明します。
このコマンドでLaravelのプロジェクトを新規に作成する必要があります。
composer create-project laravel/laravel --prefer-dist laravel-vue次に、プロジェクトの.env configファイルにデータベース名、ユーザー名、パスワードを追加して、データベース接続を行う必要があります。
DB_CONNECTION=mysql
DB_HOST=127.0.0.1
DB_PORT=3306
DB_DATABASE=laravel_vue
DB_USERNAME=root
DB_PASSWORD=
LaravelでArticleモデルを作成するには、以下のコマンドを実行してください。
php artisan make:model Article -mdatabase/migrations/create_articles_table.php に以下のコードを追加してください。
<?php
use Illuminate\Database\Migrations\Migration;
use Illuminate\Database\Schema\Blueprint;
use Illuminate\Support\Facades\Schema;
class CreateArticlesTable extends Migration
{
    /**
     * Run the migrations.
     *
     * @return void
     */
    public function up()
    {
        Schema::create('artcles', function (Blueprint $table) {
            $table->id();
            $table->string('title');
            $table->text('descriptions');
            $table->timestamps();
        });
    }
    /**
     * Reverse the migrations.
     *
     * @return void
     */
    public function down()
    {
        Schema::dropIfExists('articles');
    }
}
マイグレーションを呼び出すには、以下のコマンドを実行してください。
php artisan migrate記事コントローラを作成
記事コントローラを作成し、CRUD操作のメソッドを定義する必要があります
php artisan make:controller ArticleControllerArticle Controllerを以下のコードで更新します。
<?php
namespace App\Http\Controllers;
use Illuminate\Http\Request;
use App\Models\Article;
class ArticleController extends Controller
{
    public function index()
    {
        $articles = Article::all()->toArray();
        return array_reverse($articles);
    }
    public function store(Request $request)
    {
        $article = new Article();
        $article->title = $request->input('title');
        $article->description = $request->input('description');
        $article->save();

        return response()->json('New Article is successfully created!');
    }
    public function show($id)
    {
        $article = Article::find($id);
        return response()->json($article);
    }
    public function update($id, Request $request)
    {
        $article = Article::find($id);
        $article->title= $request->title;
        $article->description = $request->description;
        $article->save();

        return response()->json('Article is successfully updated!');
    }
    public function destroy($id)
    {
        $article = Article::find($id);
        $article->delete();
        return response()->json('Article is successfully deleted!');
    }
}
routesのweb.phpとapi.phpを更新してください。
routes/web.php
<?php
use Illuminate\Support\Facades\Route;
/*
|--------------------------------------------------------------------------
| Web Routes
|--------------------------------------------------------------------------
|
*/

Route::get('{any}', function () {
    return view('app');
})->where('any', '.*');
routes/api.php
<?php
use Illuminate\Http\Request;
use Illuminate\Support\Facades\Route;
use App\Http\Controllers\ArticleController;
/*
|--------------------------------------------------------------------------
| API Routes
|--------------------------------------------------------------------------
*/
Route::middleware('api')->group(function () {
    Route::resource('articles', ArticleController::class);
});
laravel/ui composer パッケージをインストールします。
composer require laravel/ui次に、Vueの足場を設定します。
laravel/uiパッケージには、Vueを使い始めるために必要なすべてのものを自動的に足場にしてくれる便利なArtisanコマンドがいくつか用意されています。
php artisan ui vueファイルをコンパイルする
最後に、新しく追加された依存関係をインストールして、コンパイルする必要があります。
npm install && npm run devコマンドを使用して、vue router および vue axios パッケージをインストールします。
npm install vue-router vue-axios次に、npm パッケージをインストールし、アセットをコンパイルするために、次のコマンドを実行します。
npm install
npm run watch
LaravelでVueを開始する
layoutフォルダを作成し、このフォルダ内にapp.blade.phpを作成してアプリケーションを設定する必要があります。
resources/views/layout/app.blade.php
<!doctype html>
<html lang="{{ str_replace('_', '-', app()->getLocale()) }}">
<head>
    <meta charset="utf-8">
    <meta name="viewport" content="width=device-width, initial-scale=1">
    <meta name="csrf-token" value="{{ csrf_token() }}" />
    <title>Vue JS CRUD Operations in Laravel</title>
    <link href="{{ mix('css/app.css') }}" type="text/css" rel="stylesheet" />
</head>
<body>
    <div id="app"></div>
    <script src="{{ mix('js/app.js') }}" type="text/javascript"></script>
</body>
</html>
App.vue ファイルに router-view 命令を追加する必要があります。そこで、resources/js フォルダに App.js ファイルを作成します。
resources/js/App.js
<template>
    <div class="container">
        <nav class="navbar navbar-expand-lg navbar-light bg-light">
            <div class="collapse navbar-collapse">
                <div class="navbar-nav">
                    <router-link to="/" class="nav-item nav-link">Articles List</router-link>
                    <router-link to="/create" class="nav-item nav-link">Create Article</router-link>
                </div>
            </div>
        </nav>
        <router-view> </router-view>
    </div>
</template>

<script>
    export default {}
</script>
そして、resources/js/componentsフォルダの中に必要なvue jsコンポーネントファイルを作成します。
resources/js/components/AllArticle.vue
<template>
    <div>
        <h2 class="text-center">Article List</h2>

        <table class="table">
            <thead>
            <tr>
                <th>ID</th>
                <th>Title</th>
                <th>Desciption</th>
                <!-- <th>Actions</th> -->
            </tr>
            </thead>
            <tbody>
            <tr v-for="article in articles" :key="a.article">
                <td>{{ article.id }}</td>
                <td>{{ article.title }}</td>
                <td>{{ article.description}}</td>
                <td>
                    <div class="btn-group" role="group">
                        <router-link :to="{name: 'edit', params: { id: article.id }}" class="btn btn-success">Edit</router-link>
                        <button class="btn btn-danger" @click="deleteArticle(article.id)">Delete</button>
                    </div>
                </td>
            </tr>
            </tbody>
        </table>
    </div>
</template>

<script>
    export default {
        data() {
            return {
                articles: []
            }
        },
        created() {
            this.axios
                .get('http://localhost:8000/api/articles/')
                .then(response => {
                    this.articles = response.data;
                });
        },
        methods: {
            deleteArticle(id) {
                this.axios
                    .delete(`http://localhost:8000/api/articles/${id}`)
                    .then(response => {
                        let i = this.articles.map(data => data.id).indexOf(id);
                        this.articles.splice(i, 1)
                    });
            }
        }
    }
</script>
resources/js/components/CreateArticle.vue
<template>
    <div>
        <h3 class="text-center">Create Article</h3>
        <div class="row">
            <div class="col-md-6">
                <form @submit.prevent="addArticle">
                    <div class="form-group">
                        <label>Title</label>
                        <input type="text" class="form-control" v-model="article.title">
                    </div>
                    <div class="form-group">
                        <label>Description</label>
                        <input type="text" class="form-control" v-model="article.description">
                    </div>
                    <button type="submit" class="btn btn-primary">Create</button>
                </form>
            </div>
        </div>
    </div>
</template>

<script>
    export default {
        data() {
            return {
                article: {}
            }
        },
        methods: {
            addArticle() {
                this.axios
                    .post('http://localhost:8000/api/articles', this.article)
                    .then(response => (
                        this.$router.push({ name: 'home' })
                    ))
                    .catch(err => console.log(err))
                    .finally(() => this.loading = false)
            }
        }
    }
</script>
resources/js/components/EditArticle.vue
<template>
    <div>
        <h3 class="text-center">Edit Article</h3>
        <div class="row">
            <div class="col-md-6">
                <form @submit.prevent="updateArticle">
                    <div class="form-group">
                        <label>Title</label>
                        <input type="text" class="form-control" v-model="article.title">
                    </div>
                    <div class="form-group">
                        <label>Detail</label>
                        <input type="text" class="form-control" v-model="article.description">
                    </div>
                    <button type="submit" class="btn btn-primary">Update</button>
                </form>
            </div>
        </div>
    </div>
</template>

<script>
    export default {
        data() {
            return {
                article: {}
            }
        },
        created() {
            this.axios
                .get(`http://localhost:8000/api/articles/${this.$route.params.id}`)
                .then((res) => {
                    this.article = res.data;
                });
        },
        methods: {
            updateArticle() {
                this.axios
                    .patch(`http://localhost:8000/api/articles/${this.$route.params.id}`, this.article)
                    .then((res) => {
                        this.$router.push({ name: 'home' });
                    });
            }
        }
    }
</script>
vueのルートを作成するには、resources/jsディレクトリの中にroutes.jsを作成します。
resources/js/routes.js
import AllArticle from './components/AllArticle.vue';
import CreateArticle from './components/CreateArticle.vue';
import EditArticle from './components/EditArticle.vue';

export const routes = [
    {
        name: 'home',
        path: '/',
        component: AllArticle
    },
    {
        name: 'create',
        path: '/create',
        component: CreateArticle
    },
    {
        name: 'edit',
        path: '/edit/:id',
        component: EditArticle
    }
];
最後にVue App.jsを定義します。
resources/js/app.js
/**
 * First we will load all of this project's JavaScript dependencies which
 * includes Vue and other libraries. It is a great starting point when
 * building robust, powerful web applications using Vue and Laravel.
 */
require('./bootstrap');
window.Vue = require('vue');
import App from './App.vue';
import VueAxios from 'vue-axios';
import VueRouter from 'vue-router';
import axios from 'axios';
import { routes } from './routes';
/**
 * Next, we will create a fresh Vue application instance and attach it to
 * the page. Then, you may begin adding components to this application
 * or customize the JavaScript scaffolding to fit your unique needs.
 */
Vue.use(VueRouter);
Vue.use(VueAxios, axios);

const router = new VueRouter({
    mode: 'history',
    routes: routes
});

const app = new Vue({
    el: '#app',
    router: router,
    render: h => h(App),
});
アプリを起動するには、以下の2つのコマンドを実行します。
npm run watch
php artisan serve
ブラウザで http://127.0.0.1:8000 にアクセスすると、記事の一覧表示、記事の作成、更新ができます。
この記事があなたのお役に立てれば幸いです。
By Tsuki
tsuki at 2022年03月10日 10:00:00
- 2022年3月10日
- Mac
2022-03-08 AppleEvent開催!
nishida at 2022年03月10日 10:00:00
- 2022年3月08日
- 技術情報
Useful Features of Rsync Command in Linux
Today, I would like to share about usefulness of rsync command in Linux and how to back up data with cron job. Let’s take a look.
Rsync (Remote Sync) is the most commonly used command for copying and synchronizing files and directories remotely as well as locally in Linux/Unix systems. Data can be copied, synchronized and backup both remotely and locally across directories, disks & networks.
Advantages of Rsync Command
- It efficiently copies and sync files from source to destination remotely or locally.
- It supports copying links, devices, owners, groups and permissions.
- rsync allows to transfer just the differences between source and destination. The first time, it copies the whole content of a file or a directory from source to destination but from next time, it copies only the changed files/data to the destination.
- Due to using compression and decompression method while transferring data, rsync consumes less bandwidth.
Installing Rsync
rsync is preinstalled on most Linux distributions and mac-OS. If rsync hasn’t been installed on the system, it can be installed easily using your distribution’s package manager as follows.
$ sudo apt-get install rsync [On Debian/Ubuntu & Mint]
$ pacman -S rsync [On Arch Linux]
$ emerge sys-apps/rsync [On Gentoo]
$ sudo dnf install rsync [On Fedora/CentOS/RHEL and Rocky Linux/AlmaLinux]
$ sudo zypper install rsync [On openSUSE]
Rsync Basic Command Syntax
Local to Local
rsync [OPTION] [SRC] [DEST]
Local to Remote
rsync [OPTION] [SRC] [USER@]HOST:DEST
Remote to Local
rsync [OPTION] [USER@]HOST:SRC [DEST]
Common options[OPTION] used with rsync commands
-v : verbose
-r : copies data recursively (but don’t preserve timestamps and permission while transferring data.
-a : archive mode, which allows copying files recursively and it also preserves symbolic links, file permissions, user & group ownerships, and timestamps.
-z : compress file data.
-h : human-readable, output numbers in a human-readable format.
For more options, the following command can be used.
$ rsync -h
For example, to backup data from local to local(external hard drive), the following command is commonly used.
rsync -azv /home/username/projects /media/username/SPHardDrive/BackupFolder
Schedule backups
To enable scheduled backups, cron can be used for the rsync commands.
Conclusion
This is all how to copy, synchronize and backup files & directories. And I recommend the link to learn more about rsync.
Hope you enjoy that.
By Asahi
waithaw at 2022年03月08日 10:00:00
- 2022年3月07日
- Apple
Apple’s March 8 event
The next Apple event is Tuesday, March 8th. This will be a virtual event that can also be viewed from Apple’s website or Apple TV and YouTube. Today I gonna share with you some rumors expectations for this coming event.
New iPhone SE
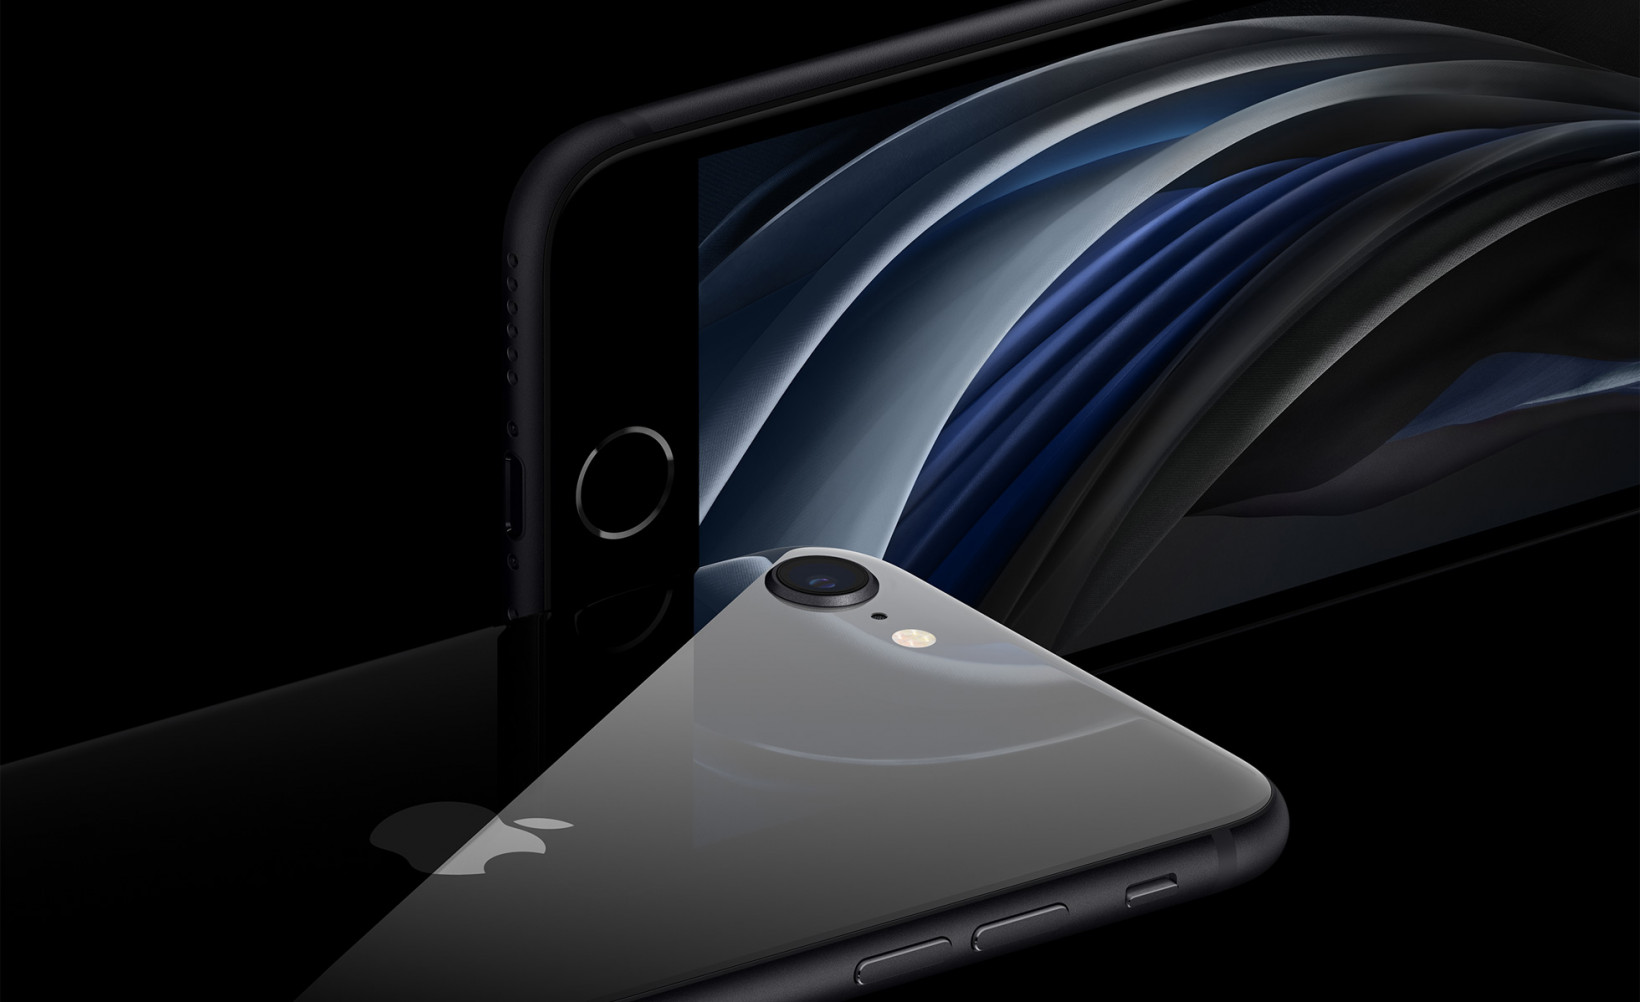
Every few years, Apple releases a low-priced iPhone with the latest components in its old body, and this year is no exception. Apple plans to launch a third iPhone SE for $ 399, with the same iPhone 6-like design as before, but with 5G support, an improved camera, and an A15 Bionic processor.
iPad air 5
New year, new iPad. The iPad will be equipped with an A15 chip, two additional speakers (four in total), and a 5G connection. The camera may also be improved.
Mac mini
Apple plans to announce a number of Macs this year, with at least one likely to be seen at the March 8 event. The catchphrase “Peak Performance”; and the direction is that Apple usually won’t launch high-performance mobile products until the fall.
Rumor has it that the “Mac Mini Pro” with M1 Max and M1 Pro chips is now being pointed out. After all, it doesn’t make sense for Apple laptops to be stronger than desktop products for a long time. This Mac Mini is expected to offer a slimmer and more sophisticated design.
New MacBook with M2
Apple’s M1 chip was announced in 2020. That is, you are trying to get an update. Rumor has it that the new MacBook Pro with an entry-level M2 chip should be better than the previous M1 MacBook Pro, but it doesn’t quite match the M1 Pro or Max.
To keep costs relatively low, the new MacBook Pro doesn’t have a flashy 120Hz display or Mini LED panel. The benefit of inferior screen technology is that it can avoid the dreaded notch, perhaps.
It’s also very likely that Apple will announce a redesigned MacBook Air with an M2 chip later this year, but it’s not sure.
iOS 15.4
On the software side, we are planning a release date for iOS 15.4. This is primarily a mid-cycle update and primarily includes Face ID support while wearing a mask. It also includes over 30 new emojis, non-binary Siri voice, and support for multi-device interaction with Universal Control. But most of the software might come at WWDC later this year.
Yuuma
yuuma at 2022年03月07日 10:30:00
 大人が楽しめるヒーリング絵本河童のカパと静かな森
 パワースポット 日本三大神滝布引の滝
 佐藤・広幸ドイツ魂
 Himeji Castle姫路城
 ボイドタイムお知らせアプリVoid Time 〜月を無視できない〜
 撮った写真をカレンダーに撮りカレ
 ライブ壁紙竹田城ライブ壁紙
 赤ちゃんにっこりBaby+Smile
 電子書籍[for iPhone]ターラのアストロロジー
 Vue.js コンパイルするときのポイント
 翻訳や文字起こしを視界の中へ――AIスマートグラス「INMO GO3」が国内発売