アプリ関連ニュース
- 2022年3月29日
- 技術情報
Most used 5 Python Image Processing Libraries
Today, I would like to share about most used image processing libraries in python. Let’s take a look.
OpenCV
First released in 2000, OpenCV has become a popular library due to its ease of use and readability. It is mostly used in computer vision tasks such as object detection, face detection, face recognition, image segmentation, etc.
Scikit-Image
Scikit-Image is a python-based image processing library that has some parts written in Cython to achieve good performance. It is a collection of algorithms for image processing such as:
- Segmentation,
- Geometric transformations,
- Color space manipulation,
- Analysis,
- Filtering,
- Morphology,
- Feature detection
Pillow/PIL
PIL (Python Imaging Library) is an open-source library for image processing in Python. PIL can perform tasks on an image such as reading, rescaling, saving in different image formats. PIL can be used for Image archives, Image processing, Image display.
NumPy
NumPy(Numerical Python) is a open-source Python library for data manipulation and scientific computing. It is used in the domain of linear algebra, Fourier transforms, matrices, and the data science field. NumPy arrays are faster than Python Lists. And an image is essentially an array of pixel values where each pixel is represented by 1 (greyscale) or 3 (RGB) values. So, NumPy can easily perform tasks such as image cropping, masking, or manipulation of pixel values.
Matplotlib
Matplotlib is mostly used for 2D visualizations, but it can also be leveraged for image processing. Matplotlib is effective in altering images for extracting information out of it although it does not support all the file formats.
This is all for now.
Hope you enjoy that.
By Asahi

waithaw at 2022年03月29日 10:00:00
- 2022年3月28日
- 技術情報
Fleet IDE
“Fleet is also a fully functional IDE bringing smart completion, refactorings, navigation, debugging, and everything else that you’re used to having in an IDE – all with a single button click.” – JetBrains
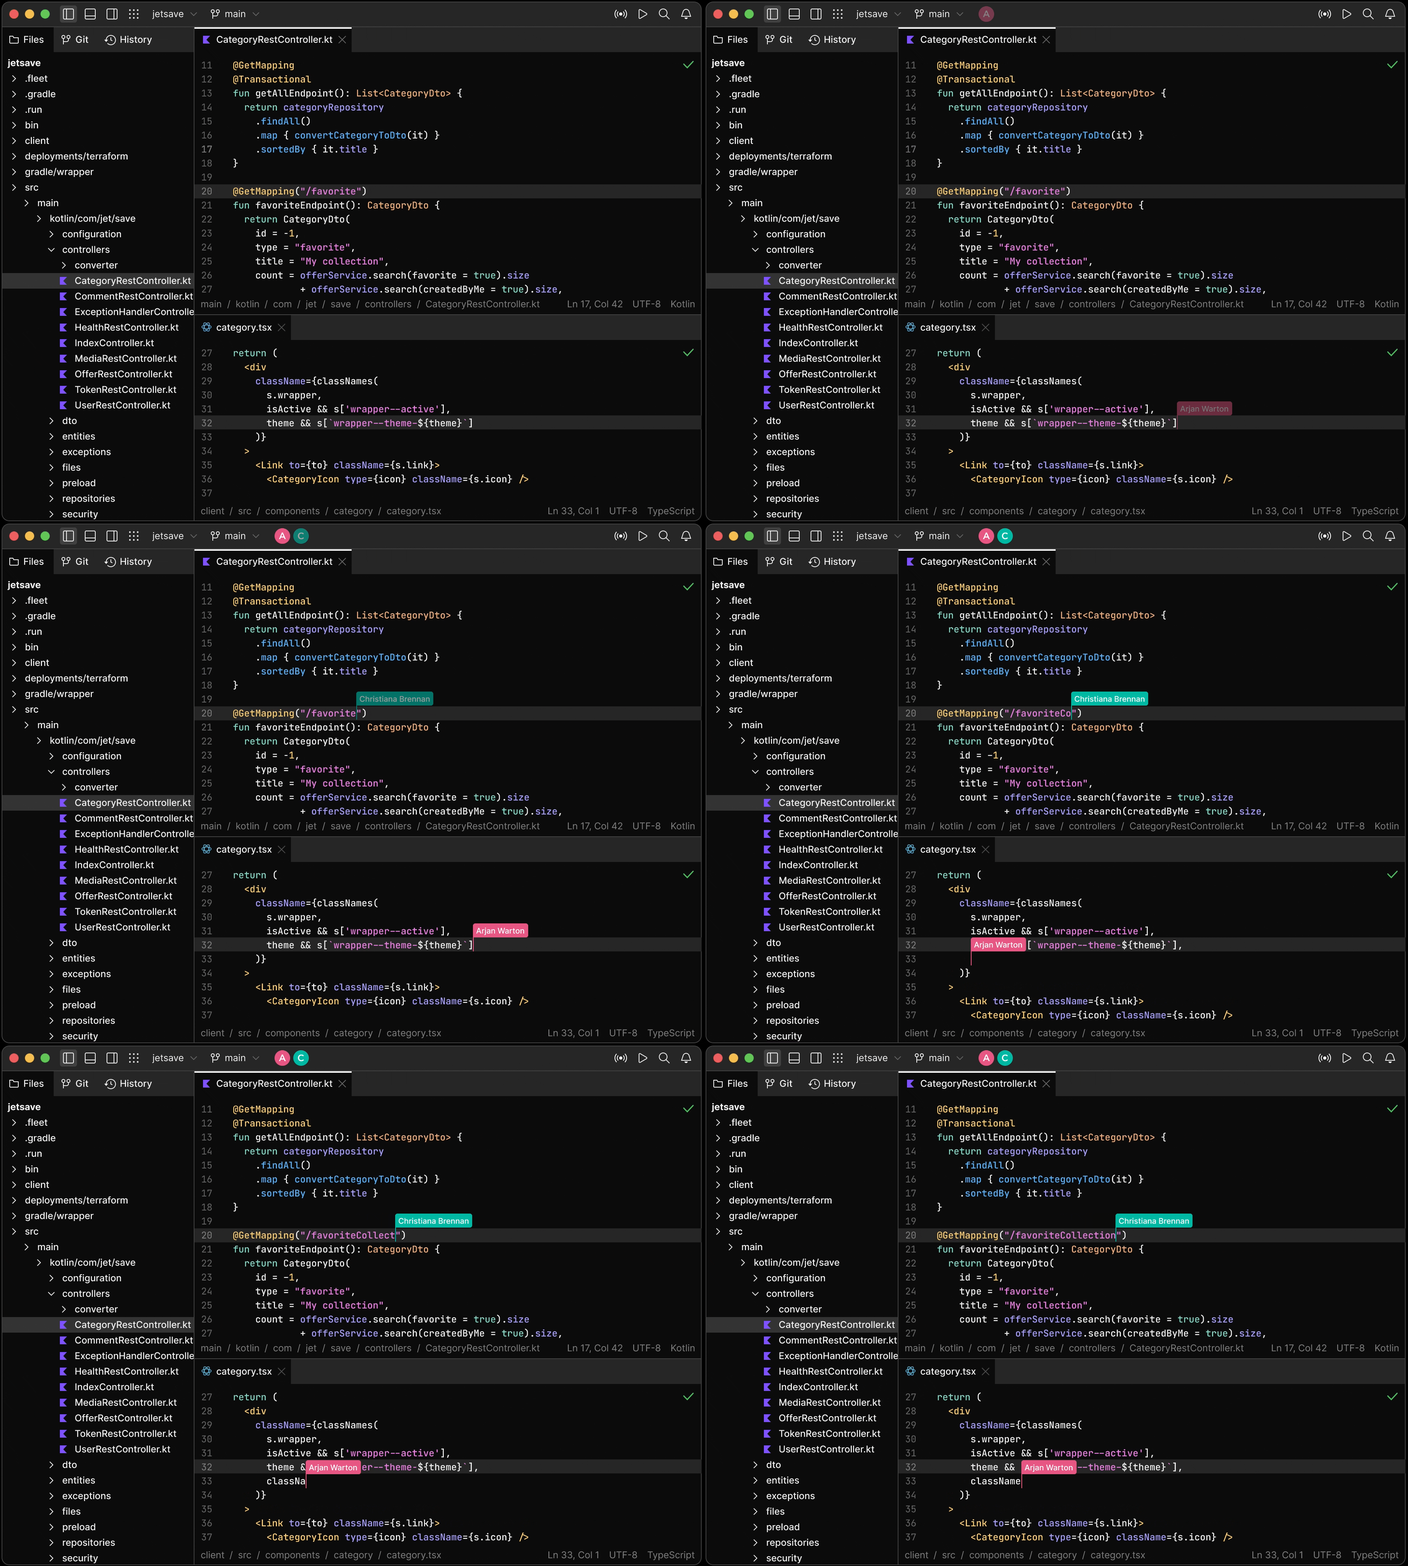
Fleet takes that approach one step further by making it a single IDE. You no longer have to open another IDE to get the functionality you need for a particular technology. With Fleet, everything is in one app.
Languages include:
- Java
- Kotlin
- Python
- Go
- JSON
- JavaScript
- Rust
- TypeScript
- PHP
- C++
- C#
- HTML
- Ruby
The fleet is built with collaboration in mind. This makes it easy to collaborate on a project, whether it’s local or remote. It provides the ability to work on the same or different files at the same time, run tests, access the device, and do other things you would expect from a collaboration IDE at the same time.
Fleet has a set of integrated tools to help developers enjoy their work and be more productive.
- Terminal
- Git
- Run & Debug
- Navigation
- MultiPlatform
- Themes
- Plugins
- etc.
The fleet’s architecture is designed to support a variety of configurations and workflows. Fleet can only run on your own machine, or you can move some processes to another location like docker , clouds etc.
This IDE also has tons of features and might worth to give it a try.
Yuuma
yuuma at 2022年03月28日 10:00:00
- 2022年3月25日
- 技術情報
素晴らしいHTMLの属性について
今回は素晴らしいHTMLの属性についていくつか共有したいと思います。
Contenteditable
Contenteditable属性は、コンテンツが編集可能かどうかを確認するために使用される。

Spellcheck
Spellcheck属性は、編集可能なモードでテキストのスペルや文法をチェックするために使用されます。

Translate
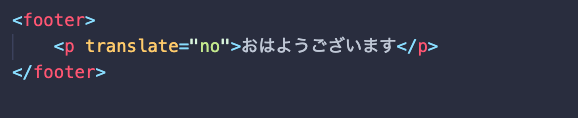
Translate属性は、あるコンテンツを翻訳するかどうかチェックするために使用されます。
Multiple
Multiple 属性は、ユーザーが複数の値を入力/選択できることを指定します。

Accept
accept属性は、ユーザーがファイル入力ダイアログボックスから選択できるファイルの種類をフィルタリングするために指定します。

Poster
poster 属性は、ユーザーが再生ボタンを押すまで表示する画像を指定することができます。

Download
download 属性は、ユーザーがリンクをクリックしたときに画像やビデオがダウンロードされることを指定します。

Inputmode
ブラウザに適切な仮想キーボードを表示できるようにする。

はい!ということで今回は以上になります。
金曜担当:Ami
asahi at 2022年03月25日 10:00:00
- 2022年3月24日
- Web Service
Nodejsの始め方
NodeJSは、サーバーサイドのWebアプリケーションを開発するためのオープンソースでクロスプラットフォームな実行環境です。今回は、NodeJSをNode Package Module(NPM)を使って、ステップバイステップで基本的な実装と解説を学びます。
NodeJSは、イベント駆動型のノンブロッキングI/Oモデルを採用しているため、軽量で効率的です。
NodeJSとNPMのインストールは、NodeJSの公式ホームページから入手できるインストーラーパッケージを使用することで簡単に行うことができます。
Nodejs
- NodeJS WebSiteからインストーラーをダウンロードします。
- インストーラーを実行します。
- インストーラーの手順に従って、使用許諾契約に同意し、「次へ」ボタンをクリックします。
- システム/マシンを再起動します。
以下のコマンドで、nodejsのバージョンを確認します。
node --versionコマンドでnpmのバージョンをテストします。
npm --versiontest.js ファイルを作成します。
/*test.js file*/
console.log("Node is working");
test.jsは、コマンドプロンプトからNodeコマンド > node test.jsで実行することができます。これでインストールは終了です。
Node Package Module
NPMは、JavaScript開発者が効率的に依存関係をロードするのを助けるパッケージモジュールです。依存関係をロードするには、コマンドプロンプトでコマンドを実行する必要があります。
npm installこのコマンドは、ルートディレクトリにあるpackage.jsonという名前のjsonファイルを見つけて、そのファイルに定義されているすべての依存関係をインストールするものです。
Package.json
Package.jsonはこんな感じです。
{
  "name": "ApplicationName",
  "version": "0.0.1",
  "description": "Application Description",
  "main": "server.js",
  "scripts": {
    "start": "node server.js"
  },
  "repository": {
    "type": "git",
    "url": "https://github.com/npm/npm.git"
  },
  "dependencies": {
    "express": "~3.0.1",
    "angular": "latest",
    "angular-ui-router": "~0.2.11",
  }
}
package.jsonで最も重要なのは、名前とバージョンです。これらは実際に必須であり、これがないとパッケージはインストールされません。
Repository
{
  "repository": {
    "type": "git",
    "url": "https://github.com/npm/npm.git"
  }
}
コードが存在する場所を指定します。もしgitリポジトリがGitHubでない場合は、npm docsコマンドで見つけることができます。
Scripts
{
 "scripts": {
    "start": "node server.js"
  }
}
NPMは、npm install、npm start、npm stopなど、便利なスクリプトを多数提供しています。
パッケージのルートにserver.jsファイルがある場合、npmはデフォルトでnode server.jsを開始コマンドとして使用します。
Dependencies
{
   "dependencies": {
     "express": "~3.0.1",
     "angular":"latest",
     "angular-ui-router": "~0.2.11",
  }
}
依存関係は、パッケージ名とバージョン範囲を対応させたシンプルなオブジェクトで指定します。
Example:
/*server.js*/

const http = require('http');

const hostname = '127.0.0.1';
const port = 3000;

const server = http.createServer(function(req, res) {
  res.statusCode = 200;
  res.setHeader('Content-Type', 'text/plain');
  res.end('Hello World\n');
});

server.listen(port, hostname, function() {
  console.log('Server running at http://'+ hostname + ':' + port + '/');
});
require(‘http’) を使って http サーバを作成し、それを http という変数に渡しています。ここでは、localHost(127.0.0.1)とポート番号3000を使用し、これをそれぞれ変数hostnameとportに代入しています。createServerメソッドを使用して、httpサーバーを作成します。
次に、server.jsファイルをnodeでコマンドを使って実行します。
node serverブラウザを開き、URL http://127.0.0.1:3000/ を入力してください。ブラウザが画面にHello Worldのメッセージを表示します。
これで、サンプルのnodejsスクリプトを作成し、正常に実行できるようになりました。
By Tsuki
tsuki at 2022年03月24日 10:00:00
- 2022年3月18日
- 技術情報
Laravelのフォームリクエスト: prepareForValidation
今回は、Laravelで検証を行う前にリクエストデータを操作することについて話したいと思います。
フォームのリクエスト例
まず、記事の投稿を保存するためのフォームリクエストの例から見てみましょう。入力に適用されるルールに注目してください。
<?php

namespace App\Http\Requests;

use Illuminate\Foundation\Http\FormRequest;

class StoreRequest extends FormRequest
{
    /**
     * Get the validation rules that apply to the request.
     *
     * @return array
     */
    public function rules()
    {
        return [
            'title' => 'required|max:200',
            'body' => 'required',
            'tags' => 'required|array|max:10',
            'is_published' => 'required|boolean',
            'author_name' => 'required',
        ];
    }
}
ここで、ユーザーが投稿を作成するためにフォームを送信し、次のような入力データを渡したと仮定します。
[
    'title' => 'My  articles post',
    'body' => 'This is the <script>alert('Alert!')</script> articles body.',
    'tags' => 'laravel,code,updates',
    'is_published' => 'true',
    'author_name' => 'Ami',
]
tagsはカンマ区切りの値のリストとしてフロントエンドから送信され、is_publishedの入力は文字列として解釈されます。どちらも、コンテンツの観点からは正しいにもかかわらず、形式が正しくないだけで検証は失敗します。
さらに、titleにタイプミスがあり、本文に悪意のあるコードが含まれているように見えます。技術的にはこれらはバリデーションの問題ではないと言えますが、ユーザーを自分自身から救い、アプリケーションを保護する手助けをすることは可能です。
prepareForValidation
このメソッドはprepareForValidationという適切な名前で、デフォルトのアクションを持ちません。つまり、オーバーライドするためだけに置かれたものです。
protected function prepareForValidation()
{
    // no default action
}
ベースとなる FormRequest クラスは Request クラスを継承しているので、 merge ヘルパーメソッドにアクセスし、必要な入力値だけを更新することができます。また、入力値そのものにクラスのプロパティのようにアクセスすることもできます。
protected function prepareForValidation()
    {
        $this->merge([
            'title' => fix_typos($this->title),
            'body' => filter_malicious_content($this->body),
            'tags' => convert_comma_separated_values_to_array($this->tags),
            'is_published' => (bool) $this->is_published,
        ]);
    }
値はリクエスト自体で更新されるので、バリデーションを行った後にコントローラでどのようにアクセスしても、操作された値が戻ってくることになります。
[
    'title' => 'My blog post',                         // 誤字を修正しました!
    'body' => 'This is the post body.',         //悪質なコンテンツは削除されました!
    'tags' => ['laravel', 'code', 'updates'],   // 配列になりました!
    'is_published' => true,                     // 今はブール値です!
    'author_name' => 'Ami',    // 相変わらずです。
今回はということで終わります。
By Ami
asahi at 2022年03月18日 10:00:00
 大人が楽しめるヒーリング絵本河童のカパと静かな森
 パワースポット 日本三大神滝布引の滝
 佐藤・広幸ドイツ魂
 Himeji Castle姫路城
 ボイドタイムお知らせアプリVoid Time 〜月を無視できない〜
 撮った写真をカレンダーに撮りカレ
 ライブ壁紙竹田城ライブ壁紙
 赤ちゃんにっこりBaby+Smile
 電子書籍[for iPhone]ターラのアストロロジー
 Vue.js コンパイルするときのポイント
 翻訳や文字起こしを視界の中へ――AIスマートグラス「INMO GO3」が国内発売