アプリ関連ニュース
- 2022年3月28日
- 技術情報
Fleet IDE
“Fleet is also a fully functional IDE bringing smart completion, refactorings, navigation, debugging, and everything else that you’re used to having in an IDE – all with a single button click.” – JetBrains
Fleet takes that approach one step further by making it a single IDE. You no longer have to open another IDE to get the functionality you need for a particular technology. With Fleet, everything is in one app.
Languages include:
- Java
- Kotlin
- Python
- Go
- JSON
- JavaScript
- Rust
- TypeScript
- PHP
- C++
- C#
- HTML
- Ruby
The fleet is built with collaboration in mind. This makes it easy to collaborate on a project, whether it’s local or remote. It provides the ability to work on the same or different files at the same time, run tests, access the device, and do other things you would expect from a collaboration IDE at the same time.
Fleet has a set of integrated tools to help developers enjoy their work and be more productive.
- Terminal
- Git
- Run & Debug
- Navigation
- MultiPlatform
- Themes
- Plugins
- etc.
The fleet’s architecture is designed to support a variety of configurations and workflows. Fleet can only run on your own machine, or you can move some processes to another location like docker , clouds etc.
This IDE also has tons of features and might worth to give it a try.
Yuuma
yuuma at 2022年03月28日 10:00:00
- 2022年3月25日
- 技術情報
素晴らしいHTMLの属性について
今回は素晴らしいHTMLの属性についていくつか共有したいと思います。
Contenteditable
Contenteditable属性は、コンテンツが編集可能かどうかを確認するために使用される。

Spellcheck
Spellcheck属性は、編集可能なモードでテキストのスペルや文法をチェックするために使用されます。

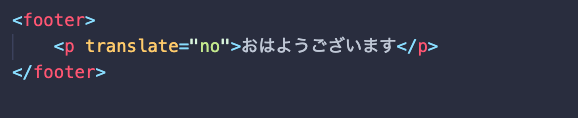
Translate
Translate属性は、あるコンテンツを翻訳するかどうかチェックするために使用されます。
Multiple
Multiple 属性は、ユーザーが複数の値を入力/選択できることを指定します。

Accept
accept属性は、ユーザーがファイル入力ダイアログボックスから選択できるファイルの種類をフィルタリングするために指定します。

Poster
poster 属性は、ユーザーが再生ボタンを押すまで表示する画像を指定することができます。

Download
download 属性は、ユーザーがリンクをクリックしたときに画像やビデオがダウンロードされることを指定します。

Inputmode
ブラウザに適切な仮想キーボードを表示できるようにする。

はい!ということで今回は以上になります。
金曜担当:Ami
asahi at 2022年03月25日 10:00:00
- 2022年3月24日
- Web Service
Nodejsの始め方
NodeJSは、サーバーサイドのWebアプリケーションを開発するためのオープンソースでクロスプラットフォームな実行環境です。今回は、NodeJSをNode Package Module(NPM)を使って、ステップバイステップで基本的な実装と解説を学びます。
NodeJSは、イベント駆動型のノンブロッキングI/Oモデルを採用しているため、軽量で効率的です。
NodeJSとNPMのインストールは、NodeJSの公式ホームページから入手できるインストーラーパッケージを使用することで簡単に行うことができます。
Nodejs
- NodeJS WebSiteからインストーラーをダウンロードします。
- インストーラーを実行します。
- インストーラーの手順に従って、使用許諾契約に同意し、「次へ」ボタンをクリックします。
- システム/マシンを再起動します。
以下のコマンドで、nodejsのバージョンを確認します。
node --versionコマンドでnpmのバージョンをテストします。
npm --versiontest.js ファイルを作成します。
/*test.js file*/
console.log("Node is working");
test.jsは、コマンドプロンプトからNodeコマンド > node test.jsで実行することができます。これでインストールは終了です。
Node Package Module
NPMは、JavaScript開発者が効率的に依存関係をロードするのを助けるパッケージモジュールです。依存関係をロードするには、コマンドプロンプトでコマンドを実行する必要があります。
npm installこのコマンドは、ルートディレクトリにあるpackage.jsonという名前のjsonファイルを見つけて、そのファイルに定義されているすべての依存関係をインストールするものです。
Package.json
Package.jsonはこんな感じです。
{
  "name": "ApplicationName",
  "version": "0.0.1",
  "description": "Application Description",
  "main": "server.js",
  "scripts": {
    "start": "node server.js"
  },
  "repository": {
    "type": "git",
    "url": "https://github.com/npm/npm.git"
  },
  "dependencies": {
    "express": "~3.0.1",
    "angular": "latest",
    "angular-ui-router": "~0.2.11",
  }
}
package.jsonで最も重要なのは、名前とバージョンです。これらは実際に必須であり、これがないとパッケージはインストールされません。
Repository
{
  "repository": {
    "type": "git",
    "url": "https://github.com/npm/npm.git"
  }
}
コードが存在する場所を指定します。もしgitリポジトリがGitHubでない場合は、npm docsコマンドで見つけることができます。
Scripts
{
 "scripts": {
    "start": "node server.js"
  }
}
NPMは、npm install、npm start、npm stopなど、便利なスクリプトを多数提供しています。
パッケージのルートにserver.jsファイルがある場合、npmはデフォルトでnode server.jsを開始コマンドとして使用します。
Dependencies
{
   "dependencies": {
     "express": "~3.0.1",
     "angular":"latest",
     "angular-ui-router": "~0.2.11",
  }
}
依存関係は、パッケージ名とバージョン範囲を対応させたシンプルなオブジェクトで指定します。
Example:
/*server.js*/

const http = require('http');

const hostname = '127.0.0.1';
const port = 3000;

const server = http.createServer(function(req, res) {
  res.statusCode = 200;
  res.setHeader('Content-Type', 'text/plain');
  res.end('Hello World\n');
});

server.listen(port, hostname, function() {
  console.log('Server running at http://'+ hostname + ':' + port + '/');
});
require(‘http’) を使って http サーバを作成し、それを http という変数に渡しています。ここでは、localHost(127.0.0.1)とポート番号3000を使用し、これをそれぞれ変数hostnameとportに代入しています。createServerメソッドを使用して、httpサーバーを作成します。
次に、server.jsファイルをnodeでコマンドを使って実行します。
node serverブラウザを開き、URL http://127.0.0.1:3000/ を入力してください。ブラウザが画面にHello Worldのメッセージを表示します。
これで、サンプルのnodejsスクリプトを作成し、正常に実行できるようになりました。
By Tsuki
tsuki at 2022年03月24日 10:00:00
- 2022年3月18日
- 技術情報
Laravelのフォームリクエスト: prepareForValidation
今回は、Laravelで検証を行う前にリクエストデータを操作することについて話したいと思います。
フォームのリクエスト例
まず、記事の投稿を保存するためのフォームリクエストの例から見てみましょう。入力に適用されるルールに注目してください。
<?php

namespace App\Http\Requests;

use Illuminate\Foundation\Http\FormRequest;

class StoreRequest extends FormRequest
{
    /**
     * Get the validation rules that apply to the request.
     *
     * @return array
     */
    public function rules()
    {
        return [
            'title' => 'required|max:200',
            'body' => 'required',
            'tags' => 'required|array|max:10',
            'is_published' => 'required|boolean',
            'author_name' => 'required',
        ];
    }
}
ここで、ユーザーが投稿を作成するためにフォームを送信し、次のような入力データを渡したと仮定します。
[
    'title' => 'My  articles post',
    'body' => 'This is the <script>alert('Alert!')</script> articles body.',
    'tags' => 'laravel,code,updates',
    'is_published' => 'true',
    'author_name' => 'Ami',
]
tagsはカンマ区切りの値のリストとしてフロントエンドから送信され、is_publishedの入力は文字列として解釈されます。どちらも、コンテンツの観点からは正しいにもかかわらず、形式が正しくないだけで検証は失敗します。
さらに、titleにタイプミスがあり、本文に悪意のあるコードが含まれているように見えます。技術的にはこれらはバリデーションの問題ではないと言えますが、ユーザーを自分自身から救い、アプリケーションを保護する手助けをすることは可能です。
prepareForValidation
このメソッドはprepareForValidationという適切な名前で、デフォルトのアクションを持ちません。つまり、オーバーライドするためだけに置かれたものです。
protected function prepareForValidation()
{
    // no default action
}
ベースとなる FormRequest クラスは Request クラスを継承しているので、 merge ヘルパーメソッドにアクセスし、必要な入力値だけを更新することができます。また、入力値そのものにクラスのプロパティのようにアクセスすることもできます。
protected function prepareForValidation()
    {
        $this->merge([
            'title' => fix_typos($this->title),
            'body' => filter_malicious_content($this->body),
            'tags' => convert_comma_separated_values_to_array($this->tags),
            'is_published' => (bool) $this->is_published,
        ]);
    }
値はリクエスト自体で更新されるので、バリデーションを行った後にコントローラでどのようにアクセスしても、操作された値が戻ってくることになります。
[
    'title' => 'My blog post',                         // 誤字を修正しました!
    'body' => 'This is the post body.',         //悪質なコンテンツは削除されました!
    'tags' => ['laravel', 'code', 'updates'],   // 配列になりました!
    'is_published' => true,                     // 今はブール値です!
    'author_name' => 'Ami',    // 相変わらずです。
今回はということで終わります。
By Ami
asahi at 2022年03月18日 10:00:00
- 2022年3月17日
- Web Service
Vue.jsの実用的なヒント
開発時にトリックを使用できれば、開発はよりスマートになり、時間を短縮できます。この記事では、Vuejsの最高のトリックを共有するつもりです。
1つのcomponentを複数のルートで使用する
複数のルートが同じVue componentに解決されることは、開発者が遭遇するかなり一般的な状況です。
しかし、問題は、Vueがアプリを最適化し、新しいコンポーネントを作成する代わりに、既存のコンポーネントを再利用することです。そのため、同じコンポーネントを使用するルート間で切り替えようとしても、何も変わりません。
router.js
const routes = [
  {
    path: "/a",
    component: ArticleComponent,
  },
  {
    path: "/b",
    component: ArticleComponent,
  },
];
これを修正するには、要素に:keyプロパティを追加する必要があります。これはApp.vueファイルにある可能性があります。これは、ページが異なる場合に routerが認識するのに役立ちます。
App.vue
<router-view :key='$route.path' />これで、アプリは既存のコンポーネントを再利用せず、ルートを切り替えるときにコンテンツを更新します。
小道具をタイプのリストに制限する
プロップ定義で「バリデーター」オプションを使用すると、プロップを特定の値のセットに制限できます。
export default {
  name: 'Image',
  props: {
    src: {
      type: String,
    },
    style: {
      type: String,
      validator: s => ['square', 'rounded'].includes(s)
    }
  }
};
この「validator」関数は小道具を受け取り、小道具が有効かどうかにかかわらず、trueまたはfalseのいずれかを返します。
single スコープスロットの省略形
スコープスロットはとても楽しいですが、それらを使用するには、多くの template タグも使用する必要があります。
幸いなことに、それを取り除くための速記がありますが、それは単一のスコープスロットを使用している場合に限られます。
<DataTable>
  <template #header="tableAttributes">
    <TableHeader v-bind="tableAttributes" />
  </template>
</DataTable>
次のように書き直すことができます。
<DataTable #header="tableAttributes">
  <TableHeader v-bind="tableAttributes" />
</DataTable>
シンプルでわかりやすく、すばらしい。
すべての小道具を子コンポーネントに渡す
小道具と言えば、親 componentからその子の1つにすべての小道具を渡す方法を知っておくと便利です。
簡単です。instanceのプロパティを覚えておく必要があります。
<child-comp v-bind="$props"></child-comp>local スタイルと global スタイルを組み合わせる
通常、スタイルを操作するときは、スタイルを単一の component にスコープする必要があります。
<style scoped>
  .component {
    background: green;
  }
</style>
ただし、ピンチでは、スコープのないスタイルブロックを追加して、必要に応じてグローバルスタイルを追加することもできます。
<style>
  /* Applied globally */
  .component p {
    margin-bottom: 16px;
  }
</style>

<style scoped>
  /* Scoped to this specific component */
  .component {
    background: green;
  }
</style>
v-forでの破壊
v-forで分解できることをご存知ですか?
<li
  v-for="{ name, id } in users"
  :key="id"
>
  {{ name }}
</li>
次のようなタプルを使用することで、v-forからインデックスを取得できることがより広く知られています。
<li v-for="(movie, index) in [
  'Lion King',
  'Frozen',
  'The Princess Bride'
]">
  {{ index + 1 }} - {{ movie }}
</li>
オブジェクトを使用するときは、キーを取得することもできます。
<li v-for="(value, key) in {
  name: 'Lion King',
  released: 2019,
  director: 'Jon Favreau',
}">
  {{ key }}: {{ value }}
</li>
また、この2つの方法を組み合わせて、キーだけでなく、プロパティのインデックスも取得することが可能です。
<li v-for="(value, key, index) in {
  name: 'Lion King',
  released: 2019,
  director: 'Jon Favreau',
}">
  #{{ index + 1 }}. {{ key }}: {{ value }}
</li>
カスタムV-model
デフォルトでは、v-model は “@input” イベントリスナーと “:value” プロップに対する構文糖の機能です。実は、どのイベントと値のプロップを使うかを指定できることをご存知でしょうか?Vueコンポーネントにmodelプロパティを指定することで、簡単に指定することができます。
export default{
  model: {
     event: 'change',
     prop: 'checked'
  }
}
複数のv-ifを使用しないでください
条件付きで複数の要素をレンダリングする必要がある場合もありますが、多くの場合、次のようなものを記述します。
<div v-if="condition">content</div>
<div v-if="condition">content</div>
<div v-if="condition">content</div>
もっとエレガントに書けるから不要なんです。
<template v-if="condition">
  <div>content</div>
  <div>content</div>
  <div>content</div>
</template>
Arraysとobjectsを見る
ウォッチャーを使う上で一番厄介なのは、うまくトリガーできないことがあることです。
通常は、ArrayやObjectをウォッチしようとしているのに、deepをtrueに設定していないことが原因です。
export default {
  name: 'ColourChange',
  props: {
    colours: {
      type: Array,
      required: true,
    },
  },
  watch: {
    // Use the object syntax instead of just a method
    colours: {
      // This will let Vue know to look inside the array
      deep: true,

      // We have to move our method to a handler field
      handler()
        console.log('The list of colours has changed!');
      }
    }
  }
}
Vue 3の反応性APIを使用すると、次のようになります。
watch(
  colours,
  () => {
    console.log('The list of colours has changed!');
  },
  {
    deep: true,
  }
);
以上が、vuejsの開発における最高のトリックです。次回は、さらに多くのトリックを紹介する予定です。
By Tsuki
tsuki at 2022年03月17日 10:00:00
 大人が楽しめるヒーリング絵本河童のカパと静かな森
 パワースポット 日本三大神滝布引の滝
 佐藤・広幸ドイツ魂
 Himeji Castle姫路城
 ボイドタイムお知らせアプリVoid Time 〜月を無視できない〜
 撮った写真をカレンダーに撮りカレ