技術情報
- 2021年11月12日
- 技術情報
How to use Flutter font awesome icon ?
Need an icon not in Material?
The material design offers many helpful patterns, including a great set of icons. But they are not the only icons out there. Font awesome’s icon are truly, well, iconic. Luckily, with font_awesome_flutter package, including them in our flutter app.
It’s too simple so let’s build with simple app including flutter font awesome icon.
Firstly, we need to add font_awesome_flutter package in our pubspec.yaml file.
dependencies:
  font_awesome_flutter: ^9.2.0
For use font_awesome_flutter package, we will need to import this package .
import 'package:font_awesome_flutter/font_awesome_flutter.dart';To start the two components of Material Icons– wrapping with Icon and the inner icon_data value. Icons.menu is a default material icon. We will use this icon in our app.
Icon(Icons.menu)To change icon size and color:
Icon(FontAwesomeIcons.user,
    size: 50, //Icon Size
    color: Colors.white,
)
Use with FaIcon widget and let’s build a simple app then find out fond awesome icon usage!
return Scaffold(
appBar: AppBar(
centerTitle: true,
leading: Icon(Icons.menu),
title: const Text("Font Awesome Icons")
),
body: Center(
child: Column(
mainAxisAlignment: MainAxisAlignment.center,
children: [
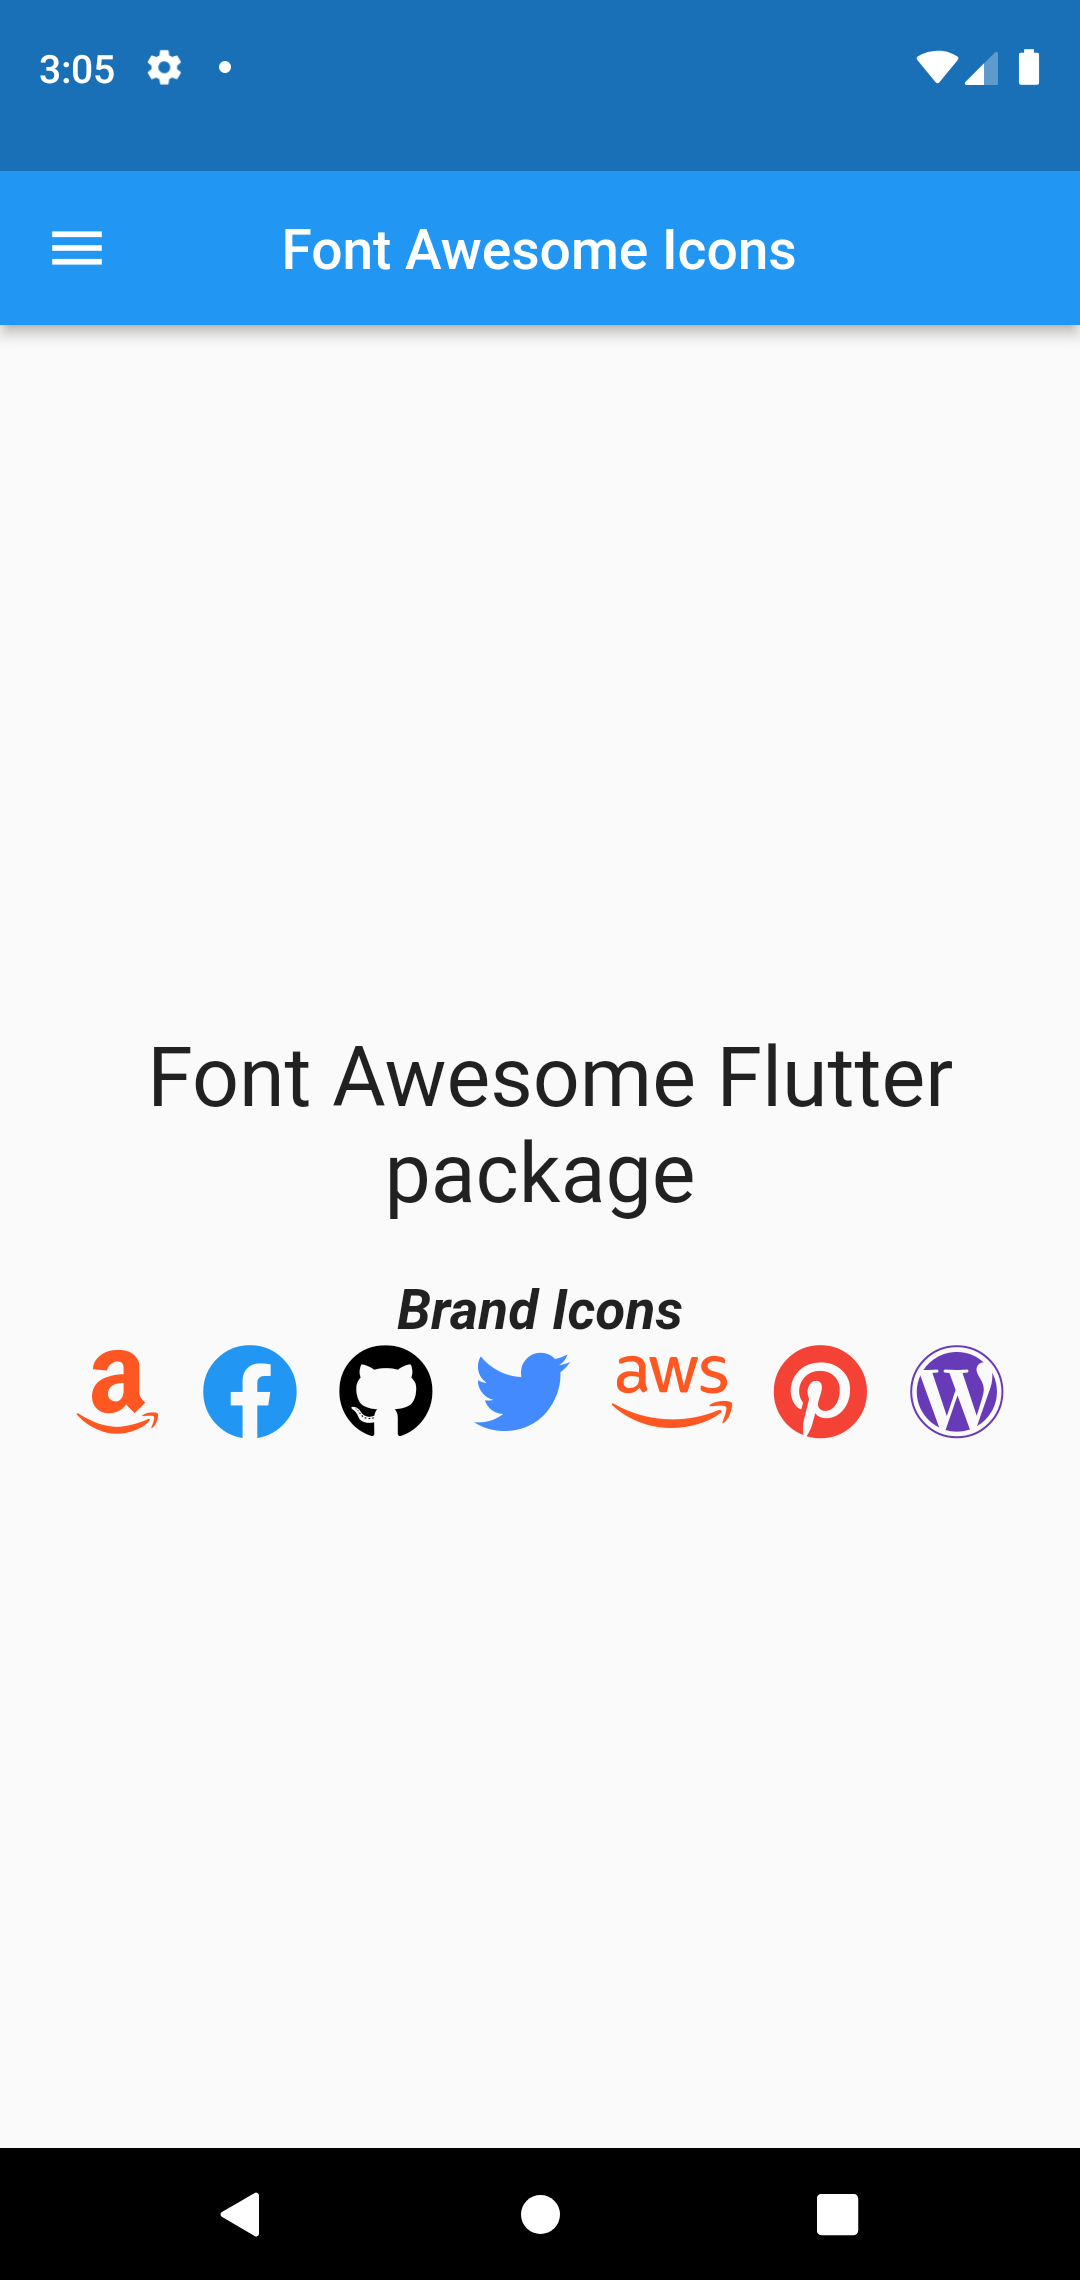
const Text(" Font Awesome Flutter package",textAlign:TextAlign.center,style: TextStyle(fontSize: 30),),
const SizedBox(height: 20,),
//brand Icons
const Text("Brand Icons",textAlign: TextAlign.start,style: TextStyle(fontWeight: FontWeight.bold,fontStyle:FontStyle.italic,fontSize: 20),),
Row(
mainAxisAlignment: MainAxisAlignment.center,
children: const [
FaIcon(FontAwesomeIcons.amazon,color: Colors.deepOrange,size: 35,),
SizedBox(width: 15,),
FaIcon(FontAwesomeIcons.facebook,color: Colors.blue,size: 35,),
SizedBox(width: 15,),
FaIcon(FontAwesomeIcons.github,color: Colors.black,size: 35,),
SizedBox(width: 15,),
FaIcon(FontAwesomeIcons.twitter,color: Colors.blueAccent,size: 35,),
SizedBox(width: 15,),
FaIcon(FontAwesomeIcons.aws,color: Colors.deepOrange,size: 35,),
SizedBox(width: 15,),
FaIcon(FontAwesomeIcons.pinterest,color: Colors.red,size: 35,),
SizedBox(width: 15,),
FaIcon(FontAwesomeIcons.wordpress,color: Colors.deepPurple,size: 35,),
],
),
],
),
),
);Hope you enjoy flutter new things!
By Ami
asahi at 2021年11月12日 10:00:00
- 2021年11月09日
- 技術情報
Differences between PHP and Nodejs
Today, I would like to share about differences between PHP and Nodejs for backend. Obviously, They have their own properties on particular aspects. The following are their comparisons.
Concurrency: Synchronous vs. Asynchronous
PHP is synchronous by nature, so it executes code line by line. When PHP code is executed, it waits for the current line to finish execution before it moves to the next line, and thus, it blocks the request.
Node.js is asynchronous by nature, so code doesn’t wait for I/O operations to complete their execution. For handling slow operations like I/O or remote data fetching, Node uses callbacks, promises, or JavaScript’s built-in and keywords. This makes Node.js pretty fast and makes it easy for a Node server to handle a high number of connections.
Runtime Environment: Zend Engine vs. V8 JavaScript Engine
PHP runs on the Zend engine, which is an open-source scripting engine which interprets the PHP code.
Node.js is an open-source, cross-platform, back-end JavaScript runtime environment that runs on Google’s V8 JavaScript engine.
Package Manager: Composer vs. NPM
Package management is one of the gray areas in PHP and has been a topic for debate over the years. There has never been a standard package manager which PHP developers could use to install reusable PHP libraries and components. PEAR was a widely-used package manager for PHP, but can now be thought to be deprecated. However, with initiatives like PHP-FIG and Composer, the PHP community has finally got a reliable system. Composer can be considered the standard package manager for PHP.
On the other hand, Node.js already provides NPM (Node Package Manager), a package management system. It is easy to use NPM to manage Node packages in your application. In fact, NPM has become the de facto standard for sharing reusable JavaScript components.
Performance
Node.js is asynchronous by nature, and thus, it has superior performance on tasks with a lot of connections or a lot of time-consuming I/O or network operations. However, it’s important to note that Node.js is single-threaded by default, so a CPU-intensive operation in one request will block all connections to the server until it is complete.
By Asahi
waithaw at 2021年11月09日 10:00:00
- 2021年11月08日
- 技術情報
Facebook might need to pay $20 million for “Meta” trademark
Changing Facebook’s identity didn’t smooth as they thought, there was someone already in front of facebook trying to get the “meta” trademark and they’re trying to give it up to Zuckerberg at a high price.
In August, the founder of a company called Meta PC filed for trademark registration of the word “meta” for computers, laptops, tablets, software, and other items related to technology.
just added this beast to our ready-to-ship page:
— META PCs (@METAPCs) November 1, 2021
✅ AMD Ryzen™ Threadripper 3970X
✅ NVIDIA GeForce RTX 3080
✅ 32GB RGB 3600MHZ DDR4 Memory
✅ Butt-load of storage
Available now on the ready-to-ship page at https://t.co/x0G1ZS6fmQ pic.twitter.com/HsGHIH3ZQV
Mark Zuckerberg may have to buy Meta’s trademark for $ 20 million after a computer retailer claims to have defeated Facebook’s founder with a trademark.
Arizona-based MetaPC introduced the “Meta” trademark on computers, laptops, tablets, software, and other tech-related items on August 23, not far from the Silicon Valley giant market. ..
Founders Joe Darger and Zuck Shut told that they were ready to withdraw the brand name if Zuckerberg agreed to pay $20 million.
The tech expert says they have been running the company for over a year and has invested “significant personal money” in meta marketing and branding.
But not all share names are bad, as they have revealed that social media pages have already grown by 5,000% since Zuckerberg’s announcement on Meta.
A Meta (Facebook) source told that the company believes it has the right to adopt the brand.
yuuma at 2021年11月08日 10:10:00
- 2021年11月05日
- 技術情報
Let’s build flutter RotatedBox with me!

Sometimes we may try our design horizontal or 90 degree for a bit more interesting layout. If you want to do that, Flutter has answered. Just use RotatedBox.
RotatedBox has provided a child and a number of quarter turns you want to rotate. One quarter to 90 degree turns.
So,
If we set 1 quarter, that will turn to 90 degree.
If we set 2 quarter, that will turn to 180 degree
If we set 3 quarter, that will turn to 270 degree
If we set 4 quarter, that will turn to 360 degree.
If we use 5 quarter, that will turn to 90 degree again.
RotatedBox(
quarterTurns : 3,
child: MyWidget(),
)
Let’s build example with RotatedBox.
Firstly, add assets image to pubspec.yaml file. After adding image assets, run flutter pub get.
assets:
  - assets/
Second step is in your main.dart file, that’s need to create a rotated box. Inside a RotatedBox() widget, we will call quarterTurns and a child.
Inside a child, we will add inside a ClipPath and his child’s property with image. The result will be underneath screen capture.
Example code :
return Scaffold(
  backgroundColor: Colors.grey[100],
  appBar: AppBar(
    title: const Text("Rotated Box"),
    backgroundColor: Colors.blueGrey[800],

  ),
  body: const Center(
      child: RotatedBox(
          quarterTurns: 5,
          child: ClipPath(
              child: Image(
                image: AssetImage("assets/logo.png"),
                fit: BoxFit.contain,
                height: 200,

              )

          )
      )
  ),
);
Hoped you enjoyed with this post!
By Ami
asahi at 2021年11月05日 10:00:00
- 2021年11月02日
- 技術情報
Cropping bulk images with the same dimensions in python script
For this week, I would like to share about cropping the bulk images with the same dimensions in python. This method is useful in some cases that image processing or some steps of computer vision projects. The following python script is to crop all images in a folder and save the result to another folder. I used Pillow image library to crop images.
Note: All images to be cropped must be the same dimensions.
First, import required libraries.
import os
import glob  # pip install glob2
from PIL import Image  # pip install Pillow
from pyfiglet import Figlet  # pip install pyfiglet
Program flow is to ask user for the bulk image directory path , desired output directory path and coordinates to be cropped. Then crop all images and save the result to output directory.
def main():
        getDirandFiletype()
        getCoordinate()
        for x in filenames:
            name = x.replace(img_dir, '')
            img = Image.open(str(x))
            region = img.crop((left, top,right, bottom))
            region.save(outpath + name)
print(custom_fig.renderText('Done!'))Then in getDirandFiletype() function, the user is asked for image path and output path and read all files in the path with the help of glob library. And also show dimension of each image to be cropped.
def getDirandFiletype():
        global img_dir, outpath, filenames

        print("Please enter Your Images Path.  eg:D:\Download\jaffedbase\n\n########################################")
        img_dir = input("\nWhat is your image directory path : ")
        outpath = input("\nWhat is your output path where to be saved : ")

        while(outpath == img_dir):
            print('\nEnter a different path with the image directory!!')
            outpath = input("\nWhat is your output path where to be saved : ")

        filetype = input("\nEnter file type (eg: png) : ")
        data_path = os.path.join(img_dir)
        # read all files in the path mentioned
        filenames = glob.glob(data_path + "/*." + filetype)
        processed = 0
        for file in filenames:
            img = Image.open(str(file))
            width, height = img.size
            print("\nDimension of source images : "+str(width),str(height))
            processed += 1
            if processed >= 1:
break And in getCoordinate() function, the user is asked for the cropping area with left, top, right, bottom coordinates. Pillow image library is used for cropping.
def getCoordinate():
        global left, top, right, bottom, img
        left = int(input("\nEnter left coordinate : "))
        top = int(input("Enter top coordinate : "))
        right = int(input("Enter right coordinate : "))
bottom = int(input("Enter bottom coordinate : ")) That is all. The final code with error handling and beautiful text render with pyfliglet library is as follows.
import os
import glob  # pip install glob2
from PIL import Image  # pip install Pillow
from pyfiglet import Figlet  # pip install pyfiglet

try:
    custom_fig = Figlet(font='standard')
    def main():
        getDirandFiletype()
        getCoordinate()
        for x in filenames:
            name = x.replace(img_dir, '')
            img = Image.open(str(x))
            region = img.crop((left, top,right, bottom))
            region.save(outpath + name)
        print(custom_fig.renderText('Done!'))

    def getDirandFiletype():
        global img_dir, outpath, filenames

        print("Please enter Your Images Path.  eg:D:\Download\jaffedbase\n\n########################################")
        img_dir = input("\nWhat is your image directory path : ")
        outpath = input("\nWhat is your output path where to be saved : ")

        while(outpath == img_dir):
            print('\nEnter a different path with the image directory!!')
            outpath = input("\nWhat is your output path where to be saved : ")

        filetype = input("\nEnter file type (eg: png) : ")
        data_path = os.path.join(img_dir)
        # read all files in the path mentioned
        filenames = glob.glob(data_path + "/*." + filetype)
        processed = 0
        for file in filenames:
            img = Image.open(str(file))
            width, height = img.size
            print("\nDimension of source images : "+str(width),str(height))
            processed += 1
            if processed >= 1:
                break

    def getCoordinate():
        global left, top, right, bottom, img
        left = int(input("\nEnter left coordinate : "))  # 50
        top = int(input("Enter top coordinate : "))  # 50
        right = int(input("Enter right coordinate : "))  # 190
        bottom = int(input("Enter bottom coordinate : "))  # 235


    main()
except SystemError:
    print("\nSorry Buddy. Your Coordinates are invalid. Plese Check Coordinates Again!")
except ValueError:
    print("\nPlease use Only Numbers for Coordinates!")
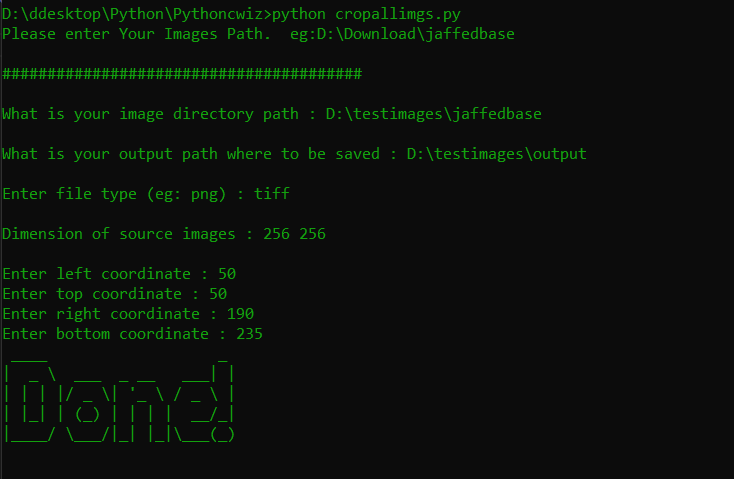
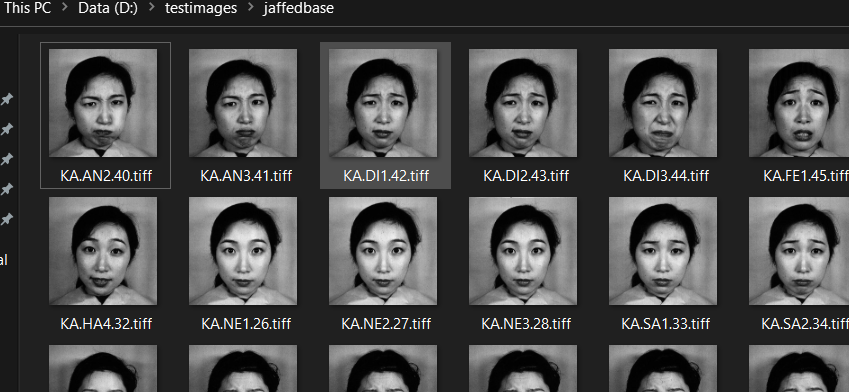
Images to be cropped are as follows.
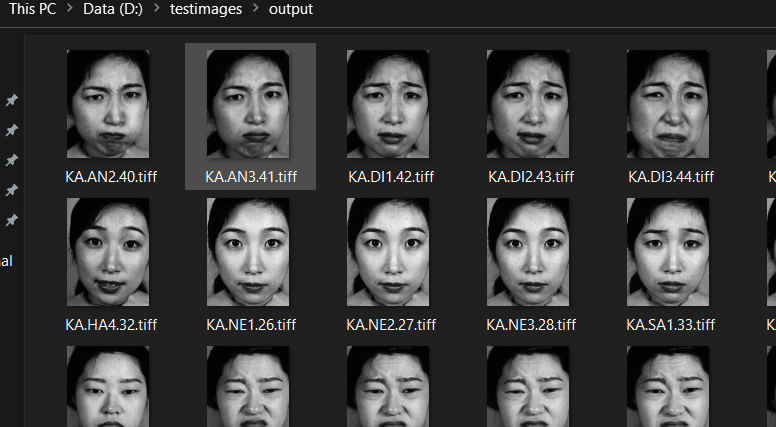
The resulted images are as follows.
Hope you enjoyed about this.
By Asahi
waithaw at 2021年11月02日 10:00:00
 大人が楽しめるヒーリング絵本河童のカパと静かな森
 パワースポット 日本三大神滝布引の滝
 佐藤・広幸ドイツ魂
 Himeji Castle姫路城
 ボイドタイムお知らせアプリVoid Time 〜月を無視できない〜
 撮った写真をカレンダーに撮りカレ