技術情報
- 2021年11月01日
- 技術情報
Facebook to Metaverse
Mark Zuckerberg, the founder of facebook has announced that they are changing their parent company name.
The rebrand would likely position the blue Facebook app as one of many products under a parent company overseeing groups like Instagram, WhatsApp, Oculus, and more. With more than 10,000 employees already building consumer hardware like AR glasses on Facebook, Zuckerberg believes it will eventually be as ubiquitous as a smartphone.
Facebook Inc is now called Meta, the company said on Thursday, in a rebrand that focuses on building the “metaverse,” a shared virtual environment that it bets will be the successor to the mobile internet.

CEO Mark Zuckerberg spoke at the company’s Live Streaming Extended Virtual Reality Conference, stating that the new name reflects the work of investing in Metaverse rather than the social media service that continues to be called Facebook.

Metaverse is a term which broadly refers to the idea of a shared virtual realism that can be accessed by people using different devices.
“From now on, we’re going to be metaverse first, not Facebook first,” Mr Zuckerberg said. He suggested that Facebook app and branding will be removed from other apps, and that it will instead look to push the new Meta name. Mr Zuckerberg announced his company’s new name during a 90-minute presentation in which he argued that the metaverse will be the future of both his company and the internet.
He showed how through the use of virtual reality goggles and smart glasses, users will be able to add virtual objects to the real world. They could hang out with friends as well as appear in real meetings as holograms.
But he also mentioned they haven’t developed much of the technology behind the Metaverse yet and hasn’t provided any information about when it will release and so on.
Yuuma
yuuma at 2021年11月01日 10:10:00
- 2021年10月29日
- 技術情報
Export CSV file in JS
This time I would like to share about export a file as CSV format using Javascript HandSonTable. HandSonTable works with many of most popular languages like : React, Angualr, Vue and Javascript.
Then what is HandSonTable? HandSonTable is like data grid spreadsheet designed to hundreds of thousands of cells. HandSonTable is performed with so much features ex: search, sort, filter without delays. Let’s start!
Firstly, we need to do is to import handsontable.full.min.js and handsontable.full.min.css in html. After importing, we can now use HandSonTable. To display HandSonTable, we need to add a new div with id or class name attribute.
Import JS and Css file in header
<script src="https://cdn.jsdelivr.net/npm/handsontable@10.0/dist/handsontable.full.min.js"></script>
<link type="text/css" rel="stylesheet" href="https://cdn.jsdelivr.net/npm/handsontable@10.0/dist/handsontable.full.min.css" />
Add new div and download button for export CSV format
<div id="example1"></div>
<div class="controls">
  <button id="export-file">Download CSV</button>
</div>
Let’s start JS code!
For use HandSonTable, we must call that two attributes roughly first one is what place we want to append data so we will call our Id named with example1, and second one is how much data display with rows and cols and what kind of data display.
Then to call our id and button using javascript querySelector.
const container = document.querySelector('#example1');
const button = document.querySelector('#export-file');
const hot = new Handsontable(container, {
data: Handsontable.helper.createSpreadsheetData(7, 7),
colHeaders: true,
rowHeaders: true,
hiddenRows: { rows: [1, 3, 5], indicators: true },
hiddenColumns: { columns: [1, 3, 5], indicators: true },
height: 'auto',
licenseKey: 'non-commercial-and-evaluation'
});To export a file, we can use tabename.getPlugin(‘exportFile’);
After button click action is done, for download the file we can use javascript addEventListener with click property. For downloadFile and fileExtension must be ‘csv’ and fill your desire filename.
button.addEventListener('click', () => {
  exportPlugin.downloadFile('csv', {
    bom: false,
    columnDelimiter: ',',
    columnHeaders: false,
    exportHiddenColumns: true,
    exportHiddenRows: true,
    fileExtension: 'csv',
    filename: 'Handsontable-CSV-file_[YYYY]-[MM]-[DD]',
    mimeType: 'text/csv',
    rowDelimiter: '\r\n',
    rowHeaders: true
  });
});
Hoped you enjoyed reading this!
By Ami
asahi at 2021年10月29日 10:00:00
Laravel Package to translate with a translation API
Today I would like to share about a laravel package that I wrote recently. That package is to translate languages easily using a translation API. I had to use a translation api in my project. Then I wanted to write short code for translation feature and reuse it for future. So I created this package locally.
Methods that can be used
After creating Translation Object, you can use the following methods.
$obj = new Translate();Translation
$translated_text = $obj->translate('Hello World", 'EN', 'JA');

echo $translated_text;
Getting supported languages
$languages = $obj->languages();

foreach($languages as $lang){
    echo $lang['language']."-".$lang['name'].'<br>';
}
Getting supported source–languages
$source_languages = $obj->languages('source');

foreach($source_languages as $lang){
    echo $lang['language']."-".$lang['name'].'<br>';
}
Getting supported target–languages
$target_languages = $obj->languages('target');

foreach($target_languages as $lang){
    echo $lang['language']."-".$lang['name'].'<br>';
}
You can monitor your usage of translation API
$usage= $obj->usage();

echo $usage['character_count'].' characters have been used. Maximum number of characters that can be translated in the current billing period are '.$usage['character_limit'];
You can setup a timeout in requesting api
$obj->setTimeout(10);
Hope you enjoyed that.
By Asahi
waithaw at 2021年10月26日 10:00:00
- 2021年10月22日
- 技術情報
Let’s learn flutter UI with me
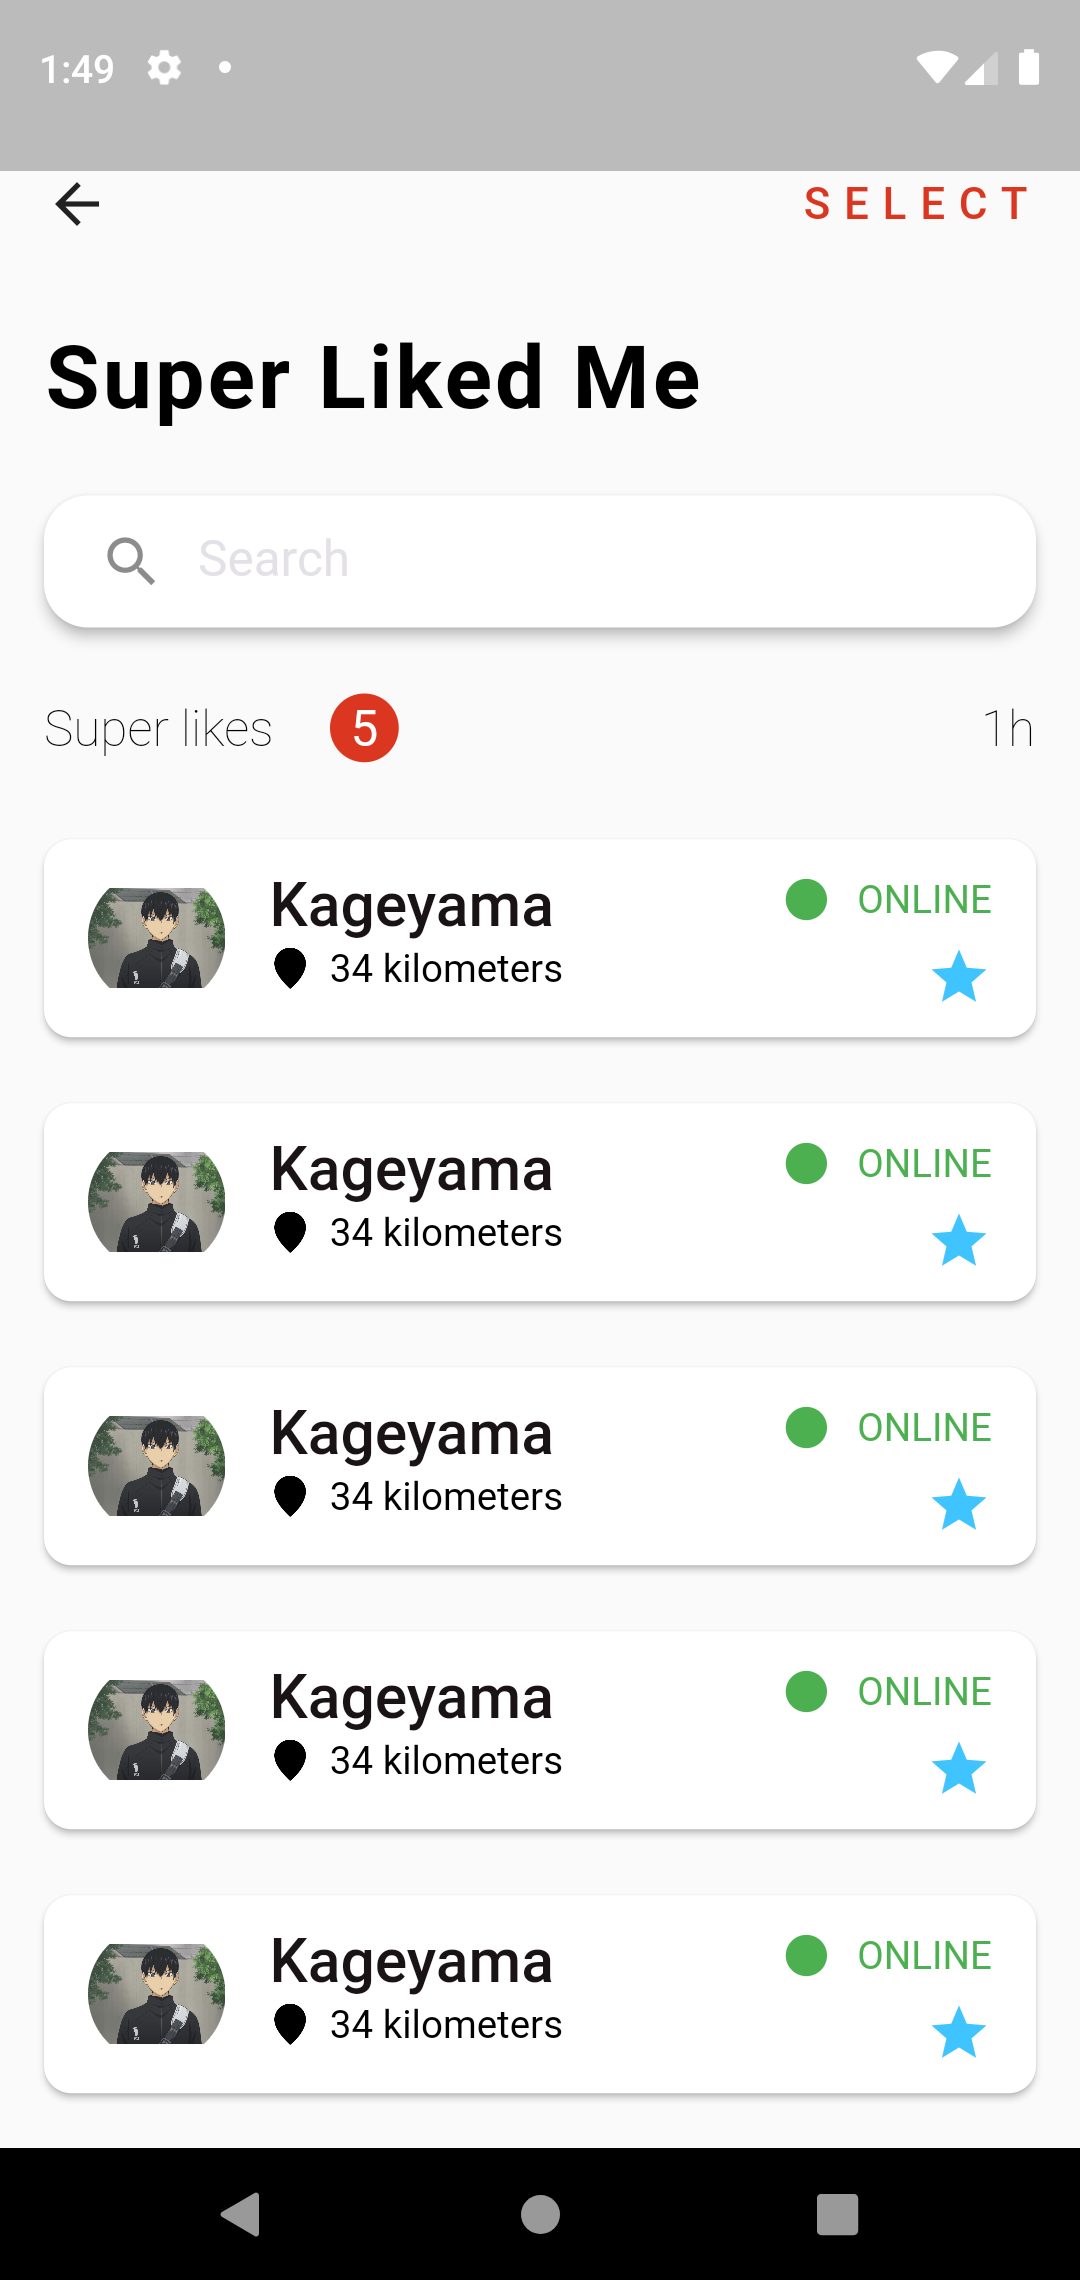
For this week, I will create only user interface design for android app using flutter. In this article I will explain deeply the usage of widget and we can learn a lot of flutter widget and how to clearly create folder structures etc.
Firstly I create images asset folders from the app directory named with assets. Like this :
project_name/assets/images/your_image.jpgAfter inserting images in assets folder, we will need to apply this image to our app. So we have to put images assets in pubspec.yaml file.
Let’s starting coding in main.dart file. In our widget, we call Profile page named with profile_page.dart. You can also use other file name.
  Widget build(BuildContext context) {
    return MaterialApp(
        title: 'Flutter Demo',
        debugShowCheckedModeBanner: false,
        theme: ThemeData(
            primarySwatch: Colors.blue,

        ),
        home: ProfilePage()
    );
  }
In our ProfilePage for appbar, inside the scaffold widget I create Row widget with leading and trailing, leading is that will display back button and trailing is that will display SELECT text in right side of the screen of the one row.
        child: Row(
          children: <Widget>[
            leading : GestureDetector(
          onTap: () {
            Navigator.of(context).pop();
          },
          child: Icon(Icons.arrow_back),
        ),
            Spacer(),
            trailing : Text(
          "SELECT",
          style: actionMenuStyle,
        ),
          ],
        ),
And for display Super Liked Me text and other design, I create one Column widget inside the body. For display Super Liked Me text, We can use Text Widget inside a Padding widget.
         Padding(
            padding: const EdgeInsets.all(16),
            child: Text(
              "Super Liked Me",
              style: headingTextStyle.copyWith(color: Colors.black),
            ),
          )
The next design for beautiful Search box, we can use TextField widget inside a Card Widget. If you do rounded search bar, we can use inside RoundedRectangleBorder widget with properties BorerRadius.circular(30) widget.
          Card(
            elevation: 4,
            shape: RoundedRectangleBorder(
              borderRadius: BorderRadius.circular(16),
            ),
            margin: const EdgeInsets.symmetric(horizontal: 16, vertical: 8),
            child: Padding(
              padding: const EdgeInsets.symmetric(horizontal: 8),
              child: TextField(
                decoration: InputDecoration(
                    border: InputBorder.none,
                    prefixIcon: Icon(Icons.search),
                    hintText: "Search",
                    hintStyle: whiteSubHeadingTextStyle.copyWith(color: hintTextColor)),
              ),
            ),
          )
And another design from the left side of Super Likes Text , the center of 5 text and the last text of 1h, to display this we can use Row widget again. Inside the Row widget , we can use three Text Widgets. Like this:
 Row(
   children: <Widget>[
     Text("Super likes",...),
        Text("5",..),
        Spacer(),
         Text("1h",..),
     ],
    )
The last thing to display a list design , we can use ListView.builder widget. If you want to scrolling the listview, we can use Expanded , that will wrap ListView.builder widget. For display the item look like a card, we can use Card Widget inside ListView.builder widget.Inside a Card widget to display subtitle, we can use ListTitle widget with subtitle property. Inside the card the first thing wanted to display item is used leading property and for the last item trailing property. And we need to add itemCount: 10 property for how many list item will display. This example is item count for 10 times.
 Expanded(
   child: ListView.builder(
      itemBuilder: (context, index) {
         return Card(
           child: ListTile(
             title: Text(.....),
               subtitle: Row(...),
               leading: ClipOval(...),
               trailing: SizedBox(...),
                ),
               );
             },
      itemCount: 10,
            ),
          ),
Hope you enjoyed this article.
By Ami
asahi at 2021年10月22日 10:00:00
XamppのMariaDBをMySQLに置き換える方法(2)
開発/検証環境を手軽に構築するためにはXamppの導入は有効ですが、Xamppに含まれるDBが本番サーバーのDBと異なる場合、同じものにあわせて検証をおこなう必要があります。
今回は本番サーバーのDBがMySQLと仮定して、Xamppに含まれているMariaDBをMySQLに置き換える方法をシェアしたいと思います。
本記事は前回の「XamppのMariaDBをMySQLに置き換える方法(1)」の続きです。
nishida at 2021年10月21日 10:00:00
 大人が楽しめるヒーリング絵本河童のカパと静かな森
 パワースポット 日本三大神滝布引の滝
 佐藤・広幸ドイツ魂
 Himeji Castle姫路城
 ボイドタイムお知らせアプリVoid Time 〜月を無視できない〜
 撮った写真をカレンダーに撮りカレ