アプリ関連ニュース
- 2021年5月28日
- 技術情報
Tips to improve website page load speed
You also know slow-loading website will impact user experience. Pages that load fast have better user retention and lower bounce rates, and win user’s trust faster.
3 Tools to Measure Page Speed
Google Search Console
Although it technically doesn’t measure site speed, but you can use the new core web vitals report to find loading issues you need to take care of.
PageSpeed Insights
Developed by Google, PageSpeed Insights is a site speed tester capable of identifying underlying load speed issues. It’s as simple as entering the URL you want to inspect, and the tool will crawl your site and create a full report.
GTmetrix
If you want more advanced features or if you want to test your page speed on specific locations, GTmetrix is a helpful tool.
2 Tips to Improve Your Website’s Page Load Speed
1.Optimize your image
Image file size
You should aim for the smallest file size possible. A good mark for big images is 150kb to 500kb per image.
File format
It’s not uncommon to use PNG images when creating content. They are easier to handle, after all. Without getting into a whole debate on image extensions, we recommend using JPGs. These have become the standard format for images on the web. They do not lose quality, and their file size is small.
Image dimensions
Make sure to upload a decent image that doesn’t lose quality while scaling. I.e., 800 x 1200 images are the most common on articles.
2.Use lazy loading
We want to make the browser render the top of the page first (above the fold content) before loading the rest of the page.
The great thing about it is that we can implement it natively using the loading attribute in our images and iframes.
<img src=”myimage.jpg” loading=”lazy” alt=”…” />

<iframe src=”content.html” loading=”lazy”></iframe>
These attributes will tell the browser only to download the elements once the user has scrolled to the element and it is now visible on the viewport.
I hope you have found this useful.
By Ami
asahi at 2021年05月28日 10:00:47
- 2021年5月27日
- 技術情報
MySQL 照合順序設定による検索結果の違い(2)
今回はデータベースを作成する際の照合順序設定によってどのように検索結果に影響を与えるかをシェアしたいと思います。
本記事は前回の「MySQL 照合順序設定による検索結果の違い(1)」の続きとなります。
nishida at 2021年05月27日 10:00:47
- 2021年5月27日
- 技術情報
MySQL 照合順序設定による検索結果の違い(1)
nishida at 2021年05月27日 10:00:08
個人用ファイルサーバー機の作成(トラブルに遭遇)
前回搭載したハードディスクを使用して
mdadmのソフトウェアRAIDを組む予定でした。
RAID10アレイは問題無く組めたのですが、
アレイの再構築処理完了後、再起動をかけると
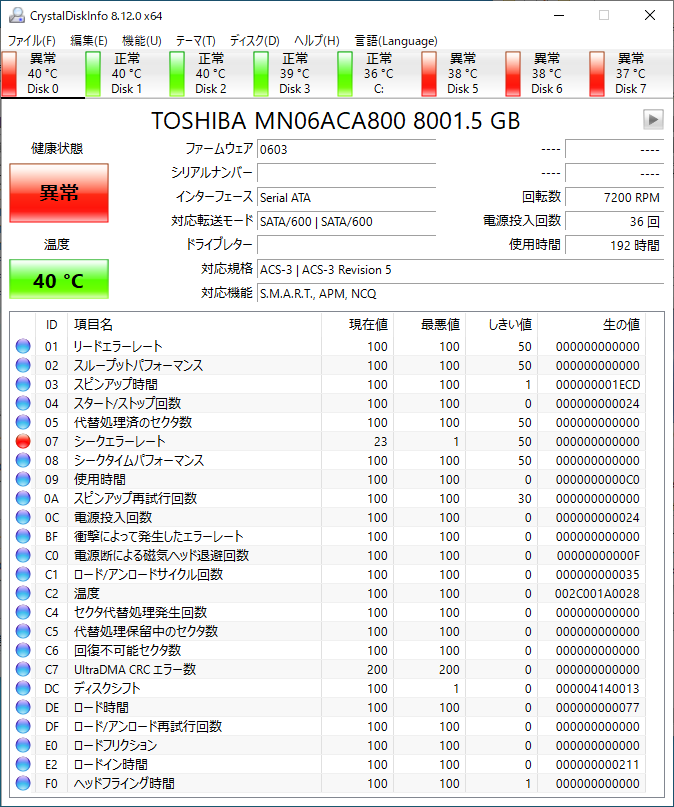
起動時に以下の画像のメッセージが表示されるようになりました。


前回搭載したHDDのS.M.A.R.T値でエラーが見つかったようです。
実際S.M.A.R.T値がどうなっているのか、
Windowsを起動して、Crystal disc info を使用して確認してみました。
健康状態が異常と表示されており、
シークエラーレートの現在値が20台、最悪値が1となっていました。
(画像のHDDの他にも4台のHDDが同じような症状で異常と表示)
ディスクに異常があるようですが、
1時間ほどアイドル状態で放置しておくと
以下の画像のように徐々に現在値が改善されているように見えます。

このまま復活するのではないかと思い更に放置すると、
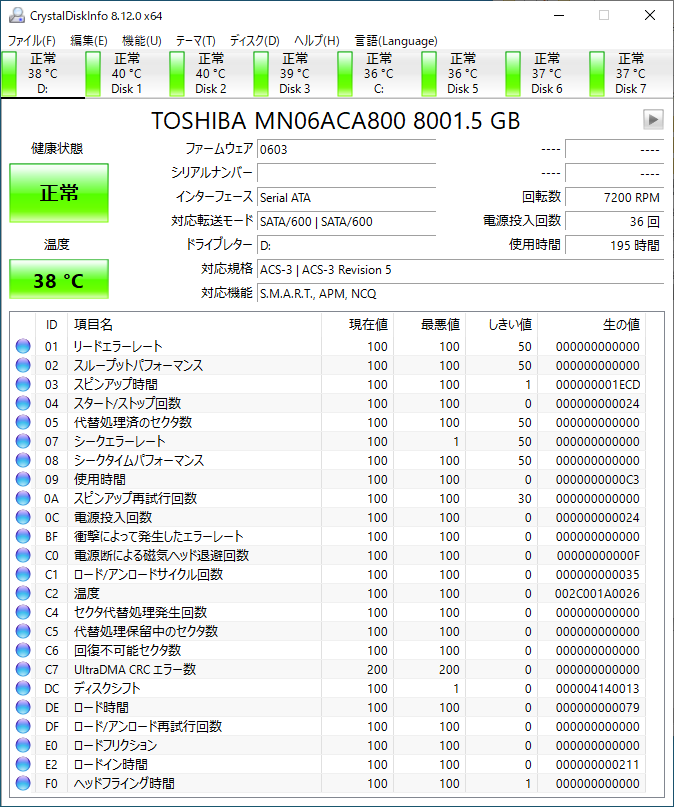
現在値が100まで回復、健康状態も正常となりました。
根本的な原因はまだ見つけられていませんが、
Raidアレイ再構築時の長時間の書き込み処理で
磁気ヘッドの移動になんらかの異常がでているのではないでしょうか。
冷却ファン等の振動が原因なのであれば、8台中5台に異常が出て、
3台は正常というのも不可解です。
ちなみに前回落下させた4台のHDDの内、
エラーが出ているのは1台、他の4台は落下させていないHDDです。
このままだと、ファイルサーバーとして使用するのは不安ですので、
早めに原因を見つけたいです。
水曜担当:Tanaka
tanaka at 2021年05月26日 10:00:51
- 2021年5月24日
- 技術情報
Snap social map
You might heard about the snapchat , one of the popular social media platforms owned by snap Inc. Well, you also might want to know about the snap map. Snap wants users to get a more personal view of the world around them.

While products like Google Maps and Apple Maps have relied on data partners to improve the quality of their contextual insights, Snap hopes to provide users with a more practical approach to mix and match third-party links with their Snap which allows users to create a view of their geographic environment tailored to their interests.
Snap Map has aimed to be a fundamentally social product, designed for people and friends rather than cars and directions. Theoretically, the layers will allow your users some customization when deciding which POIs (point of interest) they want their map to be structured.
Users will be able to rate shows at nearby concert venues and can purchase tickets within the Snapchat app. With The Infatuation, users can scan the map for editorialized recommendations for nearby restaurants with lists and reviews from the site. More of these partnerships are on the way, although it doesn’t appear that Snap is planning to open the floodgates to developers anytime soon.
Snap Inc says that Snap Map has some 250 million monthly active users.
Yuuma
yuuma at 2021年05月24日 11:00:42
 大人が楽しめるヒーリング絵本河童のカパと静かな森
 パワースポット 日本三大神滝布引の滝
 佐藤・広幸ドイツ魂
 Himeji Castle姫路城
 ボイドタイムお知らせアプリVoid Time 〜月を無視できない〜
 撮った写真をカレンダーに撮りカレ