アプリ関連ニュース
- 2021年9月20日
- 技術情報
Handling Japanese characters in PHP
We know we have manipulate strings, characters in PHP using various function depending on what we need. For example – cutting strings, counting strings length, replacing strings etc. We can directly use built-in PHP function like substr, str_replace, str_length etc. But we can’t directly use these functions for Japanese characters, Why ?
Everyone knows that a “bit” is 0 or 1, nothing else, and a “byte” is a group of eight consecutive bits. Since one byte has eight of these dual value points, the byte can consist of a total of 256 different patterns (2 power 8). Different characters can be associated with each possible 8-bit pattern.
It is working fine as long as the language characters can be represented by 256 or less.
But what if you can’t represent a language with just 256 characters? Obviously Japanese characters need more than that. Nowadays , 256 characters isn’t enough anywhere. Fortunately, the new super character sets use anywhere from 1 to 4 bytes to define characters. Unicode, a scheme that uses multiple bytes to represent characters. There are several version of it like UTF-32, 26 8.
Unicode (including UTF-8) uses multiple byte configurations to represent characters. UTF-8 uses 1 to 4 bytes to generate 1,112,064 patterns that represent different characters.
We can’t still directly use string related functions by declaring UTF-8. PHP isn’t really designed to handle multibyte characters, so using standard string functions to handle these characters can have uncertain results. If you need to handle these multibyte characters, you need to use a special set of functions, the mbstring function. Use the --enable-mbstring compile-time option to enable the mb function and set the run-time configuration option mbstring-encoding_translation.
The next thing is HTTP header might covers the communication also contains the character set ID, so we need to declare the header also like this.
mb_internal_encoding("UTF-8");
Finally we can use mb string related function instead of directly using string function.
For example we can use mb_strlen instead of strlen .
You can see various mb functions here.
That’s all for today.
Yuuma
yuuma at 2021年09月20日 10:00:00
- 2021年9月17日
- 技術情報
Flutter – share option button
This week I would like to share you about how to add share option button in flutter. Let’s get started!
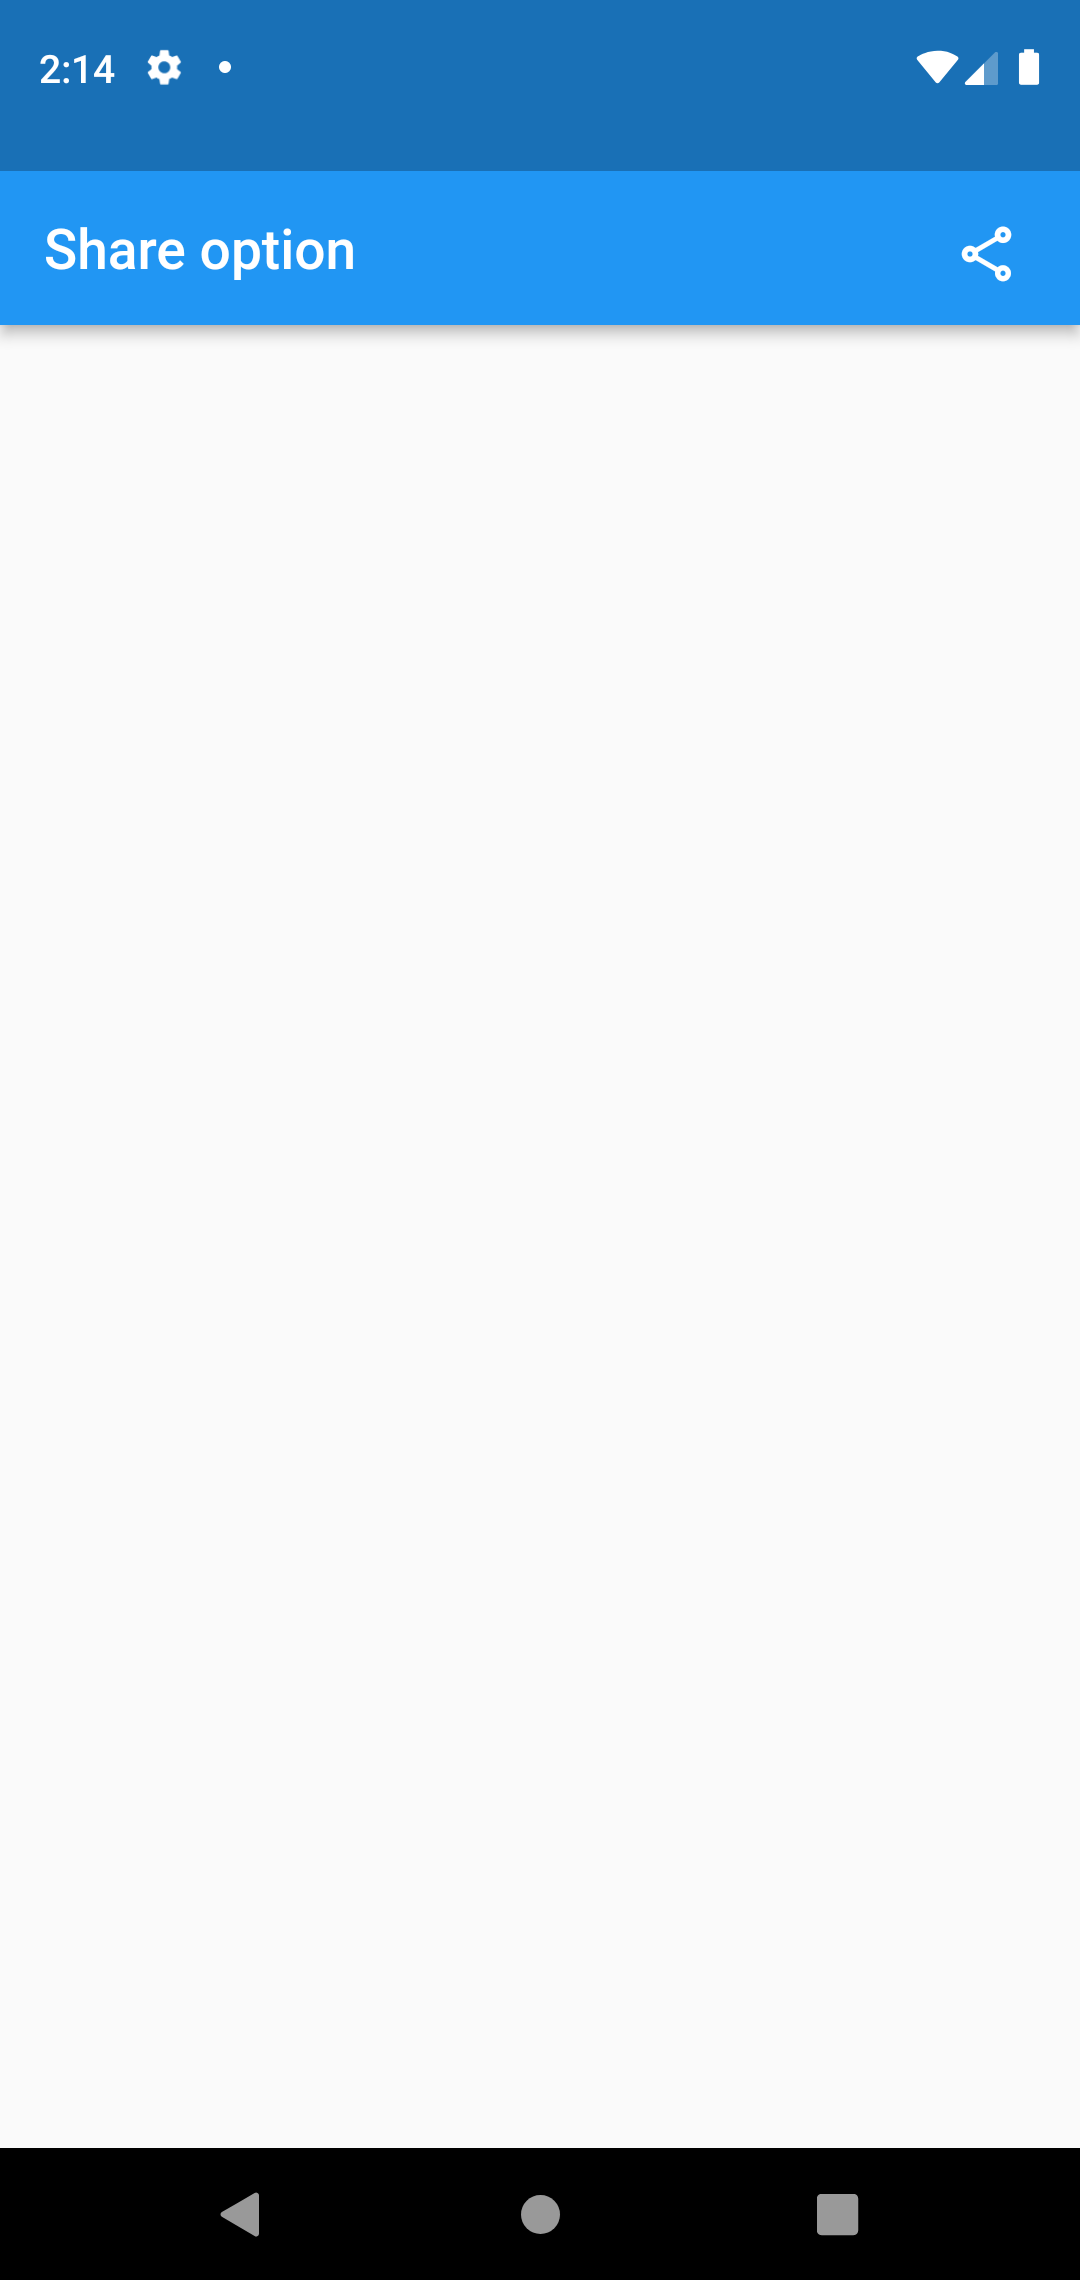
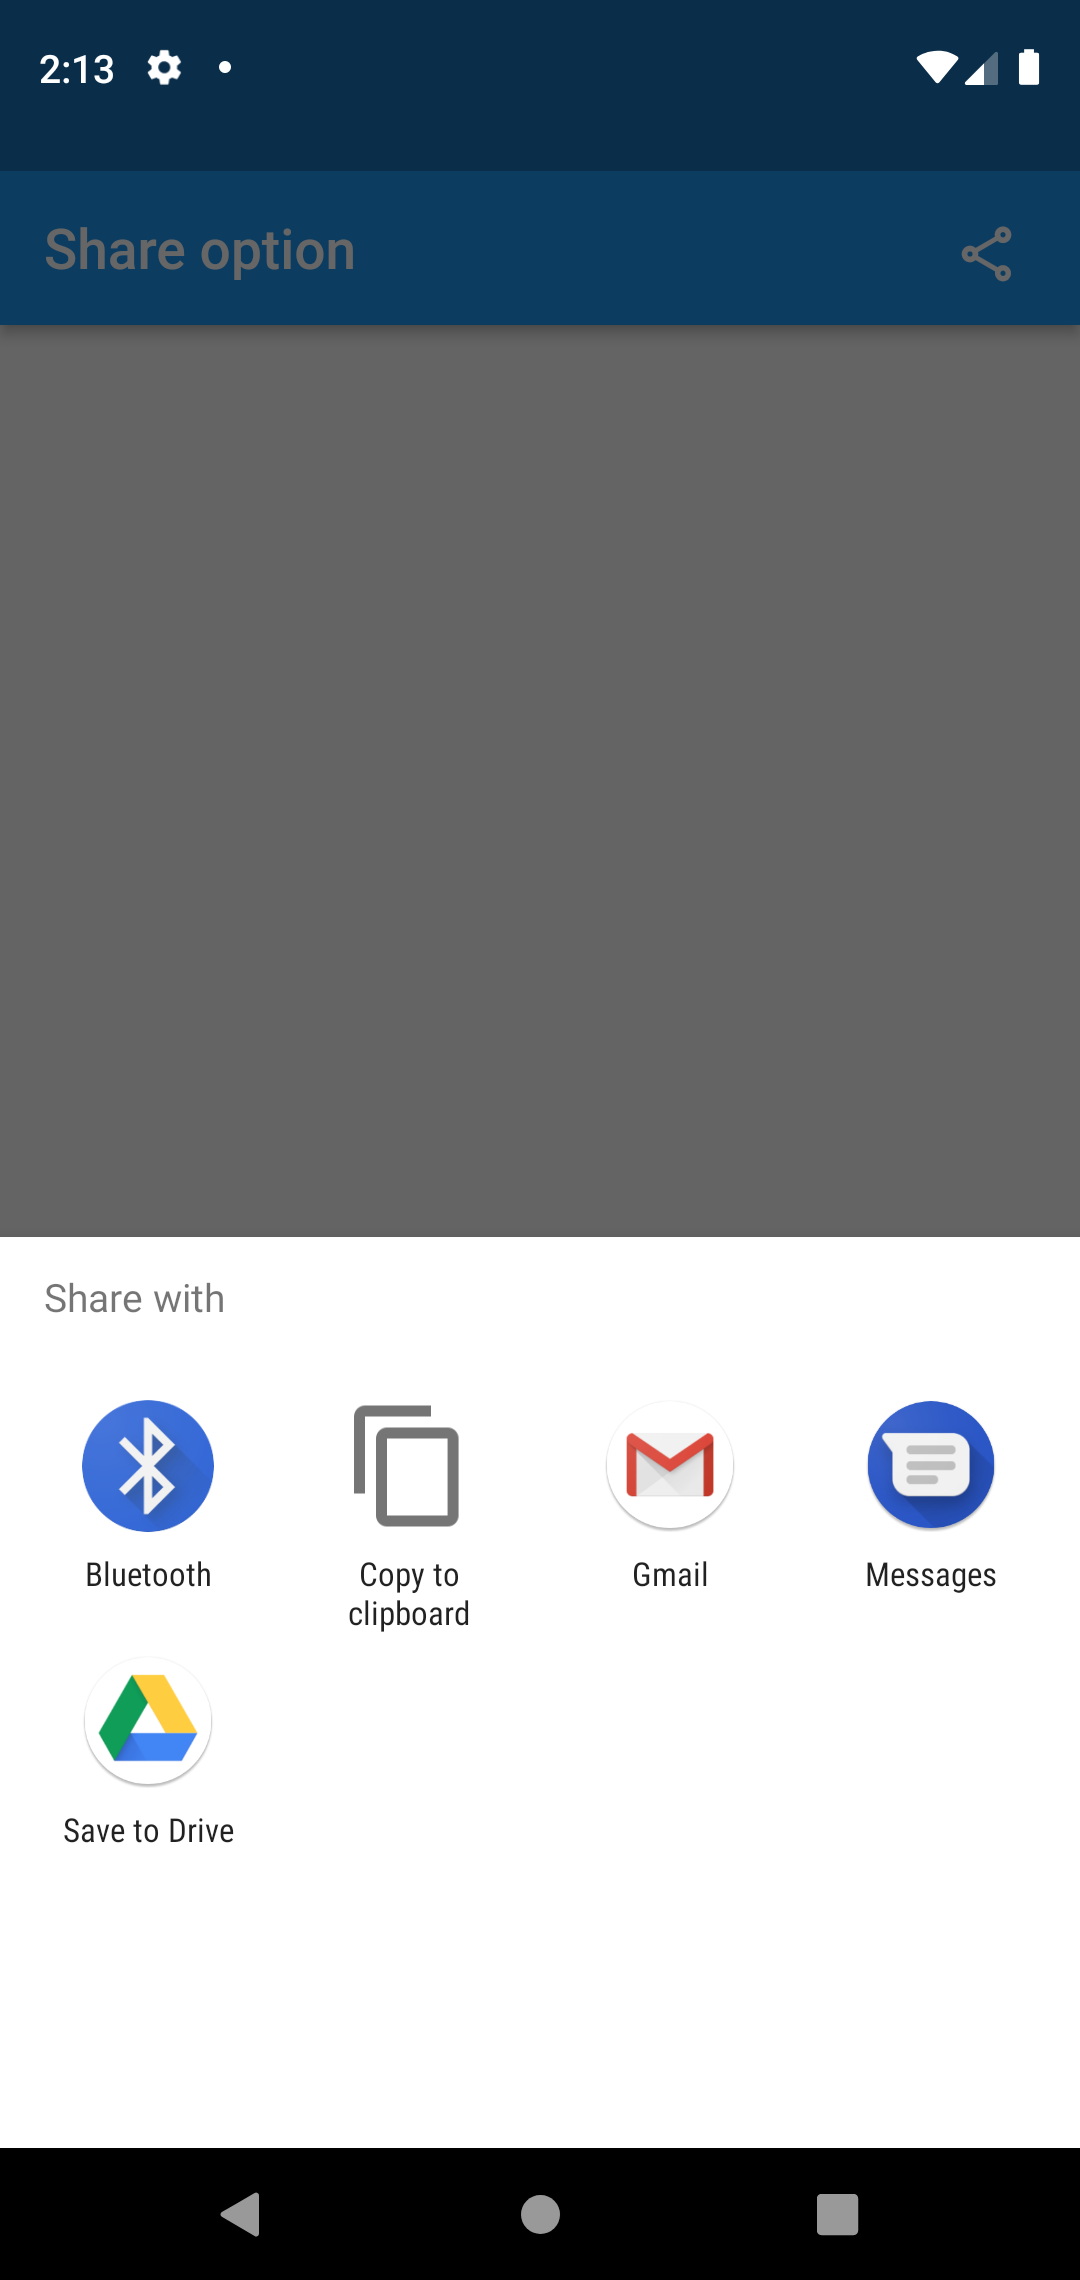
First thing we need to do is to add this share pub in your pubspec.yaml file.
dependencies:
  share: ^2.0.4
We can simply apply the share pub in the code.return Scaffold(
appBar: AppBar(
title : const Text('Share option '),
actions: [
Padding(padding: const EdgeInsets.all(10),
child: IconButton(
icon : const Icon(Icons.share_outlined),
onPressed: () {
Share.share("https://dummy~~~~~~~.com");
},
)
)
],
),
);Hope you enjoyed this article!
By Ami
asahi at 2021年09月17日 10:00:00
[Flutter] Windowsでの環境構築とエラーの対処方法(1)
nishida at 2021年09月16日 10:00:00
- 2021年9月15日
- VR
寝た姿勢で使えるVR装置が発表
tanaka at 2021年09月15日 10:00:00
iPhone 13
After much speculation, Apple will host an event on September 14 and it will most likely be the debut of the iPhone 13.
Apple has confirmed this through an event poster it sent to the press, which very clearly marks the September 14 launch event. Apple’s senior vice president of marketing tweeted this short clip, not hinting at any device though.
Design
They are expected to change little from the iPhone 12, but it appears that the company will change the design of the rear camera. It will apparently have a diagonal lens arrangement.
Color
Apple may introduce some new shades with the iPhone 13 series, with two versions rumored to be pink and orange. Along with them, we expect to see shades similar to those of the last generation, such as purple, black and white.
Display
Screen sizes and resolutions are expected to remain the same across the entire iPhone 13 product line, but both the iPhone 13 Pro and iPhone 13 Pro Max are rumored to debut with 120Hz refresh rates. That means the image on these screens will be smoother than on previous iPhones.
Camera
Apple is expected to be tweaking the camera on the iPhone 13 series, and the two Pro phones can get an improved ultra-wide shooter. The iPhone 13 Pro may also have an improved telephoto camera, plus some leaks suggest LiDAR could be present in all four models, so it will have improved depth perception, although the most recent leaks don’t mention this.
Others
The A15 chipset will likely power each of these phones, although current reports suggest this won’t bring a huge power boost. It is also widely rumored that Apple may release a 1TB iPhone for the first time in 2021, thus allowing for the largest iPhone sizes ever. You can also expect a bigger battery inside the 2021 phones. They are expected to be noticeably larger, expecting an iPhone 13 more durable than your previous iPhones.
Yuuma
yuuma at 2021年09月13日 10:20:00
 大人が楽しめるヒーリング絵本河童のカパと静かな森
 パワースポット 日本三大神滝布引の滝
 佐藤・広幸ドイツ魂
 Himeji Castle姫路城
 ボイドタイムお知らせアプリVoid Time 〜月を無視できない〜
 撮った写真をカレンダーに撮りカレ