アプリ関連ニュース
- 2021年11月05日
- 技術情報
Let’s build flutter RotatedBox with me!

Sometimes we may try our design horizontal or 90 degree for a bit more interesting layout. If you want to do that, Flutter has answered. Just use RotatedBox.
RotatedBox has provided a child and a number of quarter turns you want to rotate. One quarter to 90 degree turns.
So,
If we set 1 quarter, that will turn to 90 degree.
If we set 2 quarter, that will turn to 180 degree
If we set 3 quarter, that will turn to 270 degree
If we set 4 quarter, that will turn to 360 degree.
If we use 5 quarter, that will turn to 90 degree again.
RotatedBox(
quarterTurns : 3,
child: MyWidget(),
)
Let’s build example with RotatedBox.
Firstly, add assets image to pubspec.yaml file. After adding image assets, run flutter pub get.
assets:
  - assets/
Second step is in your main.dart file, that’s need to create a rotated box. Inside a RotatedBox() widget, we will call quarterTurns and a child.
Inside a child, we will add inside a ClipPath and his child’s property with image. The result will be underneath screen capture.
Example code :
return Scaffold(
  backgroundColor: Colors.grey[100],
  appBar: AppBar(
    title: const Text("Rotated Box"),
    backgroundColor: Colors.blueGrey[800],

  ),
  body: const Center(
      child: RotatedBox(
          quarterTurns: 5,
          child: ClipPath(
              child: Image(
                image: AssetImage("assets/logo.png"),
                fit: BoxFit.contain,
                height: 200,

              )

          )
      )
  ),
);
Hoped you enjoyed with this post!
By Ami
asahi at 2021年11月05日 10:00:00
- 2021年11月02日
- 技術情報
Cropping bulk images with the same dimensions in python script
For this week, I would like to share about cropping the bulk images with the same dimensions in python. This method is useful in some cases that image processing or some steps of computer vision projects. The following python script is to crop all images in a folder and save the result to another folder. I used Pillow image library to crop images.
Note: All images to be cropped must be the same dimensions.
First, import required libraries.
import os
import glob  # pip install glob2
from PIL import Image  # pip install Pillow
from pyfiglet import Figlet  # pip install pyfiglet
Program flow is to ask user for the bulk image directory path , desired output directory path and coordinates to be cropped. Then crop all images and save the result to output directory.
def main():
        getDirandFiletype()
        getCoordinate()
        for x in filenames:
            name = x.replace(img_dir, '')
            img = Image.open(str(x))
            region = img.crop((left, top,right, bottom))
            region.save(outpath + name)
print(custom_fig.renderText('Done!'))Then in getDirandFiletype() function, the user is asked for image path and output path and read all files in the path with the help of glob library. And also show dimension of each image to be cropped.
def getDirandFiletype():
        global img_dir, outpath, filenames

        print("Please enter Your Images Path.  eg:D:\Download\jaffedbase\n\n########################################")
        img_dir = input("\nWhat is your image directory path : ")
        outpath = input("\nWhat is your output path where to be saved : ")

        while(outpath == img_dir):
            print('\nEnter a different path with the image directory!!')
            outpath = input("\nWhat is your output path where to be saved : ")

        filetype = input("\nEnter file type (eg: png) : ")
        data_path = os.path.join(img_dir)
        # read all files in the path mentioned
        filenames = glob.glob(data_path + "/*." + filetype)
        processed = 0
        for file in filenames:
            img = Image.open(str(file))
            width, height = img.size
            print("\nDimension of source images : "+str(width),str(height))
            processed += 1
            if processed >= 1:
break And in getCoordinate() function, the user is asked for the cropping area with left, top, right, bottom coordinates. Pillow image library is used for cropping.
def getCoordinate():
        global left, top, right, bottom, img
        left = int(input("\nEnter left coordinate : "))
        top = int(input("Enter top coordinate : "))
        right = int(input("Enter right coordinate : "))
bottom = int(input("Enter bottom coordinate : ")) That is all. The final code with error handling and beautiful text render with pyfliglet library is as follows.
import os
import glob  # pip install glob2
from PIL import Image  # pip install Pillow
from pyfiglet import Figlet  # pip install pyfiglet

try:
    custom_fig = Figlet(font='standard')
    def main():
        getDirandFiletype()
        getCoordinate()
        for x in filenames:
            name = x.replace(img_dir, '')
            img = Image.open(str(x))
            region = img.crop((left, top,right, bottom))
            region.save(outpath + name)
        print(custom_fig.renderText('Done!'))

    def getDirandFiletype():
        global img_dir, outpath, filenames

        print("Please enter Your Images Path.  eg:D:\Download\jaffedbase\n\n########################################")
        img_dir = input("\nWhat is your image directory path : ")
        outpath = input("\nWhat is your output path where to be saved : ")

        while(outpath == img_dir):
            print('\nEnter a different path with the image directory!!')
            outpath = input("\nWhat is your output path where to be saved : ")

        filetype = input("\nEnter file type (eg: png) : ")
        data_path = os.path.join(img_dir)
        # read all files in the path mentioned
        filenames = glob.glob(data_path + "/*." + filetype)
        processed = 0
        for file in filenames:
            img = Image.open(str(file))
            width, height = img.size
            print("\nDimension of source images : "+str(width),str(height))
            processed += 1
            if processed >= 1:
                break

    def getCoordinate():
        global left, top, right, bottom, img
        left = int(input("\nEnter left coordinate : "))  # 50
        top = int(input("Enter top coordinate : "))  # 50
        right = int(input("Enter right coordinate : "))  # 190
        bottom = int(input("Enter bottom coordinate : "))  # 235


    main()
except SystemError:
    print("\nSorry Buddy. Your Coordinates are invalid. Plese Check Coordinates Again!")
except ValueError:
    print("\nPlease use Only Numbers for Coordinates!")
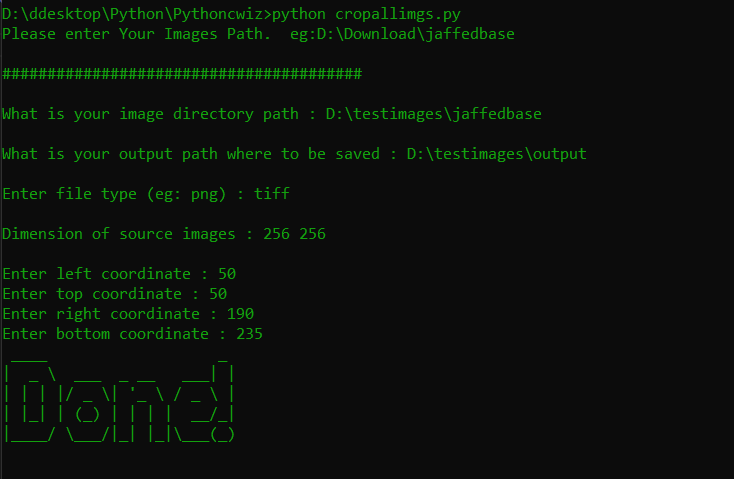
Images to be cropped are as follows.
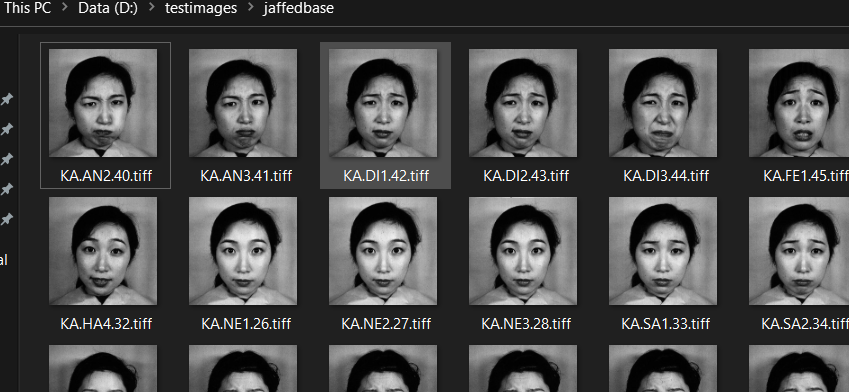
The resulted images are as follows.
Hope you enjoyed about this.
By Asahi
waithaw at 2021年11月02日 10:00:00
- 2021年11月01日
- 技術情報
Facebook to Metaverse
Mark Zuckerberg, the founder of facebook has announced that they are changing their parent company name.
The rebrand would likely position the blue Facebook app as one of many products under a parent company overseeing groups like Instagram, WhatsApp, Oculus, and more. With more than 10,000 employees already building consumer hardware like AR glasses on Facebook, Zuckerberg believes it will eventually be as ubiquitous as a smartphone.
Facebook Inc is now called Meta, the company said on Thursday, in a rebrand that focuses on building the “metaverse,” a shared virtual environment that it bets will be the successor to the mobile internet.

CEO Mark Zuckerberg spoke at the company’s Live Streaming Extended Virtual Reality Conference, stating that the new name reflects the work of investing in Metaverse rather than the social media service that continues to be called Facebook.

Metaverse is a term which broadly refers to the idea of a shared virtual realism that can be accessed by people using different devices.
“From now on, we’re going to be metaverse first, not Facebook first,” Mr Zuckerberg said. He suggested that Facebook app and branding will be removed from other apps, and that it will instead look to push the new Meta name. Mr Zuckerberg announced his company’s new name during a 90-minute presentation in which he argued that the metaverse will be the future of both his company and the internet.
He showed how through the use of virtual reality goggles and smart glasses, users will be able to add virtual objects to the real world. They could hang out with friends as well as appear in real meetings as holograms.
But he also mentioned they haven’t developed much of the technology behind the Metaverse yet and hasn’t provided any information about when it will release and so on.
Yuuma
yuuma at 2021年11月01日 10:10:00
- 2021年10月29日
- 技術情報
Export CSV file in JS
This time I would like to share about export a file as CSV format using Javascript HandSonTable. HandSonTable works with many of most popular languages like : React, Angualr, Vue and Javascript.
Then what is HandSonTable? HandSonTable is like data grid spreadsheet designed to hundreds of thousands of cells. HandSonTable is performed with so much features ex: search, sort, filter without delays. Let’s start!
Firstly, we need to do is to import handsontable.full.min.js and handsontable.full.min.css in html. After importing, we can now use HandSonTable. To display HandSonTable, we need to add a new div with id or class name attribute.
Import JS and Css file in header
<script src="https://cdn.jsdelivr.net/npm/handsontable@10.0/dist/handsontable.full.min.js"></script>
<link type="text/css" rel="stylesheet" href="https://cdn.jsdelivr.net/npm/handsontable@10.0/dist/handsontable.full.min.css" />
Add new div and download button for export CSV format
<div id="example1"></div>
<div class="controls">
  <button id="export-file">Download CSV</button>
</div>
Let’s start JS code!
For use HandSonTable, we must call that two attributes roughly first one is what place we want to append data so we will call our Id named with example1, and second one is how much data display with rows and cols and what kind of data display.
Then to call our id and button using javascript querySelector.
const container = document.querySelector('#example1');
const button = document.querySelector('#export-file');
const hot = new Handsontable(container, {
data: Handsontable.helper.createSpreadsheetData(7, 7),
colHeaders: true,
rowHeaders: true,
hiddenRows: { rows: [1, 3, 5], indicators: true },
hiddenColumns: { columns: [1, 3, 5], indicators: true },
height: 'auto',
licenseKey: 'non-commercial-and-evaluation'
});To export a file, we can use tabename.getPlugin(‘exportFile’);
After button click action is done, for download the file we can use javascript addEventListener with click property. For downloadFile and fileExtension must be ‘csv’ and fill your desire filename.
button.addEventListener('click', () => {
  exportPlugin.downloadFile('csv', {
    bom: false,
    columnDelimiter: ',',
    columnHeaders: false,
    exportHiddenColumns: true,
    exportHiddenRows: true,
    fileExtension: 'csv',
    filename: 'Handsontable-CSV-file_[YYYY]-[MM]-[DD]',
    mimeType: 'text/csv',
    rowDelimiter: '\r\n',
    rowHeaders: true
  });
});
Hoped you enjoyed reading this!
By Ami
asahi at 2021年10月29日 10:00:00
- 2021年10月28日
- VR
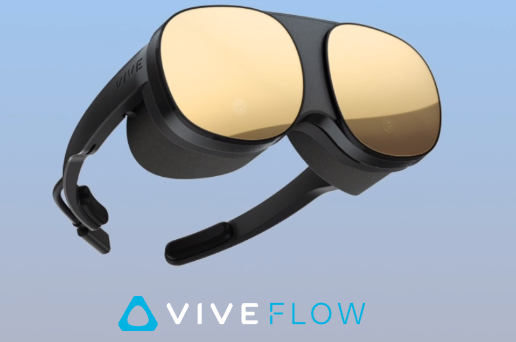
HTC社が新VRヘッドセット「Vive Flow」を発表!
HTC社が新VRヘッドセット「Vive Flow」を発表しました。
https://www.vive.com/us/product/vive-flow/overview/
スタンドアロン型VRヘッドセットとしてはFacebook社の「Oculus Quest 2」が性能やコストパフォーマンスの点で非常に優れており、市場のデファクト・スタンダードのようになっています。
Vive FlowをOculus Quest 2と比較した場合、残念ながら全体的にはOculus Quest 2のほうが優秀な点が多いです。
とはいえVive FlowにはOculus Quest 2にない利点もありますので、
今回はその点を紹介したいと思います。
重さ
VRヘッドセットは頭につけて使用するものなので、軽ければ軽いほど首への負担は少なく快適です。
Vive Flowの重さは189gです。Oculus Quest 2の503gと比べて圧倒的に軽量です。
ただVive Flowは外部バッテリーに接続して使用することが前提となっており、Oculus Quest 2のように本体にバッテリーは内蔵されていません。
度数調整
視力が悪い人限定ですが、Vive Flowには度数調整機能があり、眼鏡なしで使用できます。
Oculus Quest 2では眼鏡をかけてその上からヘッドセットを装着するので、
眼鏡の大きさによってはヘッドセットが窮屈になったり、取り外しが簡単におこなえないなどの不便な点がありました。視力が悪い人にとってはその辺りが解消されるのは大きな利点といえそうです。
装着方法
従来のVRヘッドセットは「かぶる」装着方法でしたが、Vive Flowは眼鏡の形状に近く、「かぶる」というより「かける」という表現がぴったりくるような装着方法になっています。
BeatSaberのような体を激しく動かすゲームではズレないか心配ですが、
気軽に装着するという点では優れていそうです。
木曜日担当:nishida
nishida at 2021年10月28日 10:00:00
 大人が楽しめるヒーリング絵本河童のカパと静かな森
 パワースポット 日本三大神滝布引の滝
 佐藤・広幸ドイツ魂
 Himeji Castle姫路城
 ボイドタイムお知らせアプリVoid Time 〜月を無視できない〜
 撮った写真をカレンダーに撮りカレ