Web Service
- 2021年12月02日
- Web Service
The 10 best new features in Laravel 8
1. app/Models Directory
The artisan:make model command will create the model in the app/Models directory. This feature was decided after Taylor asked people on Twitter how they feel about this.
If you don’t like that, it’s possible to delete the app/Models directory and artisan will create the model file in the app/ folder.
2. New Landing Page
Laravel 8 comes with a new landing page for a brand new install. It is now redesigned and It is built using TailwindCSS, includes light and dark-mode capabilities, and by default extends links to SaaS products and community sites.
3. Controllers Routing Namespacing
No more double prefix issues! In previous versions of Laravel, the RouteServiceProvider had an attribute called namespace that was used to prefix the controllers in the routes files. That created a problem when you were trying to use a callable syntax on your controllers, causing Laravel to mistakenly double prefix it for you. This attribute was removed and now you can import and use it without the issue.
It can also be used for single action controllers that have the __invoke method.
Route::get(‘/welcome’, [WelcomeController::class, ‘index’]);
Route::get(‘/welcome’, WelcomeController::class);
4. Route Caching
Laravel uses route caching to compile your routes in a PHP array that is more efficient to deal with. In Laravel 8, it’s possible to use this feature even if you have closures as actions to your routes. This should extend the usage of route caching for improved performance.
Route::get(‘/components’, function(){
return view(‘button’);
});
5. Attributes on Extended Blade Components
In Laravel 7 the child components didn’t have access to the $attributes passed to it. In Laravel 8 these components were enhanced and it is now possible to merge nested component attributes. This makes it easier to create extended components.
6. Better Syntax for Event Listening
In the previous versions of Laravel, when creating a closure-based event listener there was much repetition and a cumbersome syntax.
Event::listen(ConferenceScheduled::class, function( ConferenceScheduled $event){
info(get_class($event));
});
In Laravel 8 it’s simpler and cleaner:
Event::listen(function( ConferenceScheduled $event){
info(get_class($event));
});
//one line version
Event::listen(fn( ConferenceScheduled $event =>info(get_class($event))));
7. Queueable Anonymous Event Listeners
In Laravel 8 it is possible to create queueable closure from anywhere in the code. This will create a queue of anonymous event listeners that will get executed in the background. This feature makes it easier to do this, while in previous versions of Laravel you would need to use an event class and an event listener (using the ShouldQueue trait).
<?php
namespace App\Models;
use function Illuminate\Events\queueable;
Class User extends Authenticable
{
protected static function booting()
{
static::created( queueable ( function (User $user) {
info(‘ Queued: ‘.$user->name);
});
}
}
8. Maintenance Mode
artisan down —secret=laracon-2020
This is especially useful when you need to do some maintenance on your application and you want to take it down for your users but still let your developers investigate bugs. This will create a secret cookie that will be granted to whoever hits the correct endpoint, allowing it to use the application while in maintenance mode.
artisan down –render=”errors:503″
Pre-rendering an error view is a safe way for not exposing errors to your end user when your application is down (during a new deployment, for example). The Laravel 8 framework guarantees that your predefined error page will be displayed before everything else from the application.
artisan down –render=”welcome” –redirect=/ –status=200 –secret=laracon-2020
This combines the new features and will make the application only display a single predefined route, while still allowing for the people who have the secret to test and debug. This can be very useful when launching a new app.
9. Closure Dispatch “Catch”
Route::get(‘/queue-catch’, function(){
dispatch( function() {
throw new Exception(‘Something went wrong…’);
})->catch(function( Throwable $e){
info(‘Caught exception!!’);
})
});
Laravel has a pretty robust queue system that accepts a closure queue that will get serialized and executed in the background. Now we have a way to handle failures in case your job fails.
10. Exponential Backoff Strategy
This is an algorithm that decreases the rate of your job in order to gradually find an acceptable rate.
public function backoff(){
return [1,5,10];
}
Tsuki
tsuki at 2021年12月02日 07:02:50
- 2021年11月25日
- Web Service
Cleaning Up Laravel Controllers
Introduction
Controllers play a huge role in any MVC (model view controller) based project. They’re effectively the “glue” that takes a user’s request, performs some type of logic, and then returns a response.
The Problem with Bloated Controllers
Bloated controllers can cause several problems for developers. They can:
1. Make it hard to track down a particular piece of code or functionality.
2. Make it difficult to spot the exact location of a bug.
3. Make it harder to write tests for more complex requests.
The Bloated Controller
For this blog, I am going to use an example UserController:
class UserController extends Controller
{
    public function store(Request $request): RedirectResponse
    {
        $this->authorize('create', User::class);        $request->validate([
            'name'     => 'string|required|max:50',
            'email'    => 'email|required|unique:users',
            'password' => 'string|required|confirmed',
        ]);        $user = User::create([
            'name'     => $request->name,
            'email'    => $request->email,
            'password' => $request->password,
        ]);        $user->generateAvatar();
        $this->dispatch(RegisterUserToNewsletter::class);        return redirect(route('users.index'));
    }    public function unsubscribe(User $user): RedirectResponse
    {
        $user->unsubscribeFromNewsletter();        return redirect(route('users.index'));
    }
}

1. Lift Validation and Authorization into Form Requests


One of the first things that we can do with the controller is to lift any validation and authorization out of the controller and into a form request class.

We’ll use the following Artisan command to create a new form request:

php artisan make:request StoreUserRequest

The above command will have created a new app/Http/Requests/StoreUserRequest.php class that looks like this:

class StoreUserRequest extends FormRequest
{
    /**
     * Determine if the user is authorized to make this request.
     *
     * @return bool
     */
    public function authorize()
    {
        return false;
    }
    /**
     * Get the validation rules that apply to the request.
     *
     * @return array
     */
    public function rules()
    {
        return [
            //
        ];
    }
}


We can use the authorize() method to determine if the user should be allowed to carry out the request. The method should return true if they can and false if they cannot. We can also use the rules() method to specify any validation rules that should be run on the request body.

class StoreUserRequest extends FormRequest
{
    /**
     * Determine if the user is authorized to make this request.
     *
     * @return bool
     */
    public function authorize(): bool
    {
        return Gate::allows('create', User::class);
    }
    /**
     * Get the validation rules that apply to the request.
     *
     * @return array
     */
    public function rules(): array
    {
        return [
            'name'     => 'string|required|max:50',
            'email'    => 'email|required|unique:users',
            'password' => 'string|required|confirmed',
        ];
    }
}

Our controller should now also look like this:

class UserController extends Controller
{
    public function store(StoreUserRequest $request): RedirectResponse
    {
        $user = User::create([
            'name'     => $request->name,
            'email'    => $request->email,
            'password' => $request->password,
        ]);
        $user->generateAvatar();
        $this->dispatch(RegisterUserToNewsletter::class);
        return redirect(route('users.index'));
    }
    public function unsubscribe(User $user): RedirectResponse
    {
        $user->unsubscribeFromNewsletter();
        return redirect(route('users.index'));
    }
}

2. Move Common Logic into Actions or Services

Another step that we could take to clean up the store() method could be to move out our "business logic" into a separate action or service class.

class StoreUserAction
{
    public function execute(Request $request): void
    {
        $user = User::create([
            'name'     => $request->name,
            'email'    => $request->email,
            'password' => $request->password,
        ]);
        $user->generateAvatar();
        $this->dispatch(RegisterUserToNewsletter::class);
    }
}

Now we can update our controller to use the action:

class UserController extends Controller
{
    public function store(StoreUserRequest $request, StoreUserAction $storeUserAction): RedirectResponse
    {
        $storeUserAction->execute($request);
        return redirect(route('users.index'));
    }
    public function unsubscribe(User $user): RedirectResponse
    {
        $user->unsubscribeFromNewsletter();
        return redirect(route('users.index'));
    }
}

3. Use Resource or Single-use Controllers

A great way of keeping controllers clean is to ensure that they are either “ resource controllers” or “ single-use controllers”.

A resource controller is a controller that provides functionality based around a particular resource. So, in our case, our resource is the User model and we want to be able to perform all CRUD (create, update, update, delete) operations on this model. A resource controller typically contains index(), create(), store(), show(), edit(), update() and destroy() methods.

A single-use controller is a controller that only has one public __invoke() method. These are really useful if you have a controller that doesn't really fit into one of the RESTful methods that we have in our resource controllers.

So let’s create a new controller using the following Artisan command:


php artisan make:controller UnsubscribeUserController -i

Notice how we passed -i to the command so that the new controller will be an invokable, single-use controller. We should now have a controller that looks like this:

class UnsubscribeUserController extends Controller
{
    public function __invoke(Request $request)
    {
        //
    }
}

We can now move our method’s code over and delete the unsubscribe method from our old controller:

class UnsubscribeUserController extends Controller
{
    public function __invoke(Request $request): RedirectResponse
    {
        $user->unsubscribeFromNewsletter();
        return redirect(route('users.index'));
    }
}


Conclusion

Hopefully this article has given you an insight into the different types of things you can do to clean up your controllers in your Laravel projects.


Tsuki
tsuki at 2021年11月25日 10:00:00
- 2021年11月22日
- Web Service
Interesting APIs for your dummy data
Sometimes, we need dummy data to add in our projects before the production or you just want to create a fun project with some fun data. Today I will share some interesting data resources , also APIs you can try.
Movies API
The API service is intended for anyone interested in using images and data from movies, TV shows, and actors in their applications. Our API is a system provided by you and your team to acquire and use data and images programmatically.
API : API Overview — The Movie Database (TMDB) (themoviedb.org)
Meals API
The meal API allows you to access random food data and use it in your application. This API includes all meal categories including images, materials, videos, country of each meal and many other features.
API : TheMealDB.com
Jokes API
The random jokes API allows you to fetch random jokes data in an easy way using Fetch, Ajax XHR and etc.
API : icanhazdadjoke
Unsplash API
Unsplash is a website that hosts “beautiful and free images and photos that you can download and use for any project.” You can use that API to fetch photos from Unsplash. You can use the Unsplash API to create an application with a background that changes to a random image at different times of the day.
API : Unsplash Image API | Free HD Photo API
Marvel API
The Marvel Comics API gives developers access to information about Marvel’s vast comic library from anywhere.
API : Marvel Developer Portal
I am sure there are other interesting APIs around the world but that is all from me now. Enjoy the data.
Yuuma
yuuma at 2021年11月22日 10:00:00
- 2021年11月16日
- 技術情報, Web Service
Deploying a machine learning model into a web application with Django
Today, I would like to share about deploying a machine learning model into a web application using Django.
Note : In this article, I will focus only how to deploy a trained machine learning model in a web application with django rather than about the steps of machine learning processes.
First, I will create a simple ML model using multinomial Naive Bayes Classifier with the spam text dataset (spam.csv). The following code is to create spam text detection model.
First, import the necessary libraries.
import pandas as pd
import numpy as np
from sklearn.feature_extraction.text import CountVectorizer
from sklearn.model_selection import train_test_split
from sklearn.naive_bayes import MultinomialNB
And load dataset file with pandas.
data = pd.read_csv("D:\Python\datasets\spam.csv", encoding= 'latin-1')
data.head()
Then extract features and labels using CountVectorizer.
data = data[["class", "message"]]
x = np.array(data["message"])
y = np.array(data["class"])
cv = CountVectorizer()
X = cv.fit_transform(x) # Fit the Data
let’s split this dataset into training and test sets and train the model to detect spam messages
X_train, X_test, y_train, y_test = train_test_split(X, y, test_size=0.33, random_state=42)
clf = MultinomialNB()
clf.fit(X_train,y_train)
And save the model.
import pickle
pickle.dump(clf,open("spamdetection_model.sav", "wb"))
This will output spamdetection_model.sav file. This file will be used in the web app later.
So, Let’s start to develop a Django web app.
mkdir Spamdetection – First make a directory named /Spamdetection for the Django project.
cd Spamdetection – Change directory into the folder created
And to create a Django project, it is needed to run the following command.
D:/Spamdetection>django-admin startproject spamdetectapp
This command create a new directory named spamdetectapp.

To run the djangoapp, the following command is typed in the spamdetectapp directory created.
python manage.py runserver
Copy and open the link http://127.0.0.1:8000/ in a web browser. You should see Django Home page.
Then create views.py inside the same folder to work for getting inputs from users. In the main project folder, create a new folder named ‘templates’ to work with html files and new folders named ‘datasets’ and ‘mlmodels’. Then move spam.csv dataset file into the datasets folder and spamdetection_model.sav file into the mlmodels folder.
Now our project folder will be like that.
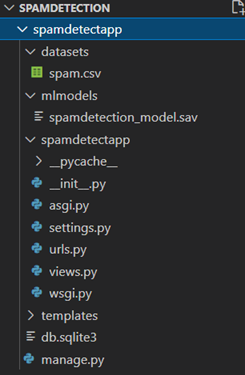
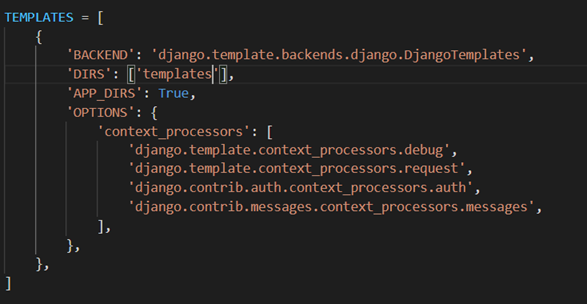
Now open settings.py and add ‘templates’ to register in ‘DIRS’ list in the ‘TEMPLATES’ list.
Now inside the urls.py file, add the following codes to configure the urls.
from django.contrib import admin
from django.urls import path

from spamdetectapp import views # add this new line to import views files

urlpatterns = [
    path('admin/', admin.site.urls),

    # add these new two lines to configure for home page and result page
    path('', views.home, name='home'),
    path('result/', views.result, name='result'),
]
And define two functions for home and result in views.py. And create a libs.py in mlmodels folder. In libs.py, we will define a getResult() function to get results from model prediction and use it in views.py.
views.py
from django.shortcuts import render
from mlmodels.libs import getResult

# for default home page view
def home(request):
    return render(request, 'index.html')

# for result page view
def result(request):
    message = request.POST['message']
    result = getResult(message)
    return render(request, 'result.html', {'result':result , 'message':message})
libs.py
import pandas as pd
import numpy as np
from sklearn.feature_extraction.text import CountVectorizer
from sklearn.model_selection import train_test_split

def getResult(message):
    import pickle
    data = pd.read_csv("D:\Spamdetection\spamdetectapp\datasets\spam.csv", encoding= 'latin-1')
    data.head()

    data = data[["class", "message"]]
    x = np.array(data["message"])
    y = np.array(data["class"])
    cv = CountVectorizer()
    X = cv.fit_transform(x) # Fit the Data

    model= pickle.load(open("D:\Spamdetection\spamdetectapp\mlmodels\spamdetection_model.sav", "rb"))

    data = cv.transform([message]).toarray()
    prediction = model.predict(data)
    if prediction == 'ham':
        return 'OK'
    elif prediction == 'spam':
        return 'SPAM'
Now we have done for backend. So, for frontend pages, let’s create index.html and result.html in templates folder.
Index.html
<!DOCTYPE html>
<html lang="en">
<head>
    <meta charset="UTF-8">
    <meta http-equiv="X-UA-Compatible" content="IE=edge">
    <meta name="viewport" content="width=device-width, initial-scale=1.0">
    <title>Spam Text Detection</title>
</head>
<body>
    <h1>Spam Text detection</h1>
    <form action="{% url 'result' %}" method="post">
        {% csrf_token %}
        <p>Message:</p>
        <input type="text" name="message">
        <br>
        <br>
        <input type="submit" value='Predict’>
    </form>
</body>

</html>
result.html
<!DOCTYPE html>
<html lang="en">
<head>
<meta charset="UTF-8">
<meta http-equiv="X-UA-Compatible" content="IE=edge">
<meta name="viewport" content="width=device-width, initial-scale=1.0">
<title>Spam Text Detection</title>
</head>
<body>
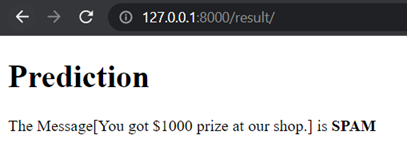
<h1>Prediction</h1>
The Message[{{message}}] is <b>{{result}}</b></body>
</html>
Now all is done. Once the above steps are completed, to stop and restart the server press Ctrl+C and run this command:
D:/Spamdetection/spamdetectapp> python manage.py runserver
And reopen the link in the browser. You will see the index home page.
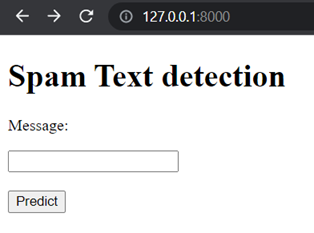
Let’s test with some messages.
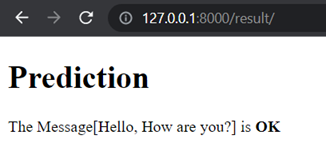
When message is ‘Hello, How are you?’, the result is as follow.
When the message is ‘You got $1000 prize at our shop.’, the result is as follow.
Hope you all enjoyed about this article.
By Asahi
waithaw at 2021年11月16日 10:00:00
- 2021年11月11日
- Web Service
APIs vs. Webhooks
An API (Application Programming Interface) enables two-way communication between software applications driven by requests. A webhook is a lightweight API that powers one-way data sharing triggered by events. Together, they enable applications to share data and functionality, and turn the web into something greater than the sum of its parts.
What is an API?
An API is like a portal through which information and functionality can be shared between two software services. The word “interface” is key to understanding an API’s purpose. Just like a web browser is an interface for a human end user to receive, send, and update information on a web server, an API is an interface that provides software programs with the same functionality.
What is a webhook?
A webhook can be thought of as a type of API that is driven by events rather than requests. Instead of one application making a request to another to receive a response, a webhook is a service that allows one program to send data to another as soon as a particular event takes place. Webhooks are sometimes referred to as “reverse APIs,” because communication is initiated by the application sending the data rather than the one receiving it. With web services becoming increasingly interconnected, webhooks are seeing more action as a lightweight solution for enabling real-time notifications and data updates without the need to develop a full-scale API.
Next week, I will continue to share the usage of webhook in Laravel.
By tsuki
tsuki at 2021年11月11日 10:00:00
 大人が楽しめるヒーリング絵本河童のカパと静かな森
 パワースポット 日本三大神滝布引の滝
 佐藤・広幸ドイツ魂
 Himeji Castle姫路城
 ボイドタイムお知らせアプリVoid Time 〜月を無視できない〜
 撮った写真をカレンダーに撮りカレ