Web Service
- 2021年10月28日
- Web Service
Clear Cache – Useful Chrome Extension
When we develope websites or mobile apps, one of the important facts we need to think is performance. For example, if the website is using too many images, we need to use cloud storage like S3. Sometimes we need to use cache for better performance.
But when we need to update our code and test again, we have to clear the browser cache to see the changes. Browser cache is cleared by the browser setting. I think it is a little busy for developers. So today I want to share useful chrome extension to clear browser cache.
Clear Cache is a useful chrome extension. Install the extension and select the small recycle icon in your browser to clear the browser cache. There are no confirmations and no extra dialogs to contend with. For easy usage, you can pin in your Chrome browser.
by tsuki
tsuki at 2021年10月28日 10:00:00
- 2021年10月18日
- Web Service
API Keys, JWT, OAuth
There are many authentication & authorization mechanisms to protect and restrict our APIs nowadays. Today I will talk about the three popular mechanisms among them.
API Keys
In the early days, API keys were the only option for limiting or tracking API traffic. The best thing about API keys is their simplicity. All you have to do is log in to the service, find its API key and use it in future requests for authentication. However, along with simplicity, there are drawbacks to API key security and user experience. If the API key grants full access to all operations that the API can perform, such as writing new data or deleting existing data, then the API key occurs and it is harmful for an attacker to know it. .. We recommend that you include your API key in the Authorization header when submitting your request.

JWT
I also talked about JWT in previous weeks. If you want to read more detail, you can check it out my previous articles.
JSON Web Token (JWT) can be used in a variety of scenarios. You can use a JWT access token to avoid database lookups because the JWT contains the base64-encoded version of the data needed to determine the identity and scope of the access. The JWT also contains signatures calculated using JWT data, creating own version of the signature using the same secret you used to create the JWT. This calculation is much more efficient than looking up the access token in the database to determine who it belongs to and whether it is valid. The JWT token must also be passed in the Authorization header. The disadvantage is that you can’t revoke the JWT on its own. Therefore, we recommend that you use JWT in combination with JWT refresh tokens and expiration tokens. If you want to improve security, you need to check the JWT signature for each API call to make sure that the expiration date is still valid.

OAuth
OAuth is the answer to communicate and access user data between services. Unlike API keys, OAuth does not require users to access the developer portal, settings, and so on. In fact, users can access their account with the a simple one click. The most common OAuth implementation uses one or both of the following tokens as below.
Access Token – Sent as an API key, allowing the application to access your data. Optionally, the access token can expire.
Refresh Token: Optional part of the OAuth flow, the renewal token gets a new access token if it has expired. The place where you are most likely to put it is also the authentication header.
Same with API keys, anyone with an access token can invoke harmful operations, such as deleting data. However, OAuth offers some improvements over API keys, like you can associate an access token with a specific scope. This limits the operations and types of data that the application can access so called permission. Also, when combined with a renewal token, the access token expires, which can limit negative impact. Finally, the access token can be revoked even if the refresh token is not in use.
Conclusion
Use API keys if you expect developers to build internal applications that do not need to access data from multiple users.
Use JWT in combination with OAuth if you want to limit database lookups but don’t need the ability to immediately revoke access.
Use OAuth access tokens if you want users to be able to easily authorize services without having to share private data or complicated works.
yuuma at 2021年10月18日 10:15:00
- 2021年09月06日
- Web Service
The structure of JWT
I talked about JWT last week and we get the basic idea of what is JWT, how it works etc. Today I will talk about the structure of JWT and its pros and cons.
If you haven’t read about JWT, you can read it here. So lets get started.
A JWT contains 3 parts separated by a “.” sign. These are header, payload and signature.
You can also take a look and can play debugging of these three parts at the official website of JWT called jwt.io
Header
Header contains the type of token and algorithm used for signing and encoding. Algorithms can be HMAC, SHA256, RSA, HS256 or RS256.
{
  "typ": "JWT",
  "alg": "HS256"
}
Payload
Payload contains the data we are exchange through client and server. Here is the sample payload.
{
  "uid": "1234567890",
  "name": "yuuma",
  "iat": 1231313123
}
We can also add expiration payload to add expiration date of that token. We have to be careful about sensitive informations since, JWT can be decoded easily.
Signature
Signatures are the most important part of JWT. It is calculated by encoding the header and payload using the Base64url encoding and concatenating them with a dot sign. This is then passed to the encryption algorithm. If he header or payload changes, signature has to calculated again.
//sample from jwt.io
HMACSHA256(
  base64UrlEncode(header) + "." +
  base64UrlEncode(payload),
  your-256-bit-secret
) secret base64 encoded
Tips
We have to be careful about these facts if we are using JWT token in your authorization mechanism
- Use HTTPS to protect the Authorization header.
- Better to prepare with blocklist tokens as the attacker might get JWT token before it’s expiration date.
- If the JWT is cookie-persistent, you need to create an HttpOnlyCookie. This restricts third-party JavaScript from reading the JWT token from the cookie.
- For XSS, the server side should always sanitize user-generated data.
- For CSRF, have to mitigate CSRF by using the source of the request and special request headers.
yuuma at 2021年09月06日 10:30:03
- 2021年08月30日
- Web Service
JWT (JSON Web Token)
You might be heard about JWT or even used it in your project for authorization. Today I will talk about JWT , what it’s and how it works.
JSON Web Token (JWT) is an open standard (RFC 7519) for securely transmitting information between parties as a JSON object.This information can be verified and trusted because it is digitally signed.
Where we can use JWT ?
JWT is a token-based authentication mechanism which is stateless. The server does not have store the information or data to hold session information.
Authorization:
This is the most common scenario for using JWT. Once the user is logged in, the next requests will be attached by JWT, allowing the user to access resources that are controlled with that token. Single Sign On is a feature that widely uses JWT nowadays, because of its small overhead and its ability to be easily used across different domains.
Information Exchange:
It’s also good for securely transmitting information between parties. Because JWTs can be signed—for example, using public/private key pairs—you can be sure the senders are who they say they are.
How it works
- User login with username and password or google / facebook.
- The authentication server verifies the credentials and issues a signed JWT using a secret salt or private key.
- The client uses the JWT to access protected resources by passing the JWT in the HTTP authorization header.
- The resource server then verifies the authenticity of the token using the public key / secret salt.
That is for now. I will talk about the JWT structure nextweek.
Yuuma
yuuma at 2021年08月30日 10:30:12
- 2021年07月12日
- Web Service
A touch to serverless framework – final part
We have created our serverless endpoint last week and lets tweak a bit more today by adding some parameters to our endpoint. Lets get started.
We don’t have to modify serverless.yml and lets keep the same way we did before.
events:
      - http:
          path: sample-endpoint
          method: GET
Lets modify the handler.js as we are adding a name parameter to our endpoint and get a different response depending on the input parameter. We will add a conditional statement for our name parameter in our handler.js like this.
if (event.queryStringParameters && event.queryStringParameters.name) {
    return {
      statusCode: 200,
      body: JSON.stringify(
        {
          message: 'Hello' + event.queryStringParameters.name,
          input: event,
        },
        null,
        2
      ),
    };
  }
So this will be our final result of handler.js
'use strict';

module.exports.hello = async (event) => {


  if (event.queryStringParameters && event.queryStringParameters.name) {
    return {
      statusCode: 200,
      body: JSON.stringify(
        {
          message: 'Hello' + event.queryStringParameters.name,
          input: event,
        },
        null,
        2
      ),
    };
  }

  return {
    statusCode: 200,
    body: JSON.stringify(
      {
        message: 'Go Serverless v1.0! Your function executed successfully!',
        input: event,
      },
      null,
      2
    ),
  }
};
Lets deploy our code and see the result.

Lets go to the endpoint from the browser but this time we will add a name parameter at the end of the url like this
?name=HlaingAs a final result, we will get a response like this.
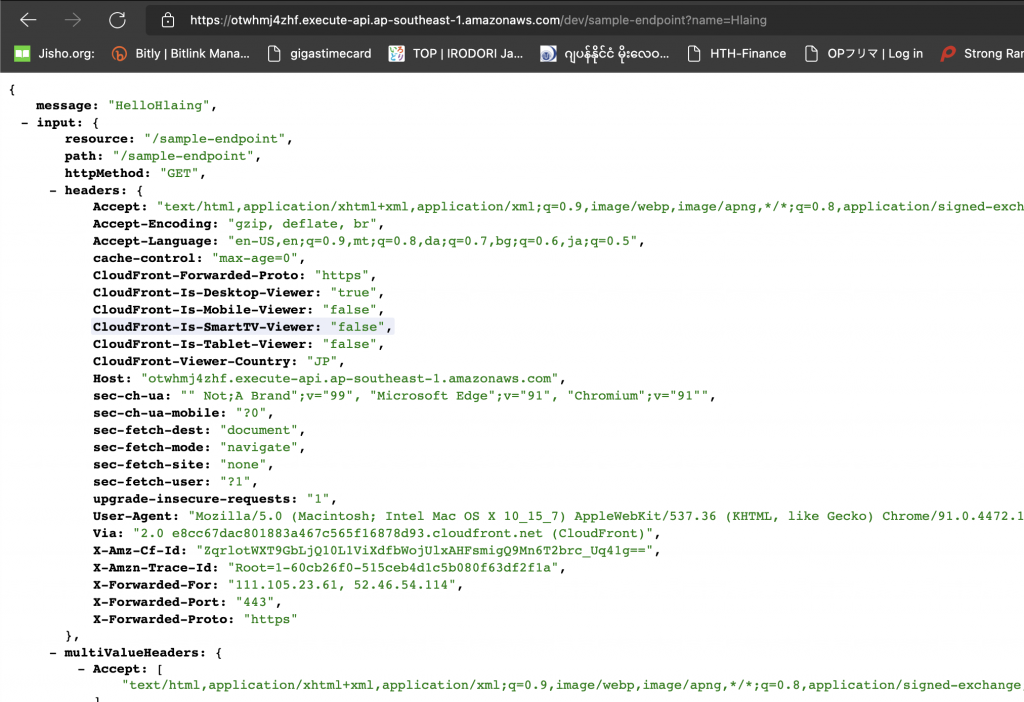
You can see the result of our name parameter in the json response of message data.
That’s all for today and we have successfully added a new parameter to our endpoint.
As a conclusion note, I have to say we can still do many things through this serverless project. We can also create other method type endpoint like POST. We can also create services like S3 buckets, DBs and so on through serverless.yml and deploying it. But let me stop the article series here as I also intended to get you a starting point to the serverless framework and I think you got it.
See you again . Yuuma
yuuma at 2021年07月12日 11:00:25
 大人が楽しめるヒーリング絵本河童のカパと静かな森
 パワースポット 日本三大神滝布引の滝
 佐藤・広幸ドイツ魂
 Himeji Castle姫路城
 ボイドタイムお知らせアプリVoid Time 〜月を無視できない〜
 撮った写真をカレンダーに撮りカレ