Deploying a machine learning model into a web application with Django
- 2021年11月16日
- 技術情報, Web Service
Today, I would like to share about deploying a machine learning model into a web application using Django.
Note : In this article, I will focus only how to deploy a trained machine learning model in a web application with django rather than about the steps of machine learning processes.
First, I will create a simple ML model using multinomial Naive Bayes Classifier with the spam text dataset (spam.csv). The following code is to create spam text detection model.
First, import the necessary libraries.
import pandas as pd
import numpy as np
from sklearn.feature_extraction.text import CountVectorizer
from sklearn.model_selection import train_test_split
from sklearn.naive_bayes import MultinomialNB
And load dataset file with pandas.
data = pd.read_csv("D:\Python\datasets\spam.csv", encoding= 'latin-1')
data.head()
Then extract features and labels using CountVectorizer.
data = data[["class", "message"]]
x = np.array(data["message"])
y = np.array(data["class"])
cv = CountVectorizer()
X = cv.fit_transform(x) # Fit the Data
let’s split this dataset into training and test sets and train the model to detect spam messages
X_train, X_test, y_train, y_test = train_test_split(X, y, test_size=0.33, random_state=42)
clf = MultinomialNB()
clf.fit(X_train,y_train)
And save the model.
import pickle
pickle.dump(clf,open("spamdetection_model.sav", "wb"))
This will output spamdetection_model.sav file. This file will be used in the web app later.
So, Let’s start to develop a Django web app.
mkdir Spamdetection – First make a directory named /Spamdetection for the Django project.
cd Spamdetection – Change directory into the folder created
And to create a Django project, it is needed to run the following command.
D:/Spamdetection>django-admin startproject spamdetectapp
This command create a new directory named spamdetectapp.

To run the djangoapp, the following command is typed in the spamdetectapp directory created.
python manage.py runserver
Copy and open the link http://127.0.0.1:8000/ in a web browser. You should see Django Home page.
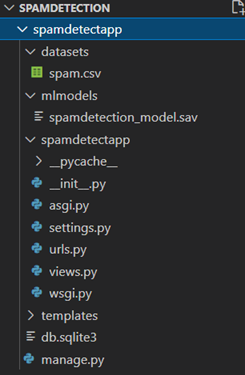
Then create views.py inside the same folder to work for getting inputs from users. In the main project folder, create a new folder named ‘templates’ to work with html files and new folders named ‘datasets’ and ‘mlmodels’. Then move spam.csv dataset file into the datasets folder and spamdetection_model.sav file into the mlmodels folder.
Now our project folder will be like that.
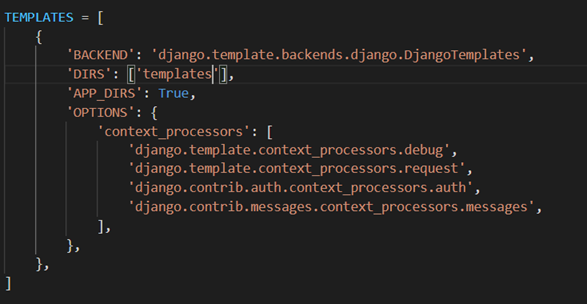
Now open settings.py and add ‘templates’ to register in ‘DIRS’ list in the ‘TEMPLATES’ list.
Now inside the urls.py file, add the following codes to configure the urls.
from django.contrib import admin
from django.urls import path

from spamdetectapp import views # add this new line to import views files

urlpatterns = [
    path('admin/', admin.site.urls),

    # add these new two lines to configure for home page and result page
    path('', views.home, name='home'),
    path('result/', views.result, name='result'),
]
And define two functions for home and result in views.py. And create a libs.py in mlmodels folder. In libs.py, we will define a getResult() function to get results from model prediction and use it in views.py.
views.py
from django.shortcuts import render
from mlmodels.libs import getResult

# for default home page view
def home(request):
    return render(request, 'index.html')

# for result page view
def result(request):
    message = request.POST['message']
    result = getResult(message)
    return render(request, 'result.html', {'result':result , 'message':message})
libs.py
import pandas as pd
import numpy as np
from sklearn.feature_extraction.text import CountVectorizer
from sklearn.model_selection import train_test_split

def getResult(message):
    import pickle
    data = pd.read_csv("D:\Spamdetection\spamdetectapp\datasets\spam.csv", encoding= 'latin-1')
    data.head()

    data = data[["class", "message"]]
    x = np.array(data["message"])
    y = np.array(data["class"])
    cv = CountVectorizer()
    X = cv.fit_transform(x) # Fit the Data

    model= pickle.load(open("D:\Spamdetection\spamdetectapp\mlmodels\spamdetection_model.sav", "rb"))

    data = cv.transform([message]).toarray()
    prediction = model.predict(data)
    if prediction == 'ham':
        return 'OK'
    elif prediction == 'spam':
        return 'SPAM'
Now we have done for backend. So, for frontend pages, let’s create index.html and result.html in templates folder.
Index.html
<!DOCTYPE html>
<html lang="en">
<head>
    <meta charset="UTF-8">
    <meta http-equiv="X-UA-Compatible" content="IE=edge">
    <meta name="viewport" content="width=device-width, initial-scale=1.0">
    <title>Spam Text Detection</title>
</head>
<body>
    <h1>Spam Text detection</h1>
    <form action="{% url 'result' %}" method="post">
        {% csrf_token %}
        <p>Message:</p>
        <input type="text" name="message">
        <br>
        <br>
        <input type="submit" value='Predict’>
    </form>
</body>

</html>
result.html
<!DOCTYPE html>
<html lang="en">
<head>
    <meta charset="UTF-8">
    <meta http-equiv="X-UA-Compatible" content="IE=edge">
    <meta name="viewport" content="width=device-width, initial-scale=1.0">
    <title>Spam Text Detection</title>
</head>
<body>
    <h1>Prediction</h1>
    The Message[{{message}}] is <b>{{result}}</b></body>
</html>
Now all is done. Once the above steps are completed, to stop and restart the server press Ctrl+C and run this command:
D:/Spamdetection/spamdetectapp> python manage.py runserver
And reopen the link in the browser. You will see the index home page.
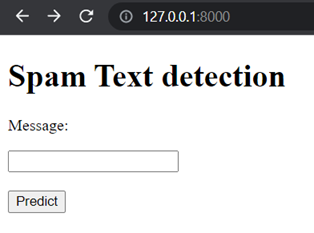
Let’s test with some messages.
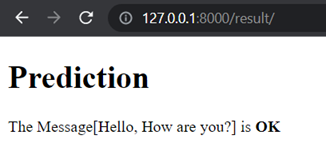
When message is ‘Hello, How are you?’, the result is as follow.
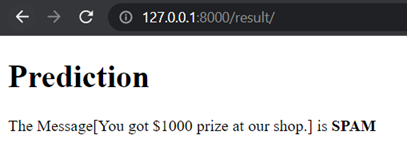
When the message is ‘You got $1000 prize at our shop.’, the result is as follow.
Hope you all enjoyed about this article.
By Asahi
waithaw at 2021年11月16日 10:00:00
 大人が楽しめるヒーリング絵本河童のカパと静かな森
 パワースポット 日本三大神滝布引の滝
 佐藤・広幸ドイツ魂
 Himeji Castle姫路城
 ボイドタイムお知らせアプリVoid Time 〜月を無視できない〜
 撮った写真をカレンダーに撮りカレ