アプリ関連ニュース
- 2023年9月07日
- AI
OpenAI GPT API(12) WebAppでの活用
nishida at 2023年09月07日 10:00:00
- 2023年9月06日
- 他の話題
X(旧Twitter)に通話機能が追加されるようです
tanaka at 2023年09月06日 10:00:00
AI website builders UI/UX designers should try
AI website builders are creating quite a buzz in the world of web design. Recently, I’ve come across some truly impressive ones that have caught my eye. Although we’re not quite at the point where you can simply type out an idea and watch a website magically appear, I have a strong sense that we’re getting closer. Here are the top 7 fantastic AI builder platforms that every UI/UX designer should keep an eye on:
1. Wix AI
Wix AI is perhaps the most user-friendly website builder I’ve encountered. You can pick it up in a day and have your site up and running. What’s more, it’s budget-friendly! And here’s the exciting part – they’re constantly adding new AI features, including text and image creation, background removal, and more. They’re on the verge of launching an AI site builder as well.
2. 10Web
Imagine that AI to set up a WordPress site and then fine-tuning it with the Elementor editor. That’s precisely what this tool offers! The best part? It seamlessly integrates with WordPress, the platform behind nearly half of all websites. It’s a simple and smart solution.
3. Bookmark
Recently, I stumbled upon a new AI website builder that’s brimming with features! It’s a perfect fit for businesses. Not only does it assist with SEO, but it also offers online selling options, generous storage, and detailed analytics.
4. Dora AI
Dora AI is at the forefront of bringing AI to website building. While it’s not available yet, the sneak peeks are quite promising. I’m hopeful that it lives up to its potential as showcased in the videos. You can join the waitlist on their website.
5. Framer AI
Framer AI stands out as one of my favorite website builders. Kudos to the Framer Team for crafting this gem! What sets Framer apart is its ability to not only create websites using AI but also allow you to edit them as if you were working on a Figma file. You can explore it yourself for free on their website.
6. Durable
With Durable, you can literally build your website in just 30 seconds with the power of AI. It’s a perfect solution for those in search of a business or professional site. In my experience, its results are even more impressive than Framer’s. With just a few tweaks, you’ll be ready to go live. This AI builder is arguably one of the most relevant options available.
7. Kleap
Kleap not only builds your website using AI but also assists you in selecting the right words and images. It even helps you track analytics, and its mobile-friendly design is impressive.
These AI website builders are revolutionizing the way designers approach web development. Keep a close watch on these platforms as they continue to evolve and make website creation more accessible and efficient than ever before. You can explore more by clicking the link of each topic.
This is all for now. Hope you enjoy that.
By Asahi
waithaw at 2023年09月05日 10:00:00
- 2023年9月04日
- AI
Google’s Duet AI
Gmail’s new AI companion will be able to help you compose your emails. Google announced Duet AI, an AI-powered companion. It is generally available to Workspace users and helps with various tasks such as meetings, documents, and Google Chat.
The company also said Duet AI will allow users to create longer, more personalized emails with just a tap, enhancing Gmail’s existing Smart Reply feature. On both web and mobile, his Gmail users who try Duet AI will now have access to a “Help Me Type” button that offers a variety of typing assistance options.
For example, Duet AI can understand the context of previous emails in a thread to create responses that are relevant to the current conversation, so you can now compose emails using your own words. You can also use AI features to make the tone of your draft emails more formal, or add more detail to your message to refine your drafts.
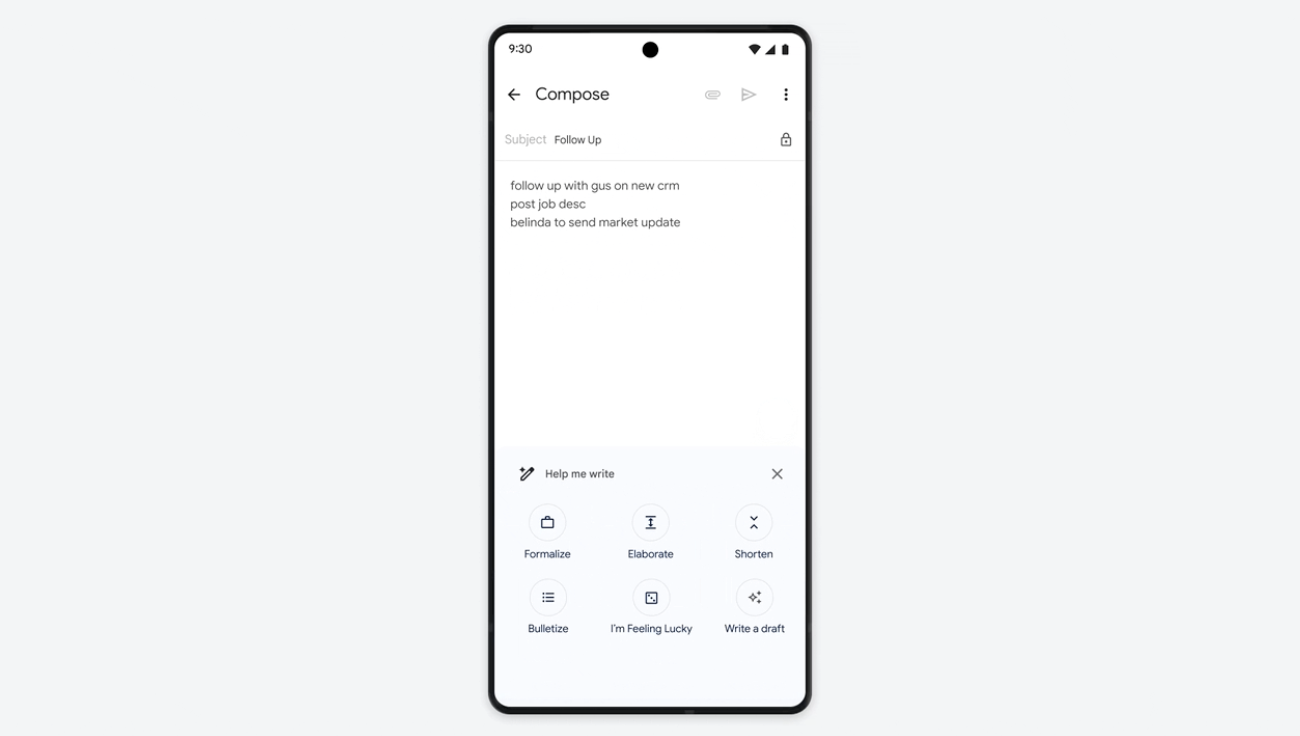
Additionally, Google has added the “I’m Feeling Lucky” feature, a backtrack to Google button that takes you directly to the first search result when you type a query into the Google search box.
In this case, however, the AI offers an “I feel lucky” option that allows you to choose from a wide variety of fun variations in tone and style for the email content you compose.
A similar “Help Me Write” feature is coming to Docs, Google said. With this feature, you can change the tone of your content, summarize sections, add bullet points, elaborate or shorten text, and receive another generated draft if you want. I can. I don’t like the first one (“try again”) etc.
yuuma at 2023年09月04日 10:00:00
- 2023年8月24日
- AI
OpenAI GPT API(11) WebAppでの活用
nishida at 2023年08月24日 10:00:00
 大人が楽しめるヒーリング絵本河童のカパと静かな森
 パワースポット 日本三大神滝布引の滝
 佐藤・広幸ドイツ魂
 Himeji Castle姫路城
 ボイドタイムお知らせアプリVoid Time 〜月を無視できない〜
 撮った写真をカレンダーに撮りカレ