技術情報
- 2021年07月30日
- 技術情報
Flutter – Aspect Ratio Widget
These days I studies flutter widgets a lot. From these studies, I would like to share you one thing – this is the importance of aspect ratio and how to use this widget.
Care about proportions more than exact dimensions?
When laying out your app, you often don’t care about the exact dimensions of which it will take. But you do care about the aspect ratio. You want the widget to be this wide irrespective of the actual dimensions or you want it to be slim or exactly square. Flutter solves this by providing the Aspect Ratio widget.
AspectRatio()you give it an AspectRatio, a child, and, well , that’s it.
AspectRatio(
 aspectRatio: 3 / 2,
child:  MyWidget(),
)
Aspect ratio is the ratio between the width and height of a box. It’s often written as a fraction, like 3/2, as in three parts of width to two parts of height. But let’s not kid ourselves – it’s really just a double: 3 over 2 is just 3 divided by 2, which is 1.5 – the same thing.
AspectRatio(
 aspectRatio: 1.5,
child:  MyWidget(),
)
But don’t worry! Dart is smart enough to do the computation for you during compilation. So it’s okay and more readable to provide the aspect ratio as a fraction.
And one more thing – make sure you actually let the AspectRatio widget size it’s child. If you put AspectRatio into something like Expanded, then that will be forced by it’s parent to expand.
Expanded(
 child: AspectRatio(
  aspectRatio: 3 / 2,
  child: MyWidget(),
 ),
)
Tightly fitted widgets like Expanded don’t give their children a choice- harsh. If this happens to you, just put something like Align between the Expanded and the AspectRatio.
Expanded(
 child: Align(
 alignment: Alignment.bottomCenter,
  child: AspectRatio(
   aspectRatio: 3 / 2,
   child: MyWidget(),
  ),
 ),
)
Align will be forced by Expanded to fill the area. But it will let it’s child assume it’s own proportions.
Hope you enjoyed the article!
By Ami
asahi at 2021年07月30日 10:00:58
- 2021年07月19日
- 技術情報
Rare HTML tags you mightn’t notice
Today I will talk about some html tags which are not very well-known but of course they are so useful if you know them. So lets get started.
<s> tag
S tag similar to the line-through value of a text decoration CSS property. This is very useful when you need to represent content that is no longer relevant or valid.
Price - <s>100</s>
<p>Discount Price - 70<p>
<ruby>, <rt>, and <rp> tags
The Ruby <ruby> HTML element represents small annotations that are rendered above, below, or next to base text, usually used for showing the pronunciation of East Asian characters.
The HTML Ruby fallback bracket () element is used to provide fallback brackets to browsers that do not support the display of ruby annotations using the element.
<ruby>
  お休み <rp>(</rp><rt>Oyasumi</rt><rp>)</rp>
</ruby>
<detail> Tag
This tag is used to specify additional details that the user can show or hide on click.
<details>
<summary>Click</summary>
<p>Helo</p>
</details>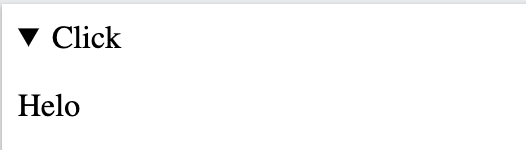
<abbr> tag
The tag displays the full meaning of the abbreviation when the user hovers the cursor over the abbreviation.
<p>My name is <abbr title="Hlaing Tin Htun">Hlaing</abbr> </p>
Well , there are some other interesting tags you probably don’t know yet. Discovering them might be very useful in our daily works relating with creating HTML elements.
Yuuma
yuuma at 2021年07月19日 11:41:13
- 2021年07月09日
- 技術情報
Creating a simple GridView in flutter
During studying flutter, I learned a beautiful and simple grid system. These interesting and simple grid view layout topics I would like to share you today.
Ever created with a multiple layout with multiple rows within a column?
Try a GridView! While there are multiple GridView constructors, the most common way to create a GridView is the count constructor.
GridView.count(
..
..
)
Start by listing all the items you want in the grid,
GridView.count(
children: [allItems],
)
but it doesn’t end there, control how many items you want to across the grid, by setting the crossAxisCount property.
GridView.count(
crossAxisCount: 1,
children: [allItems],
)
Setting it to 1 makes it look like a normal list. And if your items want to some social distancing? Use mainAxisSpacing gives horizontal space between the rows and crossAxisSpacing provides vertical space between the columns.
GridView.count(
mainAxisSpacing: 28.0,
crossAxisCount: 2,
children: [allItems],
)
Now Let’s make simple grid view using GridView.count constructor.
GridView.count(
  primary: false,
  padding: const EdgeInsets.all(20),
  crossAxisSpacing: 10,
  mainAxisSpacing: 10,
  crossAxisCount: 2,
  children: <Widget>[
    Container(
      padding: const EdgeInsets.all(8),
      child: const Text("He'd have you all unravel at the"),
      color: Colors.teal[100],
    ),
    Container(
      padding: const EdgeInsets.all(8),
      child: const Text('Heed not the rabble'),
      color: Colors.teal[200],
    ),
    Container(
      padding: const EdgeInsets.all(8),
      child: const Text('Sound of screams but the'),
      color: Colors.teal[300],
    ),
    Container(
      padding: const EdgeInsets.all(8),
      child: const Text('Who scream'),
      color: Colors.teal[400],
    ),
    Container(
      padding: const EdgeInsets.all(8),
      child: const Text('Revolution is coming...'),
      color: Colors.teal[500],
    ),
    Container(
      padding: const EdgeInsets.all(8),
      child: const Text('Revolution, they...'),
      color: Colors.teal[600],
    ),
  ],
)
The result is!

By Ami
asahi at 2021年07月09日 10:00:37
- 2021年07月08日
- 技術情報, Web Service
sourcetree/githubでの認証エラーの対処方法
nishida at 2021年07月08日 10:00:48
- 2021年06月25日
- 技術情報
Laravel 8 Push Notification using Firebase[2]
Here is final part how to do push notification using Firebase.Let’s start it.
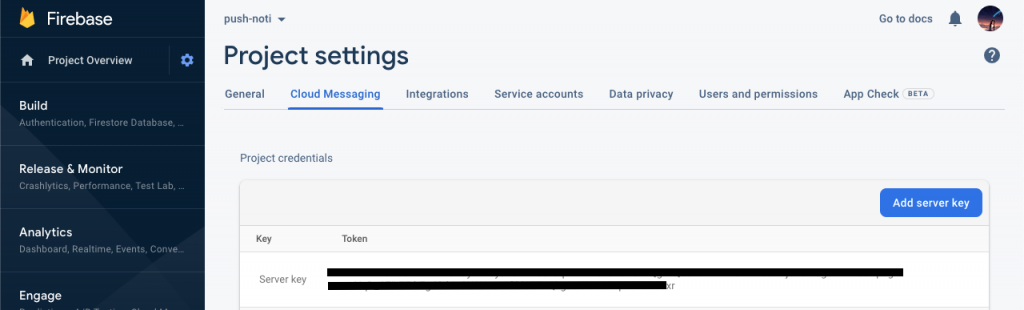
Get Firebase Cloud Messaging (FCM) Server Key
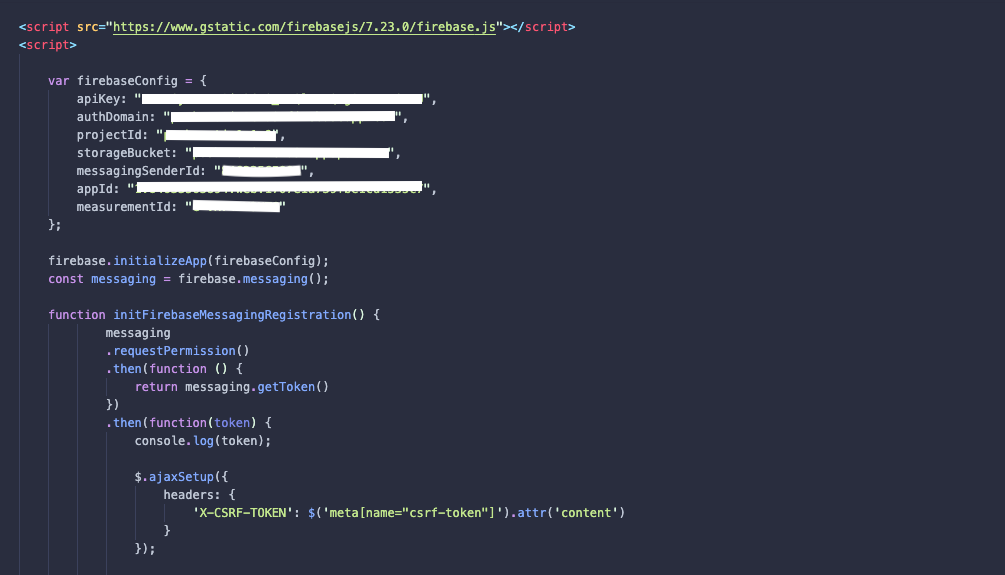
This step will show how to get FCM key and Firebase web app’s configuration credentials.
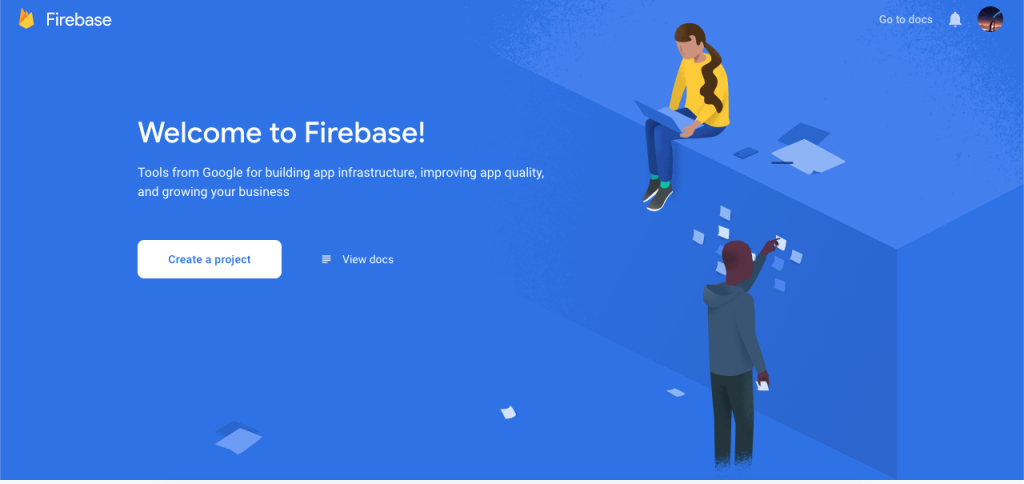
Then firstly go to the Firebase site and we need to create a project.
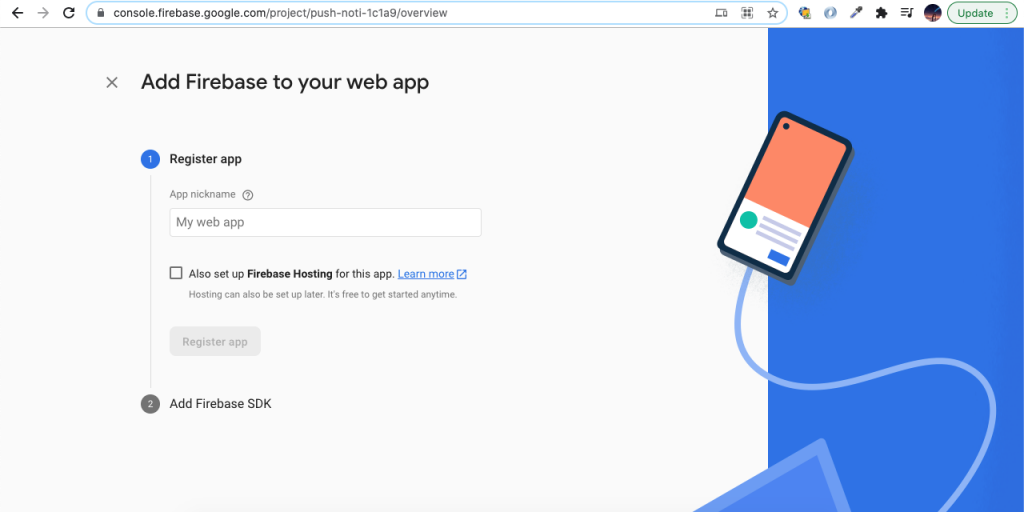
Then add your notification app name for adding Firebase to web app.
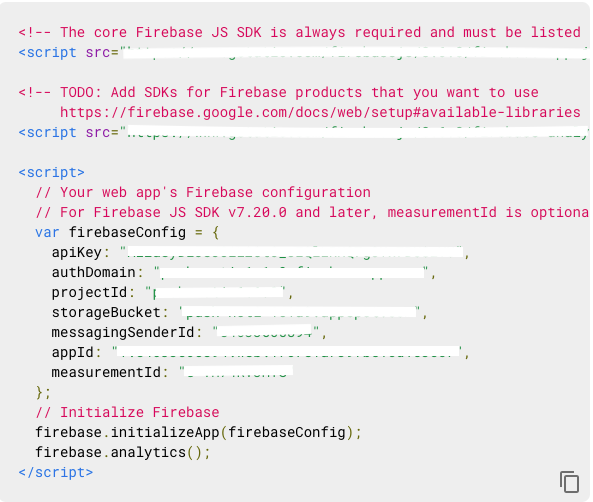
Then copy the Firebase configuration keys, and this will help to connect laravel to Firebase.
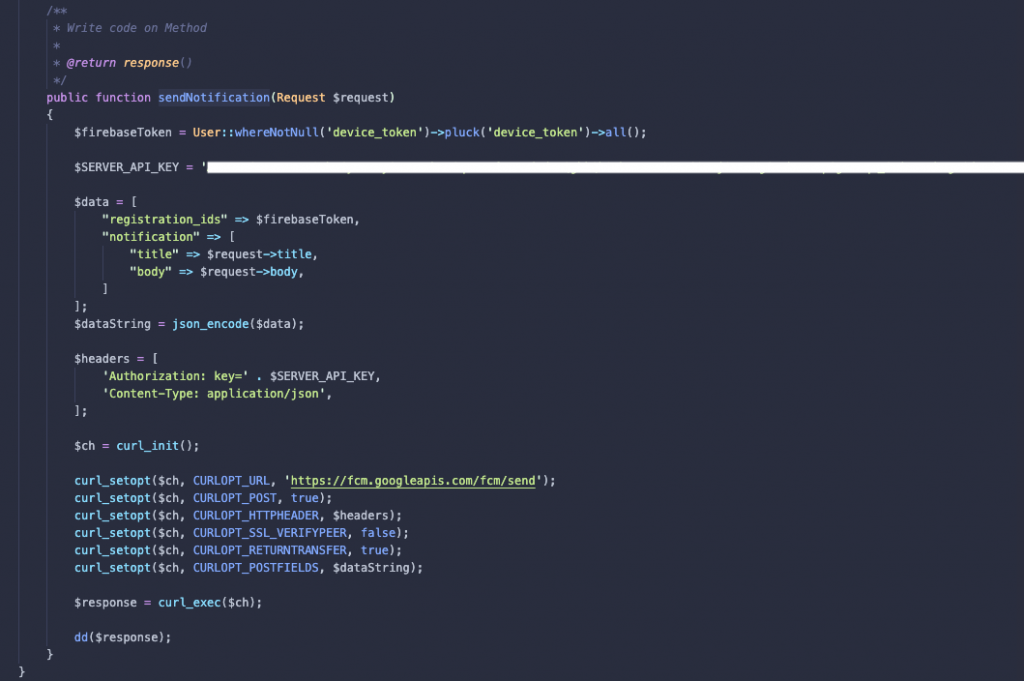
Next, go to the project dashboard setting and copy the sever key and paste in HomeController of SERVER_API_KEY variable in sendNotification() function. Next step create the controller and let’s add the key.
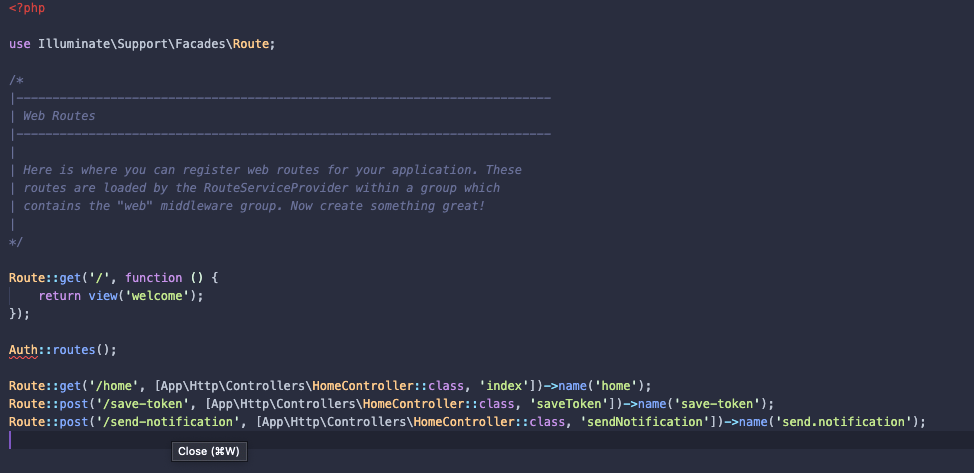
Create Route
We need to do some of routes to store token and send push notification so let’s add our routes in web.php.
routes/web.php
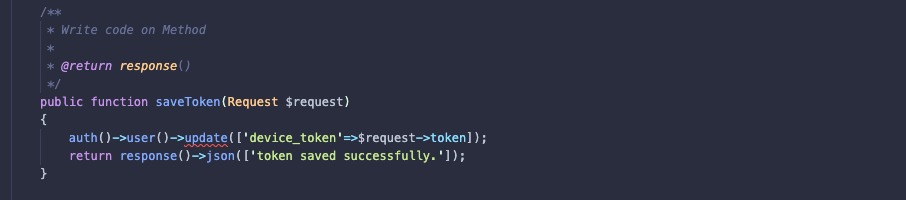
Create Controller
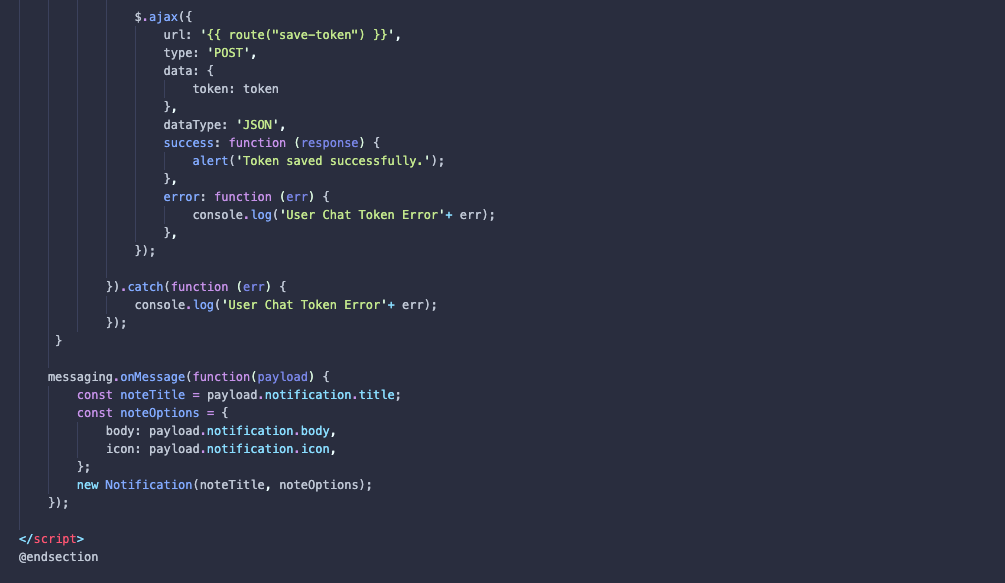
Here, we need add saveToken() and sendNotification() method for admin route in HomeController.
app/Http/Controllers/HomeController.php
Then update the home.blade.php
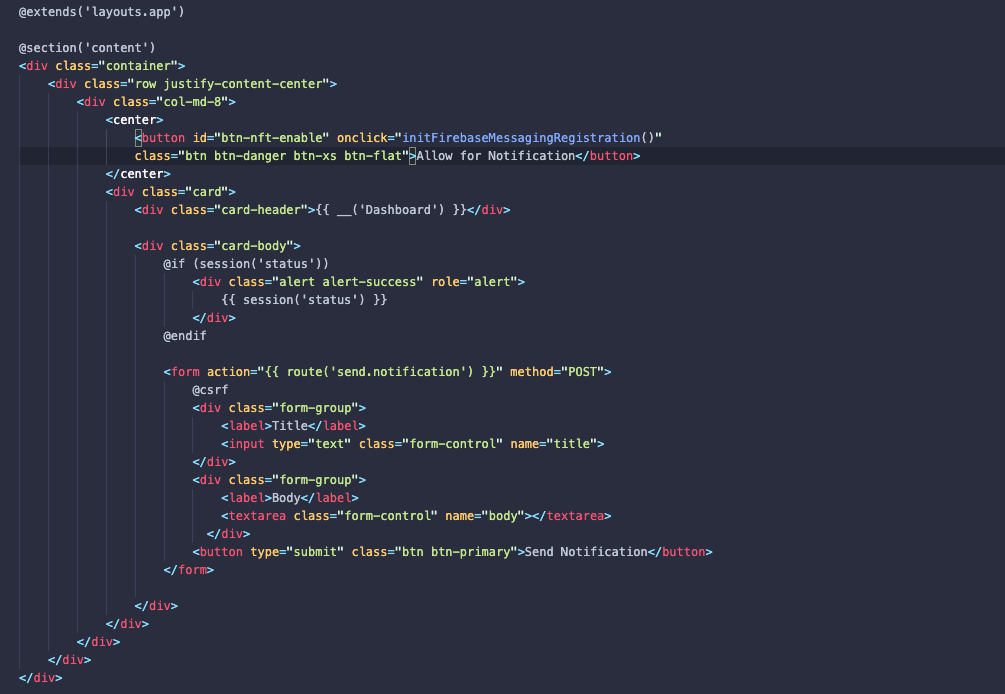
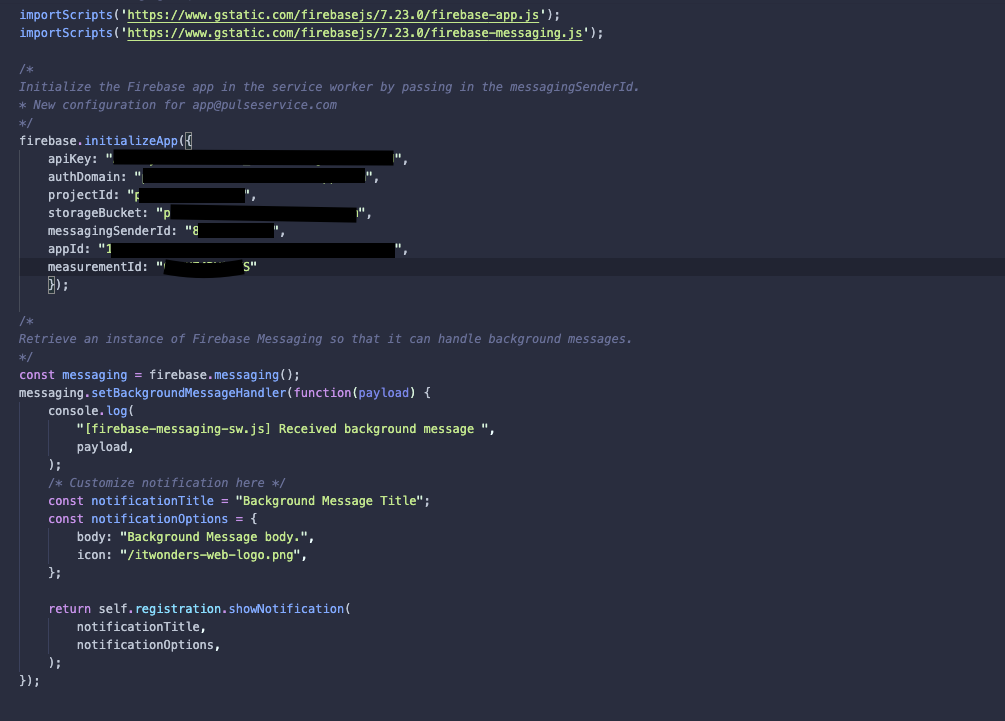
In the final step, we have to create head over to a public folder and create a new firebase-messaging-sw.js file; this file holds the web push notification configurations.
public/firebase-messaging-sw.js
Finally, to see the push notification results we need to execute php artisan serve command. Next we will do register, signed-in and then click on the allow notification button, it will generate the device id, also add push notification title and body in the given form.
we will receive notification as like bellow:

By Ami
asahi at 2021年06月25日 10:00:20
 大人が楽しめるヒーリング絵本河童のカパと静かな森
 パワースポット 日本三大神滝布引の滝
 佐藤・広幸ドイツ魂
 Himeji Castle姫路城
 ボイドタイムお知らせアプリVoid Time 〜月を無視できない〜
 撮った写真をカレンダーに撮りカレ