技術情報
- 2021年11月26日
- 技術情報
JavaScript HandSonTable Renderer Memo

I would like to share about how to renderer as your desire cells when you use HandSonTable. HandSonTable can’t directly insert html elements into cells. But after declaration renderer:html in our table of cell, we can use html elements as your desire. Second ways is to create custom renderer in cells properties with our own way.
Firstly we will create simple html file. In this file we will import handsontable.min.js and handsontable.min.css. We can get these file script from this site cdnjs.com.
<script src="https://cdn.jsdelivr.net/npm/handsontable@11.0/dist/handsontable.full.min.js"></script>
<link type="text/css" rel="stylesheet" href="https://cdn.jsdelivr.net/npm/handsontable@11.0/dist/handsontable.full.min.css" />
To insert our table, create a div with id attribute and call this id with JS querySelector.
<div id="example1" class="hot "></div>
const container = document.querySelector('#example1');
Usage of HandSonTable
const hot = new Handsontable(container, {
data : data
});
const data = [
{ id: 1, name: 'Suga', isActive: true, date: '2021-11-25' },
{ id: 2, name: 'Jimin', isActive: false, date: null },
{ id: 3, name: 'JHope', isActive: true, date: null },
{ id: 4, name: 'V', isActive: false, date: null },
];If you want to add colsHeader, set to true => colHeaders : true
And if you want to add strict cell type and render columns, we can set inside columns.
  columns: [
    { data: 'id', type: 'text' },
    // 'text' is default, you don't actually need to declare it
    { data: 'name', renderer: yellowRenderer },
    // use default 'text' cell type but overwrite its renderer with yellowRenderer
    { data: 'isActive', type: 'checkbox' },
    { data: 'date', type: 'date', dateFormat: 'YYYY-MM-DD' },
  ],
I will add another custom renderer named with greenRenderer but this greenRenderer will not add all the cell, just add some row. So I will use this greenRenderer inside a cell.
 cells(row, col, prop) {
    if (row === 3 && col === 0) {
      this.renderer = greenRenderer;
    }
  }
yellowRenderer function => this function will add all the cell with background color yellow.
const yellowRenderer = function(instance, td, row, col, prop, value, cellProperties) {
  Handsontable.renderers.TextRenderer.apply(this, arguments);
  td.style.backgroundColor = 'organe';
};
greenRenderer function => this function will add some of cell with background color red.
const greenRenderer = function(instance, td, row, col, prop, value, cellProperties) {
  Handsontable.renderers.TextRenderer.apply(this, arguments);

  td.style.backgroundColor = 'purple';
};
If you want to set custom colWidths , then set colWidths to your desire value.
colWidths : 100Hope you enjoyed about this article!
By Ami

kishimoto at 2021年11月26日 10:00:00
- 2021年11月24日
- 技術情報
Django & Laravel
Today I would like to share about advantages and disadvantages between Django and Laravel framework. First of all, as we know, each framework has each property and market. So this article just describes about the pros and cons.
What is Django?
Django is a web framework operating with Python programming language. Django is more suitable for implementing such technologies as AI(Artificial Intelligence) and ML(Machine Learning). Django follows the MVT(model view template) architectural pattern. It is adaptable to almost any project in various industries and includes various ready-made feature packages.
What is Laravel?
Laravel is a web framework that runs on PHP and maintains the MVC (model view controller) architectural pattern. It involves lots of additional libraries that make the development process more simple and supports the object-oriented approach. Laravel is supported by comprehensive documentation and detailed tutorials.
Advantages of Django
- is easily adjustable to any project;
- scalability;
- SEO tools included;
- quick prototype creating;
- generous dev community support and extensive documentation;
- easy data management
Disadvantages of Django
- Knowledge of full system is required to work
- creating API by yourself
- not very suitable for small projects
- Uses routing pattern specify its URL
Advantages of Laravel
- fast development
- clean and user-friendly architecture
- growing developer community
- a built-in command-line Artisan
- large cloud storage for files
- an easy way to build API
- ability to operate on numerous file systems simultaneously
Disadvantages of Laravel
- the syntax is difficult for beginners
- having to deal with standards
- no shared hosting support included
- unnecessary queries on databases
That is all for now. Hope you enjoy it.
By Asahi
kishimoto at 2021年11月24日 10:00:00
- 2021年11月19日
- 技術情報
Let’s create flutter UI without wasting too much time!
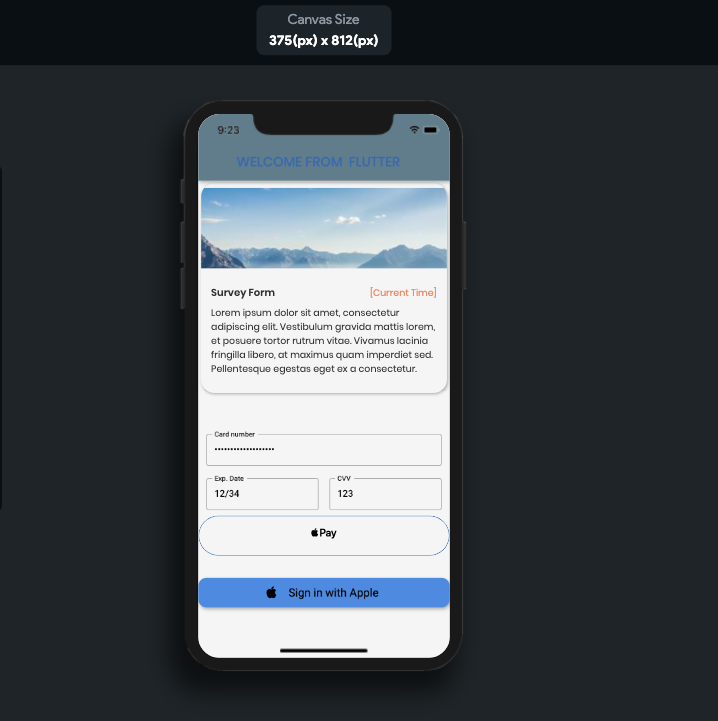
This time I would like to share about to create flutter design in mobile apps easily and quickly drag and drop. This name is flutter flow site that I found out.
Let’s take a look the site!
Firstly, we will create free account and after creation complete, we will see this page.
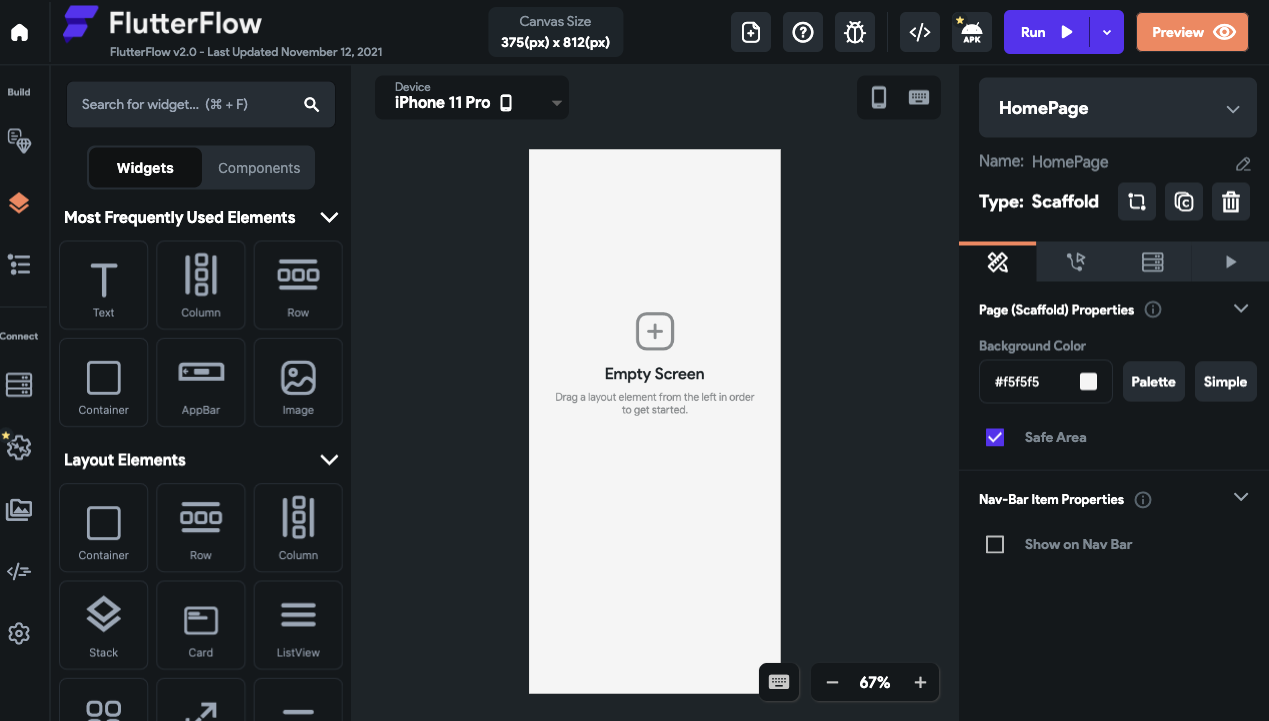
In the left side activity bar, we will see all of widgets, layouts, most popular form design etc. that you want to desire creation.
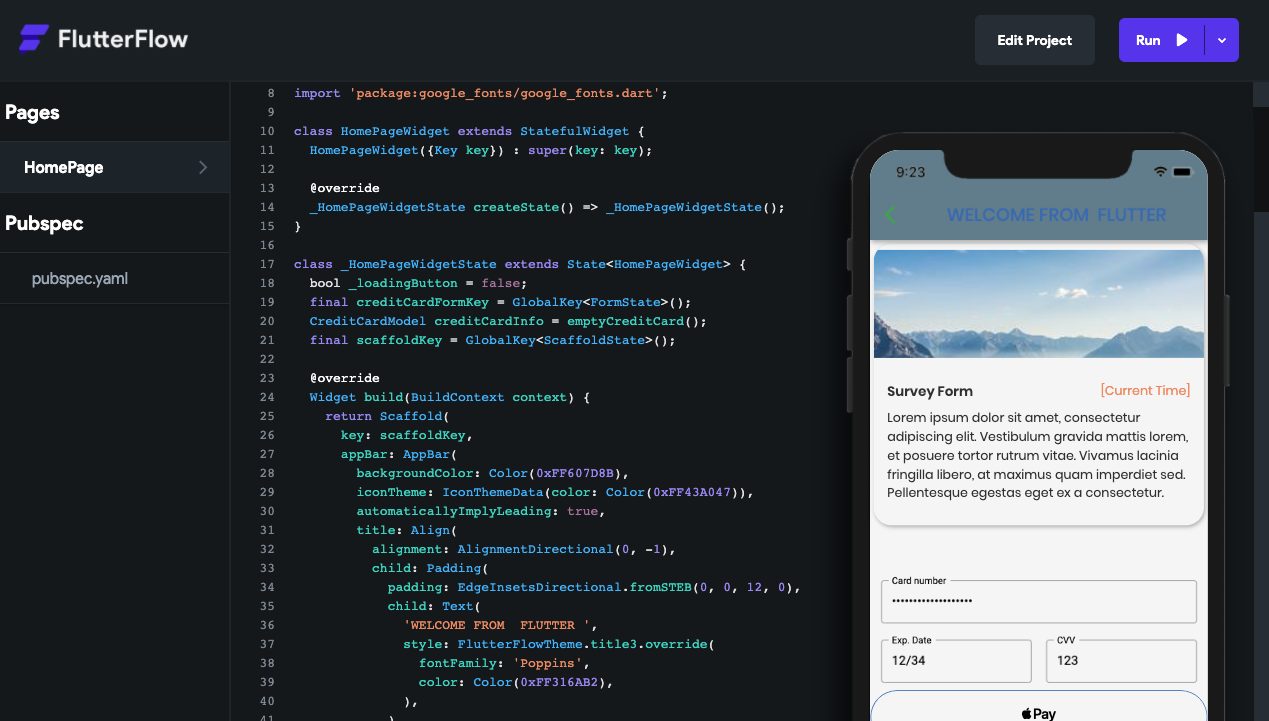
After running project or without running project, you can get your creation design code.And also if you want to get apk that also available. The below image is my creation of flutter code simple.
Hope you enjoyed my sharing article!
By Ami
kishimoto at 2021年11月19日 10:00:00
- 2021年11月18日
- 技術情報
LaravelでPDF出力処理を作成する
今回はLaravelでPDF出力をおこなうためのライブラリ「laravel-dompdf」の導入方法と
使用方法について紹介したいと思います。
必要なファイルのインストール
laravel-dompdf
https://github.com/barryvdh/laravel-dompdf
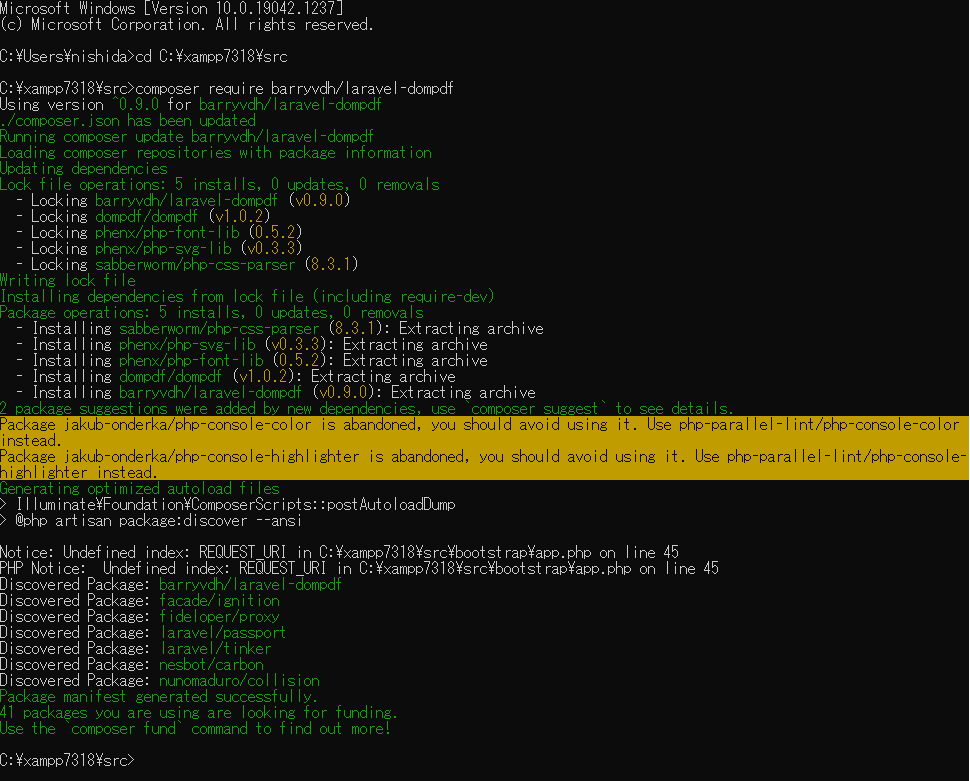
プロジェクトのルートディレクトリに移動をおこない
以下のコマンドを実行します。
composer require barryvdh/laravel-dompdf
※この操作をおこなうためにはcomposer 2のインストールが必要です。
コントローラー側の出力処理
PDFのレイアウトはbladeテンプレートのViewを作成するのと同じ要領でhtml/cssを使用して作成できます。
以下のようにテンプレートのViewを指定します。
$pdf = \PDF::loadView('pdf_template');
生成されたPDFをダウンロードさせるには以下の記述をおこないます。
以下の場合、ファイル名が「generated_pdf.pdf」のPDFファイルがダウンロードされます。
return $pdf->download('generated_pdf.pdf');
viewの準備
htmlのbladeテンプレートViewと同様に以下の階層にbladeテンプレートを作成します。\src\resources\views\pdf_template.blade.php
ページレイアウトはhtml/cssを使用して作成します。
PDFの改ページにはcssの page-break-after: always が使用できます。
<style>
    hr {
        page-break-after: always;
    }
</style>
PDFに日本語を表示する
標準の状態では日本語の表示に対応していませんので、
日本語用フォントを手動でインストールする必要があります。
今回はオープンソースの日本語フォント「IPAexフォント」を使用する方法を説明します。
IPAexフォントおよびIPAフォントについて
https://moji.or.jp/ipafont/
IPAexフォントは以下よりダウンロード可能です。
https://moji.or.jp/ipafont/ipafontdownload/
上記URLからダウンロードしたフォントファイル「ipag.ttf」を以下に配置します。
\src\storage\fonts\ipag.ttf
viewでは以下のように記述してフォント指定をおこないます。
<style>
    @font-face {
        font-family: ipag;
        font-style: normal;
        font-weight: normal;
        src: url('{{ storage_path('fonts/ipag.ttf') }}') format('truetype');
    }
    @font-face {
        font-family: ipag;
        font-style: bold;
        font-weight: bold;
        src: url('{{ storage_path('fonts/ipag.ttf') }}') format('truetype');
    }
</style>
木曜日担当:nishida
nishida at 2021年11月18日 10:00:00
- 2021年11月16日
- 技術情報, Web Service
Deploying a machine learning model into a web application with Django
Today, I would like to share about deploying a machine learning model into a web application using Django.
Note : In this article, I will focus only how to deploy a trained machine learning model in a web application with django rather than about the steps of machine learning processes.
First, I will create a simple ML model using multinomial Naive Bayes Classifier with the spam text dataset (spam.csv). The following code is to create spam text detection model.
First, import the necessary libraries.
import pandas as pd
import numpy as np
from sklearn.feature_extraction.text import CountVectorizer
from sklearn.model_selection import train_test_split
from sklearn.naive_bayes import MultinomialNB
And load dataset file with pandas.
data = pd.read_csv("D:\Python\datasets\spam.csv", encoding= 'latin-1')
data.head()
Then extract features and labels using CountVectorizer.
data = data[["class", "message"]]
x = np.array(data["message"])
y = np.array(data["class"])
cv = CountVectorizer()
X = cv.fit_transform(x) # Fit the Data
let’s split this dataset into training and test sets and train the model to detect spam messages
X_train, X_test, y_train, y_test = train_test_split(X, y, test_size=0.33, random_state=42)
clf = MultinomialNB()
clf.fit(X_train,y_train)
And save the model.
import pickle
pickle.dump(clf,open("spamdetection_model.sav", "wb"))
This will output spamdetection_model.sav file. This file will be used in the web app later.
So, Let’s start to develop a Django web app.
mkdir Spamdetection – First make a directory named /Spamdetection for the Django project.
cd Spamdetection – Change directory into the folder created
And to create a Django project, it is needed to run the following command.
D:/Spamdetection>django-admin startproject spamdetectapp
This command create a new directory named spamdetectapp.
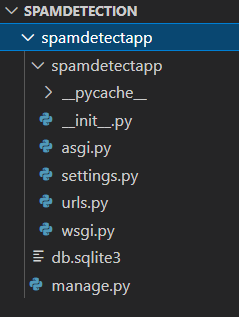
To run the djangoapp, the following command is typed in the spamdetectapp directory created.
python manage.py runserver
Copy and open the link http://127.0.0.1:8000/ in a web browser. You should see Django Home page.
Then create views.py inside the same folder to work for getting inputs from users. In the main project folder, create a new folder named ‘templates’ to work with html files and new folders named ‘datasets’ and ‘mlmodels’. Then move spam.csv dataset file into the datasets folder and spamdetection_model.sav file into the mlmodels folder.
Now our project folder will be like that.
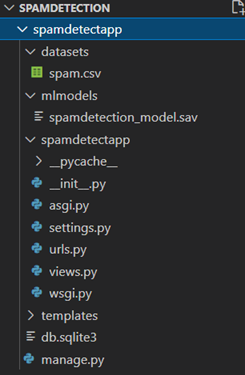
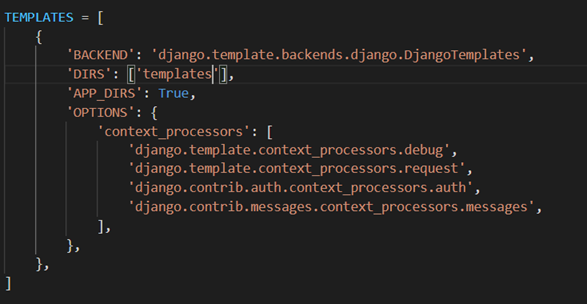
Now open settings.py and add ‘templates’ to register in ‘DIRS’ list in the ‘TEMPLATES’ list.
Now inside the urls.py file, add the following codes to configure the urls.
from django.contrib import admin
from django.urls import path

from spamdetectapp import views # add this new line to import views files

urlpatterns = [
    path('admin/', admin.site.urls),

    # add these new two lines to configure for home page and result page
    path('', views.home, name='home'),
    path('result/', views.result, name='result'),
]
And define two functions for home and result in views.py. And create a libs.py in mlmodels folder. In libs.py, we will define a getResult() function to get results from model prediction and use it in views.py.
views.py
from django.shortcuts import render
from mlmodels.libs import getResult

# for default home page view
def home(request):
    return render(request, 'index.html')

# for result page view
def result(request):
    message = request.POST['message']
    result = getResult(message)
    return render(request, 'result.html', {'result':result , 'message':message})
libs.py
import pandas as pd
import numpy as np
from sklearn.feature_extraction.text import CountVectorizer
from sklearn.model_selection import train_test_split

def getResult(message):
    import pickle
    data = pd.read_csv("D:\Spamdetection\spamdetectapp\datasets\spam.csv", encoding= 'latin-1')
    data.head()

    data = data[["class", "message"]]
    x = np.array(data["message"])
    y = np.array(data["class"])
    cv = CountVectorizer()
    X = cv.fit_transform(x) # Fit the Data

    model= pickle.load(open("D:\Spamdetection\spamdetectapp\mlmodels\spamdetection_model.sav", "rb"))

    data = cv.transform([message]).toarray()
    prediction = model.predict(data)
    if prediction == 'ham':
        return 'OK'
    elif prediction == 'spam':
        return 'SPAM'
Now we have done for backend. So, for frontend pages, let’s create index.html and result.html in templates folder.
Index.html
<!DOCTYPE html>
<html lang="en">
<head>
    <meta charset="UTF-8">
    <meta http-equiv="X-UA-Compatible" content="IE=edge">
    <meta name="viewport" content="width=device-width, initial-scale=1.0">
    <title>Spam Text Detection</title>
</head>
<body>
    <h1>Spam Text detection</h1>
    <form action="{% url 'result' %}" method="post">
        {% csrf_token %}
        <p>Message:</p>
        <input type="text" name="message">
        <br>
        <br>
        <input type="submit" value='Predict’>
    </form>
</body>

</html>
result.html
<!DOCTYPE html>
<html lang="en">
<head>
    <meta charset="UTF-8">
    <meta http-equiv="X-UA-Compatible" content="IE=edge">
    <meta name="viewport" content="width=device-width, initial-scale=1.0">
    <title>Spam Text Detection</title>
</head>
<body>
    <h1>Prediction</h1>
    The Message[{{message}}] is <b>{{result}}</b></body>
</html>
Now all is done. Once the above steps are completed, to stop and restart the server press Ctrl+C and run this command:
D:/Spamdetection/spamdetectapp> python manage.py runserver
And reopen the link in the browser. You will see the index home page.
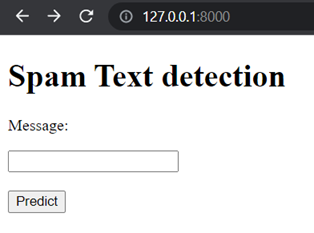
Let’s test with some messages.
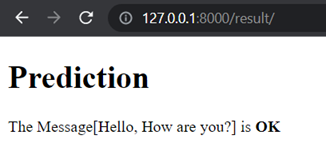
When message is ‘Hello, How are you?’, the result is as follow.
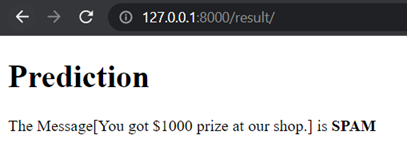
When the message is ‘You got $1000 prize at our shop.’, the result is as follow.
Hope you all enjoyed about this article.
By Asahi
kishimoto at 2021年11月16日 10:00:00
 大人が楽しめるヒーリング絵本河童のカパと静かな森
 パワースポット 日本三大神滝布引の滝
 佐藤・広幸ドイツ魂
 Himeji Castle姫路城
 ボイドタイムお知らせアプリVoid Time 〜月を無視できない〜
 撮った写真をカレンダーに撮りカレ
 ライブ壁紙竹田城ライブ壁紙
 赤ちゃんにっこりBaby+Smile
 電子書籍[for iPhone]ターラのアストロロジー
 WindowsのターミナルにもローカルAI―「Intelligent Terminal 0.2」
 Vue.js コンパイルするときのポイント