技術情報
- 2021年12月13日
- 技術情報
Flutter boosts it’s mobile performance
Google Flutter 2.8, the latest version of open source, cross-platform toolkit for building web, mobile, and desktop applications, has been released, with some improvements in mobile performance and better service compatibilities.
Flutter 2.8′ has been released on December 8 including with Flame Modular 2D Game Engine(v1.0), a game engine built on Flutter to be able to create games faster with flutter.

Google said mobile apps built with Flutter 2.8 should be faster and use less memory. The company said it is leveraging its experience with great Google apps such as Google Pay to make Flutter more efficient and provide profiling and optimization better.
It also makes it easy to connect to back-end services like Firebase and Google Cloud. In addition to supporting the production quality of Google Ads, including major camera updates and built-in web plugins.
Furthermore Dart 2.15, a programming language update that offers improved concurrency, improved enums, and optimizations that reduce memory usage by 10%. Also offering capabilities including stateful hot reload. Google also is exploring higher-level abstractions to make it easier for developers to get running faster.
Flutter is for building cross-platform applications from a single code base. The goal is to change the way applications are created so that mobile, web, desktop, and embedded applications can be developed using a single toolset. The framework currently has 375,000 apps on the Google Play Store, as well as iOS apps available on the Apple App Store.
Yuuma
yuuma at 2021年12月13日 10:00:00
- 2021年12月10日
- 技術情報
Chart.js – 外側にテキスト表示する方法 とテキストの代わりに画像を表示する方法
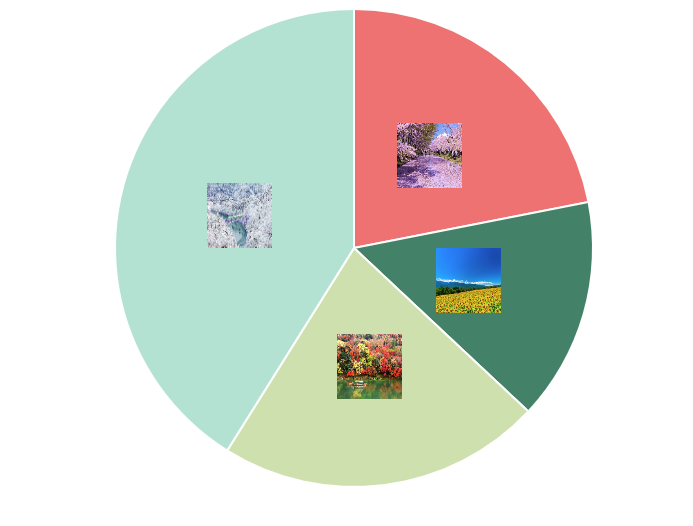
最近Chart.jsというライブラリーを使って開発してるので、Chart.jsで外側にテキスト表示するには色々な方法があるのを気づきました。
というので、今回はChart PieceLabel を使って円グラフ描く方法をご紹介していきたいと思います。
必要となるパッケージをインポートします。
<script src="https://cdnjs.cloudflare.com/ajax/libs/Chart.js/2.6.0/Chart.min.js"></script>
<script src="https://cdnjs.cloudflare.com/ajax/libs/jquery/3.2.1/jquery.min.js"></script>
<script src="https://rawgit.com/beaver71/Chart.PieceLabel.js/master/build/Chart.PieceLabel.min.js"></script>
また、円グラフの表示に必要なデータを挿入します。
 var data = {
            datasets: [{
                data: [16,11,16,30],
                backgroundColor: ['#ee7571', '#438067', '#d0dfad', '#b4e1d1'],
                label: '季' ,// for legend
            }],
          labels : ['春','夏','秋','冬'],
        };
データをキャンバスに表示するためには、キャンバスを作成する必要があります。そして、スクリプトファイルを書くためには、canvas-idを取得する必要があります。
    <div class="col-md-6" style="width: 40%; margin-left: 200px;">
        <canvas id="pieChart" class="chart chart-pie"></canvas>
    </div>
var pieChartCanvas = $("#pieChart");PieceLabelの設定をoptionsに追加し、typeを「pie」に設定する必要もある
        var pieChart = new Chart(pieChartCanvas, {
          type: 'pie',
          data: data,
          options: pieOptions
        });
var pieOptions = {
pieceLabel: {
render: function(d) {
return d.label;
},
fontColor: '#000',
position: 'outside',
arc : true,
fontSize:35,
fontFamily: '"Helvetica , "游ゴシック", sans-serif'
},
};外側にラベル表示するには position に outside と設定する必要があります。FontColor, fontSize, fontFamily も変更したいなら、簡単にできます。
legendを非表示にしたい場合は、displayをfalseにします。
legend: {
   display: false
 },
その結果は:
また、renderにimageを設定して画像を表示することもできます。
render: 'image',
            images: [
                { src: './images/spring.jpeg', width: 65, height: 65 },
                { src: './images/Summer.jpeg', width: 65, height: 65 },
                { src: './images/Autumn.jpeg', width: 65, height: 65 },
                { src: './images/Winter.jpeg', width: 65, height: 65 }
            ]
}
結果は記事の一番上にあります。
最後までお読みいただき、ありがとうございます。この記事を楽しんでいただければ幸いです。
By Ami
asahi at 2021年12月10日 10:00:00
- 2021年12月09日
- 技術情報
PHP QRコード生成ライブラリ「endroid/qr-code」
nishida at 2021年12月09日 10:00:00
- 2021年12月08日
- 技術情報
次世代機で実行可能なUnreal Engine 5 の技術デモが公開されます
映画マトリックスの世界を題材にしたUnreal Engine 5 の技術デモ
「The Matrix Awakens: An Unreal Engine 5 Experience」
がPlayStation5とXbox Series X|S向けに12月10日から公開予定のようです。
tanaka at 2021年12月08日 10:00:00
- 2021年12月07日
- 技術情報
Some Web Security tools which developers should use
Today I would like to share about some web security tools that should be used by developers. When we develop a software, we must also consider the aspects of security. So, in some situations, not only have to write secure codes but reverse testing is also needed. Let’s take a look at some web security tools as follows.
1. Zed Attack Proxy (ZAP)
Developed by OWASP (Open Web Application Security Project), ZAP or Zed Attack Proxy is a multi-platform, open-source web application security testing tool. ZAP is used for finding a number of security vulnerabilities in a web app during the development as well as the testing phase.
2. Wapiti
Wapiti is a open source project. Wapiti performs black box testing to check web applications for security vulnerabilities. As it is a command-line application, it is important to have a knowledge of various commands used by Wapiti. You can find all the Wapiti instructions on the official documentation. For checking whether a script is vulnerable or not, Wapiti injects payloads. This tool provides support for both GET and POST HTTP attack methods.
Vulnerabilities exposed by Wapiti are:
- Command Execution detection
- CRLF injection
- Database injection
- File disclosure
- Shellshock or Bash bug
- SSRF (Server Side Request Forgery)
- Weak .htaccess configurations that can be bypassed
- XSS injection
- XXE injection
3. Sqlmap
SQLMap is entirely free to use that allow automating the process of detecting and utilizing SQL injection vulnerability in a website’s database. This tool supports 6 types of SQL injection techniques:
- Boolean-based blind
- Error-based
- Out-of-band
- Stacked queries
- Time-based blind
- UNION query
4. Skipfish
Skipfish is a web application security tool that crawls your website and then checks each page for various security threats and provides a final security report. It is highly optimized for HTTP handling and utilizing minimum CPU.
5. Burp Suite
Burp Suite is a Java-based web penetration testing framework. Its various tools work seamlessly together to support the entire testing process, from initial mapping and analysis of an application’s attack surface, through to finding and exploiting security vulnerabilities. The tool intercepts HTTP/S requests and acts as a middle-man between the user and web pages. The paid version provides a more agile automated testing tool with integrations with other frameworks such as Jenkins.
6. Nikto
The Nikto web server scanner is a security tool that will test a website for thousands of possible security issues including dangerous files, mis-configured services, vulnerable scripts and other issues. It is open source and structured with plugins that extend the capabilities.
Hope you enjoy that.
By Asahi
waithaw at 2021年12月07日 10:00:00
 大人が楽しめるヒーリング絵本河童のカパと静かな森
 パワースポット 日本三大神滝布引の滝
 佐藤・広幸ドイツ魂
 Himeji Castle姫路城
 ボイドタイムお知らせアプリVoid Time 〜月を無視できない〜
 撮った写真をカレンダーに撮りカレ