技術情報
- 2022年02月04日
- 技術情報
Laravel の「One of Many」を使って最新と最高を取る方法
今回は、LaravelのOne of Manyを使って、最新と最高のデータを取得する方法についてご紹介します。
リレーションシップはpostとcommentの関係を作ることにします。そのため、新しいプロジェクトを作成し、このプロジェクトでマイグレーションとシーダーファイルをそれぞれ設定することにします。
以下のコメントは、マイグレーションファイルとシーダーファイルの作成を同時に使用することができます。
php artisan make:model Post -ms
php artisan make:model Comment -ms
マイグレーションを変更
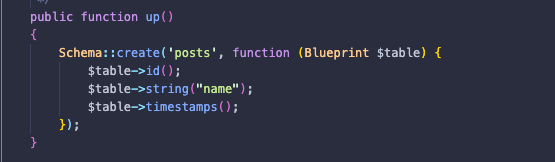
ファイル __create_posts_table に name カラムを追加する。
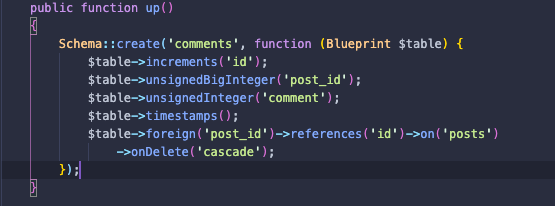
ファイル __create_comment_table にcommentと post_idカラムを追加する。
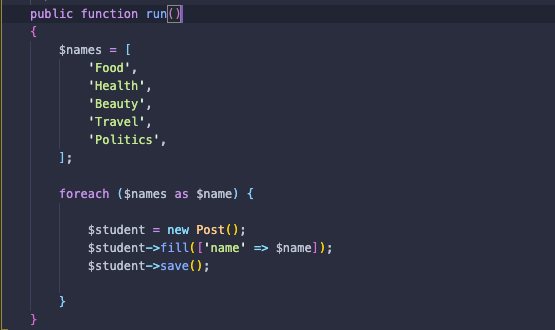
続いて、post とcomemntテーブルにテストするためSeederファイルを作ります。
postテーブルため
commentテーブルため

最後は、作成したファイルをDatabaseSeeder.phpにセットします。

続いて、今から「One of Many」の設定をしましょう!
今回は最初のidだけを使ってますが、他のことにも同じようにできます。
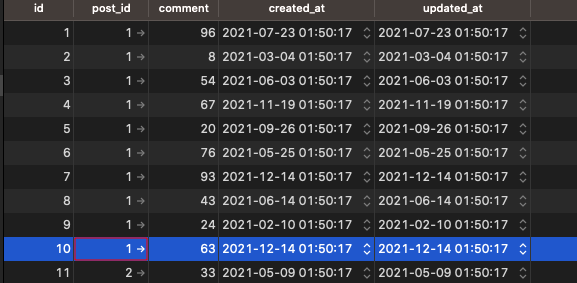
post id 1の最新コメントを取得しましょう!

呼び出し方は

このように設定すると、結果は
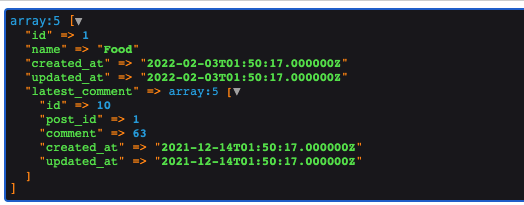
データベースにも、コメントID10が最後となります。
次は
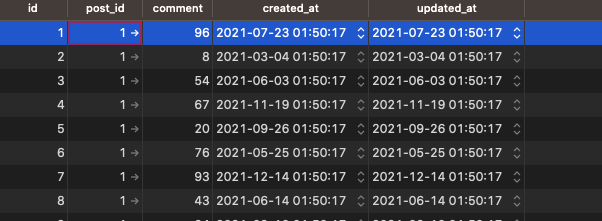
post id 1の最高コメントを取得しましょう!

今回はOfManyを使います。
以下のように呼び出します。

すると、結果は

データベースにも、96が一番高いコメント点のデータなので、Ok となります。
ということで今回は以上になります。
最後までご高覧頂きまして有難うございました。
By Ami
asahi at 2022年02月04日 10:00:00
- 2022年02月03日
- 技術情報
DataTablesを使用したテーブル生成とサーバーサイド連携 (1)
nishida at 2022年02月03日 10:00:00
- 2022年02月01日
- 技術情報
SQL & NoSQL
Today I would like to share about differences between SQL and NoSQL. Let’s take a look.
SQL databases are commonly referred to as relational database management systems (RDBMS). Traditional RDBMS uses SQL syntax as these systems utilize row-based database structures that connect related data objects between tables. Examples of RDBMS SQL databases include Backendless, Microsoft Access, MySQL, Microsoft SQL Server, SQLite, Oracle Database, IBM DB2, etc.
NoSQL databases, on the other hand, are databases without any structured tables fixed for holding data. Technically, all non-relational databases can be called NoSQL databases. Because a NoSQL database is not a relational database, it can be set up very quickly and with minimal pre-planning. Examples of NoSQL databases include MongoDB, DynamoDB, SimpleDB, CouchDB, CouchBase, Orient DB, Infinite Graph, Neo4j, FlockDB, Cassandra, HBase, etc.
Querying Language & Database Schema
SQL
SQL database use structured query language. They have pre-defined schema for data structure. SQL querying languages have been around for long time and have evolved greatly , even providing with great libraries one can use to ease querying. It is perfect for complex data structures and queries. But SQL has strict data structure. SQL query language is declarative and lightweight. Significant research has to be done before creating and implementing any RDB since it is very difficult to change schema and data structure once project is deployed.
NoSQL
NoSQL have dynamic schema and hence data can be created quickly without defining the structure. Every document can have its own structure and syntax, and there is flexibility to use column-oriented, document-oriented, graph-oriented or Key-value pairs! Each NoSQL can have a different query language, adding to the complexity of learning more languages in order to work with different database. NoSQL query language is non-declarative.
Data Structure
SQL
Data is stored in tables with pre-defined columns. Each entry is a new row essentially that we are creating or accessing.
NoSQL
Data can be stored as a JSON, graph, key-value pairs or tables with dynamic columns.
Database Scaling
SQL
They are Vertically scalable. Load handling capabilities of a single server can be increased by adding more RAM, CPU or SSD capacity. This is also called ‘scale-up’.
NoSQL
They are Horizontally scalable. Data traffic can be increased by sharding, simply by adding more servers. They are better from scalability perspective, and preferred for large and frequently changed data.
Conclusion
Both SQL and NoSQL databases are used in specific needs. Depending on the goals and data environment of an organization, their specific pros and cons could be amplified.
When we decide between SQL and NoSQL, we have to focus on 3 core concepts for our database that suits our project.
Structure: Every project needs to store and retrieve data differently. Structure needs to be chose that requires least amount of work and easy scalability.
Speed and Scale: Data modelling can help in deciding best route to get optimum speed. Some databases are designed for optimized read-heavy app while others write-heavy solutions. Selecting right database for project’s I/O is important.
Size: It depends on maximum amount of data we can store and process, before impacting the database. It can vary from combination of data structure stored, partitioned data across multiple filesystems and servers, and also vendor specifics.
This is all for now.
Hope you enjoy that.
By Asahi
waithaw at 2022年02月01日 10:00:00
- 2022年01月31日
- 技術情報
Working with large csv file memory efficiently in PHP
When we are supposed to work with large csv file with 500K or 1mil records, there is always a thing to be careful about the memory usage. If our program consumes lot of memory , its not good for the physical server we are using. Beside from that our program should also performed well. Today I would like to share some tips working with laravel csv file.
Configuration
Firstly , we have to make sure our PHP setting is configured. Please check the below settings and configure as you need. But keep in mind, don’t enlarge the memory_limit value if it’s not required.
- memory_limit
- post_max_size
- upload_max_filesize
- max_execution_time
Code
Once our PHP configuration is done, you might to restart the server or PHP itself. The next step is our code. We have to write a proper way not to run out of memory.
Normally we used to read the csv files like this.
$handle = fopen($filepath, "r"); //getting our csv file
while ($csv = fgetcsv($handle, 1000, ",")) { //looping through each records
//making csv rows validation
// inserting to database
// etc.
}
The above code might be ok for a few records like 1000 to 5000 and so on. But if you are working with 100K 500K records , the while loop will consume lot of memory. So we have to chunk and separate the loop to get some rest time for our program.
$handle = fopen($filepath, "r"); //getting our csv file
$data = [];
while ($csv = fgetcsv($handle, 1000, ",")) { //looping through each records
   $data[] = $csv;// you can customize the array as you want
   //we will only collect each 1000 records and do the operations
   if(count($data) >= 1000){
  // do the operations here
   // inserting to database (If you already prepared the array in above, can directly add to db, no need loops)
   // etc.

   //resetting the data array
   $data = [];
   }

   //if there is any rows less than 1000, keep going for it
   if(count($data) > 0){
      // do the operations here
   }
}
Above one is a simple protype to run the program not to run out of the memory, our program will get rest time for each 1000records.
Here is an another way using array_chuck and file function
$csvArray = file($filepath); //this will output array of our csv file
//chunking array by 1000 records
$chunks = array_chunk($csvArray,1000);

// Then lets store the chunked data files in somewhere
foreach ($chunks as $key => $chunk) {
   file_put_contents($path,$chunk);
}

//get the files we have stored and can loop through it
files = glob('path/path'."/*.csv");

foreach ($files as $key => $file) {
  $filer = fopen($file, "r");
  while ($csv = fgetcsv($filer, 1000, ",")) {
     // do the operations here
  }

  //delete the file back
  unlink($file);
}
Please don’t forget to close the files back fclose if you have done the file operations.
Looping content
One more thing to keep in mind is we have to take care of the codes we put inside loops. If there is any
- Database calls or
- Third party API calls,
it will surely slow down the performance and consume the memory more. So if you can put these calls outside of the loops, our program will be much more efficient.
I am sure there might also be some other work arounds or some packages to handle about this issue behind the scence.
Yuuma
yuuma at 2022年01月31日 10:00:00
- 2022年01月28日
- 技術情報
Laravel 9に搭載される機能の紹介
Laravel v9はLaravelの次のLTSバージョンで、2022年2月頃に登場する予定です。この記事では、これまでに発表された新機能や変更点を概説したいと思います。
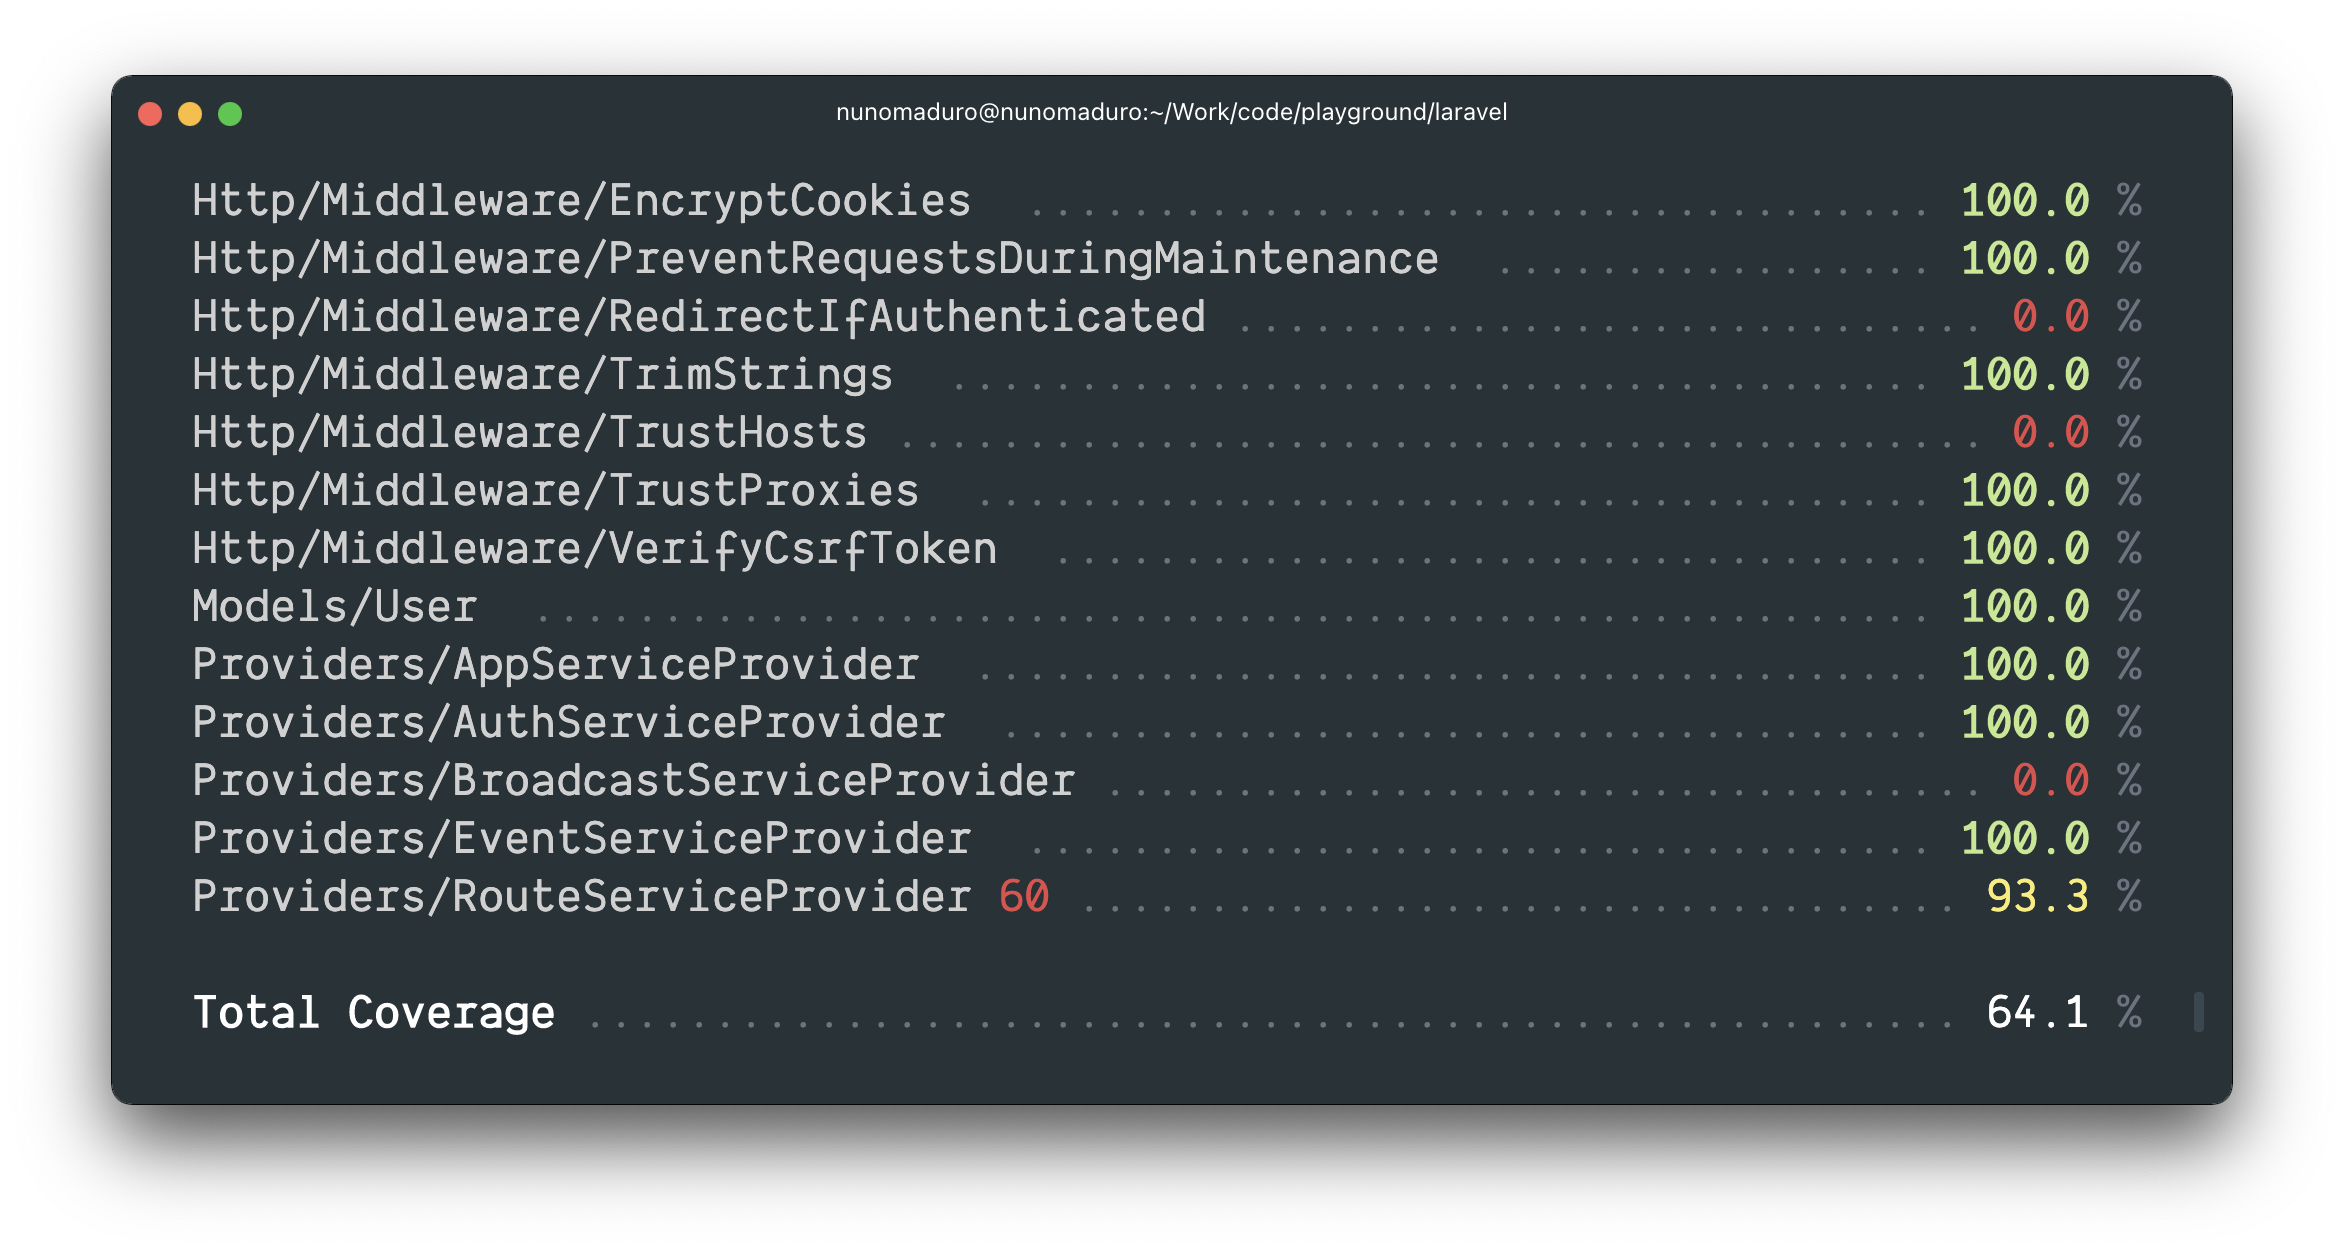
テストカバレッジオプションを追加
新しいartisan test –coverage オプションは、テストカバレッジをターミナルに直接表示します。また、–min オプションを使用すると、テストカバレッジの最小閾値を指定することができます。
Enumを使った暗黙のルートバインディング
PHP 8.1ではEnumのサポートが導入されました。Laravel 9では、ルート定義にEnumをタイプヒントする機能が導入され、LaravelはそのルートセグメントがURIの有効なEnum値である場合にのみルートを呼び出します。そうでない場合は、HTTP 404レスポンスが自動的に返されます。例えば、次のようなEnumがあるとします。
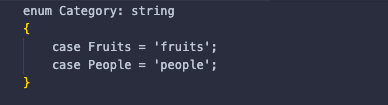
ルートセグメント {category} が fruits または people のときだけ呼び出されるルートを定義することができます。そうでない場合は、HTTP 404 レスポンスが返されます。

全文インデックス/Where句
fullText メソッドをカラム定義に追加して、フルテキストインデックスを生成することができるようになりました。
$table->text('bio')->fullText();whereFullTextまたはWhereFullTextメソッドを使用すると、フルテキストを取得することができます。
$users = DB::table('users')
           ->whereFullText('bio', 'web developer')
           ->get();
* laravelのリリースから引用しています。
また、公式リリースページもご覧いただけます。
今週はここで終了となります。
最後までご高覧頂きまして有難うございました。
By Ami
asahi at 2022年01月28日 10:00:00
 大人が楽しめるヒーリング絵本河童のカパと静かな森
 パワースポット 日本三大神滝布引の滝
 佐藤・広幸ドイツ魂
 Himeji Castle姫路城
 ボイドタイムお知らせアプリVoid Time 〜月を無視できない〜
 撮った写真をカレンダーに撮りカレ