技術情報
- 2023年03月30日
- 技術情報
正規表現基礎(4)
nishida at 2023年03月30日 10:00:00
- 2023年03月28日
- 技術情報
Checking if a file already exists in the given path with Node js
Today, I would like to share about checking if a file already exists in the given path using Node js. Let’s take a look.
To check if a file already exists or not, we can perform simply by using existsSync() method of ‘fs’ module in node js. The code is as follow.
const fs = require('fs')

let filePath = "C:\\Users\\waith\\Documents\\t1ee.pdf"
if (!fs.existsSync(filePath)) {
  console.log('File does NOT exist!');
}else{
  console.log('File exists.');
}
Yes, that is it. The steps to perfom that is very simple. It is just to declare fs module and use fs.existsSync() method to check the filepath.
This is all for now. Hope you enjoy that.
By Asahi
waithaw at 2023年03月28日 10:00:00
- 2023年03月07日
- 技術情報
3 Useful image manipulation libraries in Node JS
Today, I would like to share about image manipulation libraries in Node JS. Let’s take a look.
1. Canvas
Node Canvas is a very powerful image library which implements Web Canvas API. So it will be flexible for developers.
Check here for more details.
2. Sharp
Sharp is an efficient image processing library for Node JS. It is very useful for resizing, converting and editing images.
Check here for more details.
3. GraphicsMagick
GraphicsMagick is also a powerful image processing library of Node JS for many image functions.
Check here for more details.
This is all for now. Hope you enjoy that.
By Asahi
waithaw at 2023年03月07日 10:00:00
- 2023年03月06日
- 技術情報
Instagram is releasing its age verification system in more areas
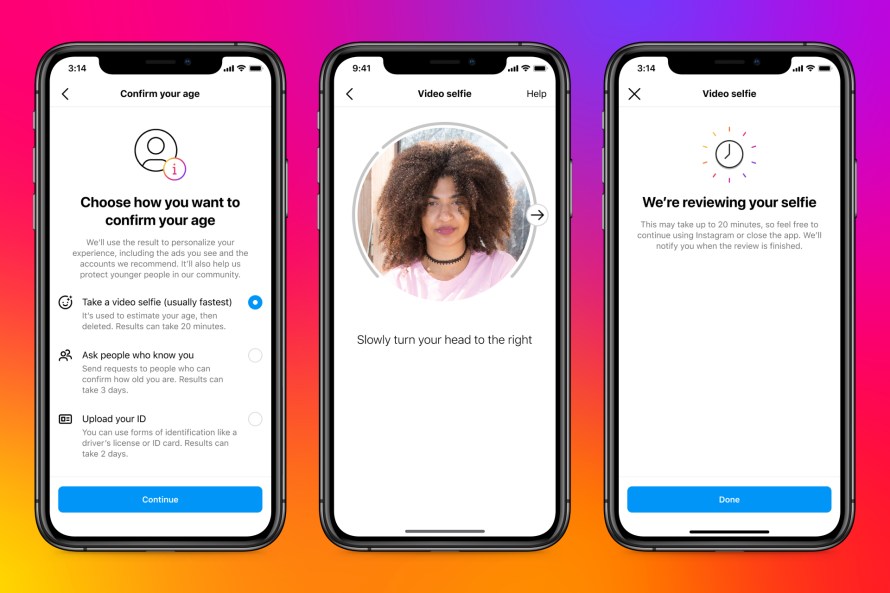
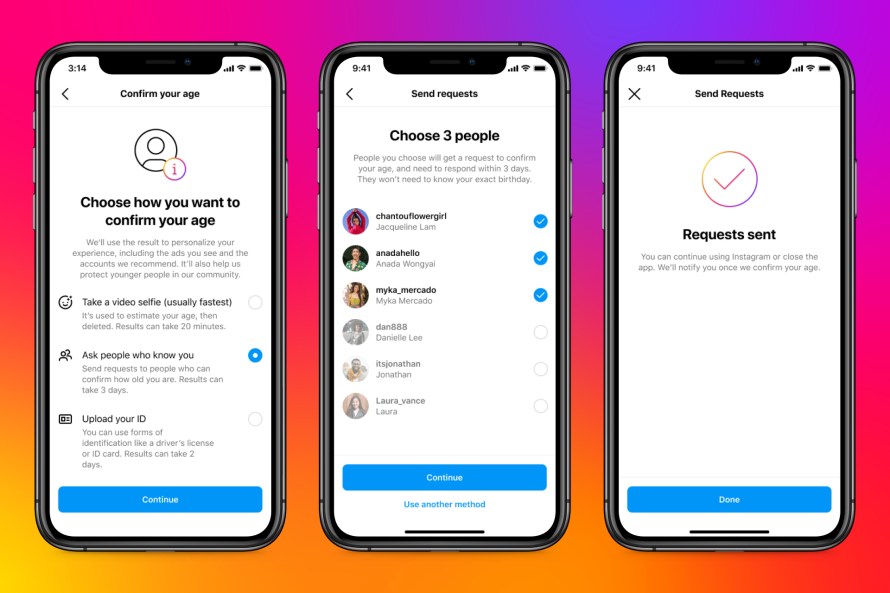
Meta announced that it has begun testing Instagram’s age verification tool in more countries, including Canada and Mexico. Last June, this social he networking app began testing new options for users to verify their age. Use one of the three options. Upload your ID, record a video selfie, or ask a mutual friend to verify your age. When a user tries to edit her date of birth on her Instagram from her 18 to her 18+, the app asks her to verify her age using one of three methods.
It started at the United States and expanded to Brazil and Japan in last October. The age verification tool is currently being tested in more countries in Europe, Mexico, Canada, South Korea, Australia, and Japan. Meta plans to make the tool available globally in the coming months.

To verify your age, you can show your ID, such as your passport or driver’s license. In that case, Instagram will store her ID on its servers for 30 days before deleting it. If you do not have valid ID, you can choose the selfie video method. Instagram has partnered with London-based digital identity startup Yoti to offer this option. When you upload a selfie video, it will be shared with Yoti who uses specially trained AI to check your age. Both companies delete the data once the verification process is complete.

A third age verification option, called “social verification,” allows mutual followers to verify their age. The nominator must be 18 years of age or older and may not nominate on behalf of someone else at that time. Her three chosen guarantors must receive age verification requests and respond within three days. Those who vouch for you will get the option to specify an age range and All three must select the same option to pass age verification.

Yuuma
yuuma at 2023年03月06日 10:00:00
- 2023年02月27日
- 技術情報
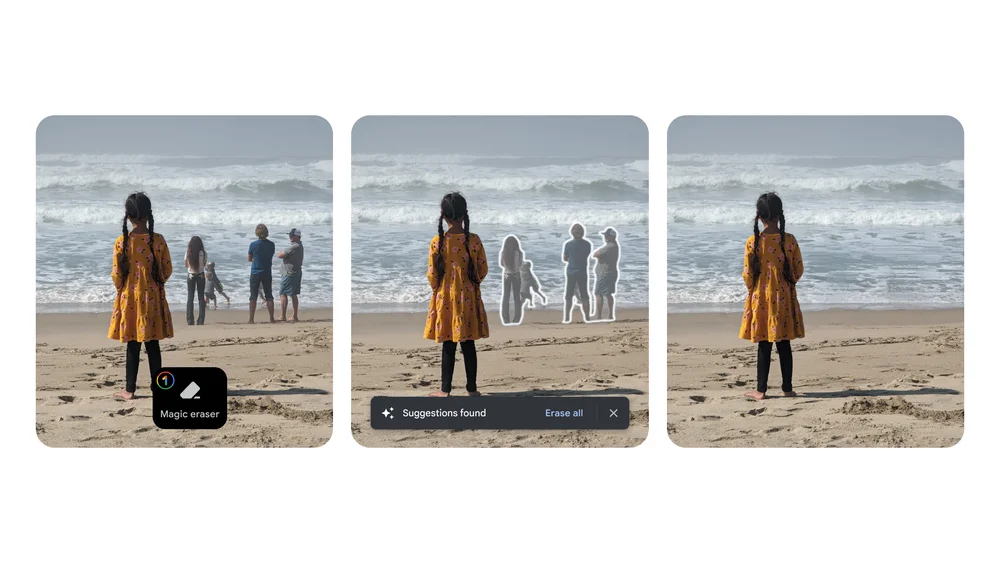
Google’s Magic Eraser is rolling out as one of the Google One subscription benefits
One of Google Pixel’s best photo editing features, “Magic Eraser”, is rolling out for both Android and iOS devices. But it’s not free. Google announced that its popular tool, which uses AI to remove unwanted content from images, will be available to Google One subscribers in addition to existing Pixel owners. Google One subscribers also get access to several other editing tools, including new HDR video effects and exclusive collage styles.
Google One subscriptions originally started as a way to pay for additional cloud storage like photos, documents, Gmail, and more. Over the years, however, the features have expanded and now include a VPN, the ability to host long group video calls on Google Meet, 10% cashback on Google Store purchases, and other members-only features.
The Google Photos exclusive set of benefits is once again expanding with the rollout of Magic Eraser and other new additions.

Magic Eraser, previously only available to Google Pixel 6 and 7 owners, is rolling out to all Google One subscribers on both Android and iOS. It’s also available on his Pixel phones, Pixel 5a and earlier, and doesn’t require a Google One subscription.
Google Photos’ collage editor now also has a variety of new styles to choose from, plus the ability to apply the style to one of his photos in the collage. This is also available for both the Google One subscriber and his Pixel owner.
Google One subscribers will receive free shipping on photo prints ordered from their online store in the US, Canada, UK and EU.
Yuuma
yuuma at 2023年02月27日 10:00:00