こんにちは、Tamamoです。
今回はじめてViewFlipperを使い、画像の切り替えを行いましたので、
紹介します。
スマホに表示された画像を左右どちらかにフリックすると別の画像に切り替わるという
ご経験があると思います。
フリックで画像を切り替える場合、onTouchEventやGestureDetectorの実装が必要になるため
ここでは例としてボタンを押すことで画像の切り替えを行いたいと思います。
まず、ViewFlipperとButtonをレイアウトに定義します。
|
<?xml version=”1.0″ encoding=”utf-8″?>
<android.support.constraint.ConstraintLayout xmlns:android=”http://schemas.android.com/apk/res/android”
xmlns:app=”http://schemas.android.com/apk/res-auto”
xmlns:tools=”http://schemas.android.com/tools”
android:layout_width=”match_parent”
android:layout_height=”match_parent”
tools:context=”com.example.tamamo.slide_test.MainActivity”>
<Button
android:id=”@+id/button”
android:layout_width=”wrap_content”
android:layout_height=”wrap_content”
android:text=”<<”
app:layout_constraintBottom_toBottomOf=”parent”
app:layout_constraintHorizontal_bias=”0.212″
app:layout_constraintLeft_toLeftOf=”parent”
app:layout_constraintRight_toRightOf=”parent”
app:layout_constraintTop_toTopOf=”parent”
app:layout_constraintVertical_bias=”0.505″ />
<Button
android:id=”@+id/button2″
android:layout_width=”wrap_content”
android:layout_height=”wrap_content”
android:text=”>>”
app:layout_constraintBottom_toBottomOf=”parent”
app:layout_constraintHorizontal_bias=”0.807″
app:layout_constraintLeft_toLeftOf=”parent”
app:layout_constraintRight_toRightOf=”parent”
app:layout_constraintTop_toTopOf=”parent”
app:layout_constraintVertical_bias=”0.505″ />
<ViewFlipper
android:id=”@+id/flipper”
android:layout_width=”384dp”
android:layout_height=”wrap_content”>
<include
android:id=”@+id/firstLayout”
layout=”@layout/first” />
<include
android:id=”@+id/secondLayout”
layout=”@layout/second” />
</ViewFlipper>
</android.support.constraint.ConstraintLayout>
|
そして、続けて「layout」フォルダに新規で1枚目の画像と、2枚目の画像を
first.xml、second.xmlにImageViewでそれぞれ定義します。
first.xml
|
<?xml version=”1.0″ encoding=”utf-8″?>
<android.support.constraint.ConstraintLayout
xmlns:android=”http://schemas.android.com/apk/res/android”
xmlns:app=”http://schemas.android.com/apk/res-auto”
xmlns:tools=”http://schemas.android.com/tools”
android:layout_width=”match_parent”
android:layout_height=”match_parent”>
<ImageView
android:id=”@+id/imageView”
android:layout_width=”143dp”
android:layout_height=”wrap_content”
android:adjustViewBounds=”true”
android:baselineAlignBottom=”false”
android:scaleType=”centerCrop”
android:src=”?android:attr/textSelectHandle”
app:layout_constraintBottom_toBottomOf=”parent”
app:layout_constraintHorizontal_bias=”0.502″
app:layout_constraintLeft_toLeftOf=”parent”
app:layout_constraintRight_toRightOf=”parent”
app:layout_constraintTop_toTopOf=”parent”
app:layout_constraintVertical_bias=”0.0″ />
</android.support.constraint.ConstraintLayout>
|
second.xml
|
<?xml version=”1.0″ encoding=”utf-8″?>
<android.support.constraint.ConstraintLayout
xmlns:android=”http://schemas.android.com/apk/res/android”
xmlns:app=”http://schemas.android.com/apk/res-auto”
xmlns:tools=”http://schemas.android.com/tools”
android:layout_width=”match_parent”
android:layout_height=”match_parent”>
<ImageView
android:id=”@+id/imageView2″
android:layout_width=”193dp”
android:layout_height=”168dp”
app:layout_constraintBottom_toBottomOf=”parent”
app:layout_constraintHorizontal_bias=”0.502″
app:layout_constraintLeft_toLeftOf=”parent”
app:layout_constraintRight_toRightOf=”parent”
app:layout_constraintTop_toTopOf=”parent”
app:layout_constraintVertical_bias=”0.0″
app:srcCompat=”@mipmap/ic_launcher” />
</android.support.constraint.ConstraintLayout>
|
以上でレイアウトは完了です。
次に、MainActivityに以下のようなコードを書いていきます。
|
import android.support.v7.app.AppCompatActivity;
import android.os.Bundle;
import android.view.View;
import android.widget.ViewFlipper;
public class MainActivity extends AppCompatActivity {
private ViewFlipper viewFlipper;
@Override
protected void onCreate(Bundle savedInstanceState) {
super.onCreate(savedInstanceState);
setContentView(R.layout.activity_main);
viewFlipper = findViewById(R.id.flipper);
//左ボタン
findViewById(R.id.button).setOnClickListener(new View.OnClickListener() {
@Override
public void onClick(View v) {
// クリック時の処理
viewFlipper.showPrevious();
}
});
//右ボタン
findViewById(R.id.button2).setOnClickListener(new View.OnClickListener() {
@Override
public void onClick(View v) {
// クリック時の処理
viewFlipper.showNext();
}
});
}
}
|
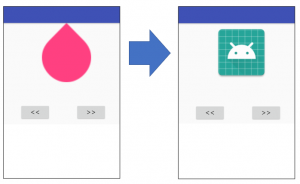
ビルドすると以下のような画像が表示され、左右のボタンを押すことで
画像を切り替えることができます。
また、切り替えの際にアニメーションを付けることも可能です。
フリックしたときに画像を切り替えたい場合は、
onTouchEventとGestureDetectorを実装することで、
フリック動作を検出できます。
ViewFlipperは手軽に画像切り替えができるんですね!
これを応用すればビジュアル的にも面白いアプリが作れそうです!
火曜日担当:Tamamo
 大人が楽しめるヒーリング絵本河童のカパと静かな森
 パワースポット 日本三大神滝布引の滝
 佐藤・広幸ドイツ魂
 Himeji Castle姫路城
 ボイドタイムお知らせアプリVoid Time 〜月を無視できない〜
 撮った写真をカレンダーに撮りカレ