Windows

WindowsをAndroidタブレットから操作しよう

「安価なAndroidタブレットは便利だけど、
Windowsで使っているソフトがつかえたらな」
と思うことがたまにあります。

そこで便利なのが、AndroidからWindowsへリモートデスクトップ接続が行える
Remote Desktopです。

まず初めに接続先のWindowsでリモートデスクトップ接続を有効にします。
設定画面から「システム」->「リモートデスクトップ」へと進み
「リモートデスクトップを有効にする」をオンにします。
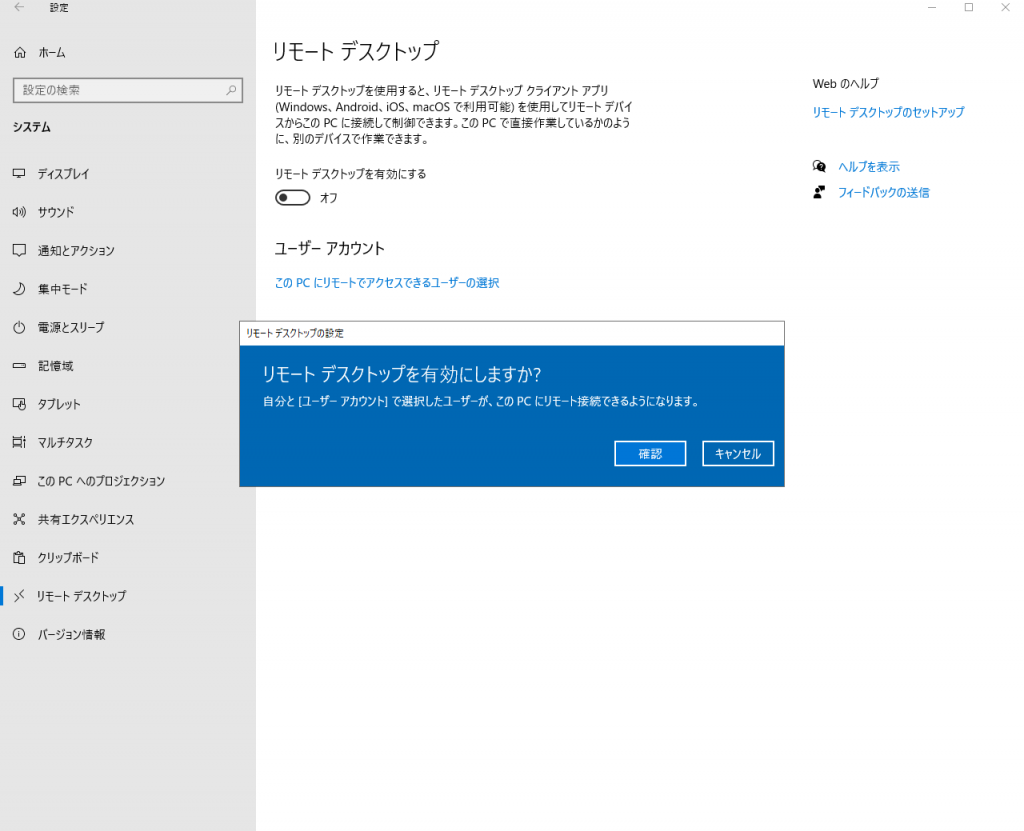
その後、必要に応じてリモートアクセス可能なユーザーを選択します。

次に、Android端末にインストールした Remote Desktop アプリを起動し、
「PCs」画面を開き、右上にある「+」ボタンをタップすると
自動的にネットワーク上にある接続可能なPCが表示されます。
ここに表示されていればソレを選択し、なければ、
「Add Manually」から接続対象のPCのipアドレスを指定します。

アクセスするユーザーのログイン情報を尋ねられるので、
ユーザー名とパスワードを入力し認証を完了します。
これで接続完了です。

このままでも使用できますが、
マウスでの操作をタップで行うのは難しいところがあるので、
リモートデスクトップ接続を解除し、
接続先のWindowsの設定を変更し、タブレットモードを有効にしましょう。
設定画面から 「システム」->「タブレット」へと進み、
「サインイン時の動作」を「常にタブレットモードを使用する」へ変更した後
再度 リモートデスクトップ接続 を行うことでタブレットモードで操作できます。

水曜担当:Tanaka


Leaks about Google Pixel 6 and 6 Pro

Google Pixel 6 and Google Pixel 6 Pro leaked with some designs. Both devices appear to have a single-hole punched display and a bold industrial design on the back. Both devices appear to have a camera on their back that is a kind of bridge from one side to the other.

For your information, The leaks aren’t straight-up leaked from Google or anything like that, but were created by a third party based on real-life images of the phones.

Image Credit : FRONT PAGE TECH

The Google Pixel 6 Pro appears in this leak in two color combinations. Instead of a white background rear section, this larger Pixel 6 Pro appears with a very light orange background section. The Google Pixel 6 Pro also appears in a color scheme with an off-white bottom and champagne accents.

The Pixel 6 looks smaller and has only two cameras on the back, we wouldn’t be surprised if one of them was a normal wide sensor while the other was an ultra-wide. The Pixel 6 Pro, on the other hand, appears larger and adds a third sensor, hopefully a telephoto lens, though from the looks of these renders it won’t be a periscope type, so can’t expect more than 3x optical magnification.

Hopefully Google will also update the sensors it uses, which are getting kind of old now.

If you are curious about watching a video, here is the link created by FRONT PAGE TECH youtube channel.

Yuuma.


アプリからギャラリーを起動して画像を取得しましょう

今回はAndroidアプリのActivityからギャラリーアプリを起動して、
画像データを取得する方法についてご紹介します。

続きを読む

[Unity] パフォーマンス改善Tips

今回はUnityで処理負荷を軽減させるために効果があった方法をいくつか紹介したいと思います。

続きを読む

AndroidのカメラサポートライブラリのCameraXを使ってみました

Androidのカメラ制御は
カメラが対応している解像度の取得や
プレビュー解像度の設定、画面回転など
いくつか面倒なステップを踏む必要がありますが
それらを吸収してくれる公式ライブラリがCameraXです。

ライブラリの使用方法はGoogleのCameraXのドキュメントに記載されていますが、
実際に動かしてみたコードを以下に記載します。
MainActivityにカメラプレビューを表示するだけの機能を持つアプリです。

import androidx.appcompat.app.AppCompatActivity
import android.os.Bundle
import androidx.camera.core.CameraSelector
import androidx.camera.core.Preview
import androidx.camera.lifecycle.ProcessCameraProvider
import androidx.camera.view.PreviewView
import androidx.core.content.ContextCompat
import androidx.lifecycle.LifecycleOwner
import com.google.common.util.concurrent.ListenableFuture

class MainActivity : AppCompatActivity() {
    private lateinit var cameraProviderFuture: ListenableFuture<ProcessCameraProvider>
    private lateinit var previewView : PreviewView
    override fun onCreate(savedInstanceState: Bundle?) {
        super.onCreate(savedInstanceState)
        setContentView(R.layout.activity_main)

        // PreviewView
        previewView = findViewById(R.id.cameraPreview)

        // CameraProvider リクエスト
        cameraProviderFuture = ProcessCameraProvider.getInstance(this)

        // タスクを実行するエグゼキューター
        val executor = ContextCompat.getMainExecutor(this)

        // リスナー用タスク
        val listenerRunnable = Runnable {
            // ListenableFutureからCameraProviderを取得
            val cameraProvider = cameraProviderFuture.get()
            // ライフサイクルにバインド -カメラの指定とプレビューの設定も行う
            bindToLifecycle(cameraProvider)
        }

        // CameraProvider リクエスト のリスナーをセット
        cameraProviderFuture.addListener(listenerRunnable, executor)
    }

    private fun bindToLifecycle(cameraProvider: ProcessCameraProvider)
    {
        // Previewを作成
        val preview : Preview = Preview.Builder().build()
        // 背面カメラを選択
        val cameraSelector : CameraSelector = CameraSelector.Builder()
            .requireLensFacing(CameraSelector.LENS_FACING_BACK)
            .build()
        // Previewとレイアウト上のPreviewViewを接続
        preview.setSurfaceProvider(previewView.surfaceProvider)

        // CameraProvider をライフサイクルにバインド
        val camera = cameraProvider.bindToLifecycle(this as LifecycleOwner, cameraSelector, preview)
    }
}

Kotlinで書いているのもありますが、
ライブラリを使用しない時と比べて、ぐっと必要なコード量が減っています。

画像の撮影や、画像分析もライブラリに含まれているようです。

水曜担当:Tanaka


アプリ関連ニュース

お問い合わせはこちら

お問い合わせ・ご相談はお電話、またはお問い合わせフォームよりお受け付けいたしております。

tel. 06-6454-8833(平日 10:00~17:00)

お問い合わせフォーム